This is an English translation of a Chinese training manual (右脑开发训练手册) covering methods for right-brain development and Eyeless sight education, primarily aimed at children ages 6-12. The training includes relaxation techniques, visualization exercises, ESP games, and memory methods.
- Original title: 右脑开发 训练⼿册
- Author: 陈洪震 (Chen Hongzhen)

Content Summary
Summary
This book systematically introduces right brain development and its training methods and steps. Centered on the consolidation and enhancement of the mental imagery ability of children aged 6 to 12, it promotes the full play of children’s imagination, creativity, intuition, and image thinking, so that attention, memory, comprehension, self-confidence, and learning attitudes will be greatly improved. It lifts the veil of mystery on potential training and also reveals the training methods for “special functions” such as ESP blindfolded reading. Through this book, firstly, it is hoped that more excellent instructors will benefit more children, providing instructors and parents with a handle to grasp when training children so they can train correctly. Secondly, the training methods are fully disclosed so that anyone can develop children’s potential according to the methods introduced in this book. It is hoped that some skeptics will not easily deny and criticize brain potential development, triggering more people to research it. Thirdly, it unveils the mystery of potential training, does not believe in any religion or pseudoscience, raises people’s level of consciousness, popularizes right brain education, and puts an end to sky-high priced courses for right brain education.

Authored by Chen Hongzhen
Author Introduction:
Chen Hongzhen, an information technology teacher at Zoucheng Experimental Middle School in Shandong Province, is a high-quality class instructor and a backbone teacher in Shandong Province. He twice undertook the research work of sub-projects of the national “Eleventh Five-Year” and “Twelfth Five-Year” key education topics and won awards. In 2006, while researching information technology teaching, he discovered the development mode of human brain potential and began to try research on brain potential development such as brain imaging. He is committed to educating students to pay attention to human development, making students’ learning a little easier, and letting brain potential development truly play a role in learning, life, and work.
A Letter to Parents and Instructors
Dear Parents and Instructors:
Greetings!
Thank you for sharing the joy and cooperation of this course with your children. We are gratified to be able to work with you to help children unlock their natural potential in the right brain development training course and help them open the “Path of Genius.”
In the upcoming training phase, your support and daily training for the child will become incredibly important. This will directly determine whether the tender sprout that has just broken through the soil can be cultivated into a towering tree standing proudly between heaven and earth. We have prepared three months of training courses and extension training courses specifically for this purpose. What we need to develop is not just ability, but more importantly, to transform it into fruitful gains, allowing it to manifest in the child’s learning, thinking, comprehension, and life, thereby reducing learning pressure and improving learning efficiency!
The greatest support you need to give your child, along with absolutely professional guidance and training, is your sincere encouragement for each child. This encouragement includes praise when the child achieves results, motivation when the child encounters setbacks and failures, and a look of affirmation when the child faces doubt…
With your immense love as a strong backing, we believe that under your education, every child can create any miracle. In the upcoming training process, you may be pleasantly surprised to find that the child’s self-confidence is quietly changing, and their attention, observation, and imagination are progressing at an amazing speed, all of which will gradually be reflected in their learning.
To enable you to better help your child make progress and to maximize our teaching effectiveness, we have specifically written this manual for you. It includes the essential knowledge, concepts, and methods for daily training. At the same time, the manual provides various right brain training methods, which will be helpful to you in guiding your child in blindfolded mental training in daily life.
We believe that with the patient guidance and unwavering instruction of the instructors, we will certainly be able to cultivate pillars of the state who contribute to the country and society.
We wish you and your family happiness and joy!
Preface
Since 1981, when Dr. Roger Sperry of the California Institute of Technology proved the theory of “left and right brain division” through the “split-brain” experiment, uncovering the secrets of the brain’s two hemispheres and their functional division—a major scientific discovery—and won the Nobel Prize, people’s understanding of the brain has deepened increasingly. In particular, right brain education has excavated right brain potential, and the magical learning power that right brain education brings to people, especially children, is becoming more and more accepted by people. To cultivate more outstanding talents, we must awaken the right brain, develop the whole brain, and balance the development of the left and right brains.
Right brain education started earlier in Japan, the United States, and South Korea, and has achieved very remarkable achievements. This is especially true for internationally renowned right brain development experts such as Makoto Shichida and Shigeo Haruyama of Japan, and Lee Seung-hoon of South Korea. Right brain education in China only began to start around 2000, mainly adopting or borrowing from Shichida’s Super Right Brain Training Method. However, Shichida’s research on right brain training was mainly aimed at children under the age of 6, while there was less training research for children aged 6 to 12 or even older people.
Makoto Shichida dedicated his life to advocating for and practicing research, development, and promotion of right brain education. With mental development as the core, and through extensive practice in infant potential development, he established a comprehensive personality education system covering the mind, intelligence, language, movement, social emotions, and behavioral habits. Shichida-style early childhood education does not aim for elite education or genius education, but rather to cultivate a heart that is considerate of others, full of love and positivity, aiming for whole-personality education and the balance of left and right brains. Its characteristic lies in the theory of the law of receding talent. Between the ages of 0 and 6, spending 30 minutes a day to cultivate a child’s excellent qualities through interactive play is the essence of Shichida-style early childhood education theory.
Around 2010, some midbrain development courses introduced from Malaysia, Taiwan, China, and Indonesia for children under the age of 12 landed in China’s coastal areas. Some of the content of these midbrain development courses and the research on the right brain by Shichida and Lee Seung-hoon regarding ESP (or HSP, Higher Sensory Perception) is consistent. Therefore, after some right brain development institutions added ESP content to right brain or whole brain development courses, they mystified right brain development, even charging exorbitant fees of up to 100,000 yuan, overly emphasizing certain special sensory abilities of humans, which caused social questioning and rejection of right brain development, especially super right brain development. This ESP ability looks particularly magical, but in fact, almost every child can do it. It is just that this innate ability diminishes as people grow, making it difficult for adults to achieve. Based on right brain development and ESP, Shichida researched super right brain photographic memory and super right brain wave speed reading. Not every child in training can persist to achieve satisfactory results in these two abilities. However, in these super right brain trainings, even if the child does not achieve the abilities of photographic memory and wave speed reading, they can already achieve wonderful results in other aspects. For example, learning becomes easier through right brain development training.
The reason why learning becomes easier is also very simple. It is mainly through right brain development training that a person’s focus is greatly improved, thereby allowing imagination, creativity, intuition, and image thinking to be fully brought into play, so that memory, comprehension, self-confidence, and learning attitude will be greatly improved. Therefore, explaining right brain development from the perspective of brain science is no longer so important; what is important is that through this training method, we can see improvements in people’s learning abilities and learning motivation.
The author has worked in schools at the basic education stage for 20 years. Combining the most advanced ideological concepts in traditional education with the experience of Japan and the United States, which are at the forefront of potential education worldwide, I integrated music, subconscious mind, suggestion, Buddhism, yoga, Qigong, hypnosis, and meditation into right brain development training, adopting a game-based teaching method to develop children’s right brain potential. In 2014, I cooperated with Shandong Mingbo Education. Combining the teaching essentials of various right brain and midbrain development education institutions, I finally confirmed the right brain development training content suitable for children aged 6 to 12. The training curriculum is more open and easy to operate, and the effect on improving children’s abilities and learning is more significant. After more than two years of research and practice, we have currently cultivated a group of whole brain students whose right brains have been initially developed and possess certain whole brain thinking functions. Their thinking and memory abilities demonstrated in learning have reached an astounding level—it is hard for hearers to believe, and hard for observers to believe. It is certain that right brain development training improves children’s abilities, makes learning easier and happier, and even improves academic performance.
In the right brain development of children aged 6 to 12, ESP training is very important and interesting. ESP training combines mental imagery training and imagination training. Through this training, right brain potential can be quickly unlocked, laying the foundation for the cultivation of other abilities. ESP training looks like games of blindfolded color touching and character touching. Some individual parents have questioned blindfolding children, and some experts in society even consider blindfolded reading to be magic. Ridiculously, some people, in order to resolve their own doubts, require children to cover their eyes with various methods during the training process. But what is infuriating is that after children suffer various mental blows, they still cannot believe it and attack our instructors and even the children, causing the children to suffer great grievances and humiliation.
In writing this training manual, the author has three wishes: First, I hope more excellent instructors will benefit more children, providing instructors and parents with a handle when training children, enabling correct training, and playing a due role in educating the next generation and cultivating more outstanding talents. Second, to completely disclose the training methods so that anyone can develop a child’s potential according to the methods introduced in this book, and I hope some doubters will not easily negate and criticize brain potential development, triggering more people to research it. Third, to remove the mysterious veil of potential training, not to be superstitious about any religion or pseudoscience, to improve people’s level of consciousness, and to popularize right brain education so that there are no more sky-high priced courses for right brain education.
The three elements of right brain potential development are relaxation, concentration, and imagination. These three points are integrated into every segment of the basic training in this book. Loving play is human nature, and the state of play is precisely the best state for children to relax their brains and stimulate right brain potential! Through practice games, let children treat learning as playing, learn while playing, and unconsciously release right brain potential during the game process. To enter a better and deeper state of right brain relaxation, this book also introduces training methods for breathing, meditation, and body relaxation.
Activating the pineal gland is the first step in right brain potential development. The pineal gland is not “dead”; its function is masked by the functions of the cerebral cortex. Activating the sensory function of the pineal gland allows for the development and cultivation of senses beyond the five senses (vision, hearing, taste, smell, and touch), and acquiring information about things that are difficult to perceive in daily life. Through ESP game training, one can surpass one’s original perception and speed of brain information processing, making it rapidly improve, thereby becoming more confident. When perceiving the color of a card with closed eyes, the card’s information will be reflected in the brain to form a mental image. At the beginning, the image regarding color information is relatively blurry, but with continuous practice, it will become increasingly vivid. This training can greatly improve a person’s brain focus, imagination, creativity, and willpower.
Einstein once said: Imagination is more important than knowledge, because knowledge is limited, whereas imagination summarizes everything in the world and promotes progress; imagination is the source of knowledge evolution. Imagination is closely related to memory, comprehension, reading, and creation. Imagination training is also one of the most important parts of right brain development training.
Guiding brainwaves to an Alpha wave state through Alpha wave music, thereby activating the pineal gland and developing the right brain, is also an important part of the training. This training can be fully integrated into life, study, or work.
Visual training can expand information perception capabilities and enhance mental imagery ability, which is of extremely important significance for speed reading and photographic memory.
This book also provides some methodological guidance on the connection between right brain development and school education, so that students can apply what they have learned. Extension training mainly enriches the basic training of right brain development, laying the foundation for photographic memory and wave speed reading.
The era of focusing only on academic grades and the amount of information is gone forever. The continuous development of society requires parents to strive to explore their children’s unique potential and abilities and focus on cultivating them. The potential of the right brain is huge. As long as children persist in training, they can learn and live easily, happily, and happily. It will surely bring a lifetime of wealth to the child!
Table of Contents
- Chapter 1 What is Right Brain Development
- Right Brain Development Training Course
- How the Pineal Gland Perceives Information
- How Children “Touch” Out Information
- Do Not Miss the Critical Period of Right Brain Development
- “The Strongest Brain” and the Right Brain 8
- The Significance of Right Brain Development 9
- The Secret to Success in Right Brain Development 15
- Key Points of this Chapter
- Chapter 2 Right Brain Development Training Course Standards 19
- Requirements for Instructors
- Qualification Standards for Right Brain Development Training 20
- Preparations Needed for Right Brain Development Training 21
- Right Brain Development Training Curriculum Setup 23
- Basic Teaching Flow 26
- Matters Needing Attention in Right Brain Development Training 29
- Chapter 3 Relaxation Games .32
- Chapter 4 Activating the Pineal Gland ·40
- Light Training 41
- Candle Gazing Training Method 43
- Sun Gazing Method… :44
- Vocal Reading 45
- Music Stimulation to Open the Pineal Gland, 45
- Recitation to Activate the Pineal Gland· .47
- Speed Listening and Speed Reading ….49
- Tapping Vibration 50
- Other Methods ..50
- Meditation 51
- Electrical Stimulation…… .53
- Qigong… .53
- Light Training 41
- Chapter 5 Relaxation and Breathing Training· ·55
- Abdominal Deep Breathing· 55
- Natural Abdominal Breathing Method ·56
- Dantian Breathing Training Method ·57
- Whole Body Relaxation Method· 58
- Breathing Relaxation ·59
- Muscle Relaxation. 59
- Self-Hypnosis Method· 60
- Instructor-Guided Hypnotic Relaxation 61
- Hypnotic Relaxation Guide (Part 1) ….61
- Hypnotic Relaxation Guide (Part 2) ….63
- Chapter 6 Mental Imagery Training 67
- Manifestations of Mental Imagery· 67
- Mental Imagery Manifestation 1: Profound and Direct Mental Imagery ….68
- Mental Imagery Manifestation 2: Clarity of Graphics is Related to Attention, .68
- Mental Imagery Manifestation 3: Synchronous Change Ability of Graphics· .69
- Mental Imagery Manifestation 4: Color, Texture, and Five Senses Can Be Changed at Will .69
- Manifestations of Mental Imagery· 67
- Chapter 7 Imagination Training· 83
- Visualization of Information· 83
- Imagination and Suggestibility Test 85
- “Sour Lemon” Test: Focus, Imagination, and Suggestibility .86
- “Apple Visualization” Test: Image Visualization Imagination .86
- “Arm Rising and Falling” Test: Imagination· .87
- “Falling Backwards” Test: Trust Level .88
- “Hand Clenching” Test: Suggestibility… .88
- “White Light Visualization” Test: Image Visualization Imagination ….89
- “Chevreul Pendulum” Test: Focus… .89
- Image Thinking Training …91
- Imagination Training… ….98
- Advanced Imagination Training ….9
- Comprehensive Method Training ….104
- Shichida Style Imagination Training .105
- Meditation: …110
- Chapter 8 Visual Training ·119
- One-Point Gazing Training 119
- Eye Muscle Training. 120
- Eye Muscle Training 1: Superior Rectus, Inferior Rectus Training . 122
- Eye Muscle Training 2: Medial Rectus, Lateral Rectus Training 122
- Eye Muscle Training 3: Superior Oblique, Inferior Oblique Training 123
- Eye Muscle Training 4: Circular Movement Training· 123
- Visual Field Expansion Training: ….124
- Drawing Card Training… 125
- Text Card Training… 126
- 3D Image Training …127
- Viewing Images with Parallel Method 128
- Viewing Images with Cross Method 131
- Schulte Grid· 133
- Afterimage Training· 135
- Yellow Card Training: 137
- Color Card Training… 146
- Shape Card Training 147
- Mandala Card Training. 148
- Chapter 9 Using Music to Assist Training 150
- What is Alpha (α) Wave Music ·150
- Classification of Alpha (α) Wave Music 152
- Classical Music 153
- Resonance Music. 158
- Precautions for Listening to Alpha (α) Wave Music 159
- Music and Imagination… ·160
- Using Hypnotic Music for Right Brain Development 163
- Chapter 10 ESP Games· ….165
- Blindfolded Color Card Touching .6
- Blindfolded Text Card Touching…. .168
- Blindfolded Color Discrimination… -1.69
- Blindfolded Reading… ….170
- Blindfolded Drawing and Coloring ….170
- Blindfolded Homework .….171
- Blindfolded Mobile Gaming· .….171
- Under the Blindfold…. ….171
- Blindfolded Poker Playing· ….171
- Blindfolded Threading a Needle ….172
- Eyebrow Color and Character Discrimination, Discrimination….172
- Behind-the-Back Color and Character Discrimination .….172
- Ear Listening to Color Cards, Text Cards .172
- Blindfolded Sports…… ….173
- ESP Contact Sensing Training ….173
- ESP Card Games ….173
- Sticking Coin Game ….174
- Sticking Spoon Game ….175
- Telepathy Game ….1.76
- Tactile Force Game ….17
- Talking to Plants. …177
- Chapter 11 Expansion Training 178
- Dual-Tasking… ….178
- Finger Exercises …….179
- Staring Without Blinking ….182
- Listening with the Heart· …186
- Identifying Objects by Scent· :189
- Intimate Contact· …191
- Unity of Body and Mind ·193
- Letting Imagination Run Wild· ·197
- Right Brain Thinking Training …203
- 3D Expansion Diagrams 203
- Left and Right Hand Identification (Thurstone Hand Gesture Test) 204
- 9-Dot Connection 205
- Instant Imaging …207
- 1000 Images· ….207
- Chapter 12 Connection with School Education …210
- Concentration Helps Students Improve Homework Speed! 211
- Reciting Texts is Simple 212
- Memorizing Words with a Photographic Memory· 214
- Step 1: Find the Word …217
- Step 2: Find the Pinyin ·218
- Step 3: Find the Code (Find Letter Codes) 220
- Step 4: Find Homophones… ·221
- Meditation Promotes Knowledge Consolidation 223
- Image Thinking—Helping with Science Learning 225
- Using the Right Brain to Write Essays, No More Worrying About Good Writing, ·226
- Super Learning Method· 230
- Inspiration Learning Method ·231
- Appendix: Right Brain Development Day 1 Course Flow 233 Main References. 235
Chapter 1 What is Right Brain Development
Right Brain Development Training Course
The Right Brain Development Training Course is designed for children aged 6 to 12. Through the method of blindfolded identification, it develops brain potential, activates Higher Sensory Perception, and enhances children’s self-confidence, concentration, imagination, comprehension, mood regulation, attention, etc. Furthermore, it allows these abilities to be applied in daily learning, achieving the goal of making learning easier and life happier for the child. The most amazing aspect of the course for many is the training like Blindfolded Reading, but this ability is not the objective of our course. The goal is to enhance the child’s abilities and apply them to their student life and daily life. We have designed this course from the perspectives of pedagogy and psychology.
It is important to clarify here that the “left and right brain” in Right Brain Development, as we usually refer to it, does not refer to the structural left and right hemispheres of the brain, but rather to the neocortex and the paleocortex (archicortex) of the cerebral cortex. The right brain is located in the paleocortex, develops earlier than the left brain, and operates learning circuits via images to absorb and output information (i.e., using image memory). It is the subconscious brain for intuition, music, images, and art. The left brain is located in the neocortex, develops later than the right brain, and operates learning circuits via language and understanding, using language and text to memorize. It is the logical, linguistic, and analytical conscious brain.
Right Brain Development Training is also known as Midbrain Potential Development, Blindfolded Brain Training, Pineal Gland Activation Course, Super Sensory Course, ESP (Extra Sensory Perception) Course, HSS (Super Sensory) Course, etc. It is a method of initiating self-brain potential. Through original heuristic training, children can unlock their right brain’s self-potential, allowing them to see any object with brainwaves while blindfolded, and even distinguish the shape of objects through touch, smell, or hearing, such as reading and writing while blindfolded. When blindfolded activities begin, the brain training method commences. As long as children follow the blindfolded brain training method for self-practice, after a period of time, you will discover significant improvements in their abilities across the board, especially in memory and absorption. Moreover, they can achieve the effects of rapid memory and high-speed absorption in their studies. The blindfolded brain training method allows the human brain’s instincts to manifest, while also promoting balanced development of the left and right brains, allowing their functions to perform at an optimal level. After the right brain is activated, children only need to practice on their own for 15–30 minutes daily for 3–6 months. We can find that children’s abilities in memory and learning, as well as the establishment of self-confidence, can achieve significant breakthroughs and self-improvement. If brain ability is enhanced, naturally coping with numerous school assignments becomes much easier.
How Does the Pineal Gland Perceive Information
During the course training, many readers or parents may wonder: how do children “see” with their eyes covered? Some people may raise various doubts and criticisms about this magical phenomenon, subjectively believing it is magic or a deceptive trick. Currently, there are many explanations for this issue. A relatively common one is that there is a structure called the pineal gland in the midbrain of the brain. It has the function of perceiving special electromagnetic waves. It can capture visible light and even light that is invisible to the naked eye. It can see light directly without conduction through the optic nerve, so some people call the pineal gland the “third eye” of humans. The function of the pineal gland is strongest before the age of 3, so many people say that children before the age of 3 can “see” things adults cannot see. In fact, the perceptual ability of toddlers before 3 is indeed beyond the reach of adults. The pineal gland connects the left and right brains of humans, and right brain training cannot be separated from the activation of the pineal gland’s function.
How does the pineal gland receive information? We know that the light received by the eyes stimulates the photoreceptor cells on the retina, and then is transmitted by the optic nerve to the cerebral cortex to form vision. The light wavelength that human vision can perceive is between 400 and 760 nanometers, which is a very small area in the entire electromagnetic spectrum. Other electromagnetic waves such as radio waves, infrared rays, ultraviolet rays, X-rays, γ-rays, and r-rays, apart from visible light, cannot be perceived by the naked eye. What the human visual system cannot perceive does not mean that other nerve cells cannot perceive.
The perceptual ability of nerve cells is far beyond what we currently know. For example, many animals can perceive and make corresponding disaster avoidance reactions before disasters like earthquakes and tsunamis. On November 16, 2015, the research group of Xie Can from the School of Life Sciences at Peking University published a paper in Nature Materials, discovering a protein capable of perceiving magnetic fields in pigeon nerve cells. This discovery explains why organisms like monarch butterflies, salmon, lobsters, sea turtles, migratory birds, compass termites, and moles have magical “senses of direction.” One of the reasons is that their sensory systems, in addition to vision, hearing, smell, touch, and taste, also have a “sixth sense” called magnetoreception—i.e., organisms using the geomagnetic field to accurately find the correct direction. From a neurological perspective, the nervous system of Homo sapiens should far surpass that of ordinary animals. The perceptual ability of human nerve cells seems to be absent, but in fact, some functions have degenerated during the evolutionary process. It is said that some Native American Indians can judge how far a horse has traveled from its hoof prints. This super-sensitivity and intuition are actually habitual reflections of experiential subconscious formed by long-term dealings with horses and hooves. Some Australian aboriginals possess superhuman sensory abilities; they can transmit information over long distances in a non-material way. However, with the intrusion of modern civilization, this ability has almost been completely lost.
How Do Children “Touch” Information
Tianyi’s mother wrote the two words “Guangdong” on two separate pieces of paper. When writing on the first piece, she thought about the information of “Guangdong Province.” When writing “Guangdong” on the other piece, she thought about Tianyi’s father (Tianyi’s father’s name). When touching the first piece of paper, Tianyi described seeing a map, looking like a ham, close to the sea, with “Guangdong Province” written on the map. When touching the second piece, he said, “I saw Dad.”
The information expressed by text is abstract. When writing these words, the writer often imbues some information into the words during the writing process. People with developed right brains possess the ability to read this information.
When a child’s eyes are covered with an eye mask, the child’s eyes are closed. When wanting to touch something, a “screen” that lights up like a small TV will appear in the brow area of the vast majority of children. The child obtains information from this screen. When perceiving information, various clear images, and even sounds and text, will appear on the “screen.” Children just starting right brain training often need to filter out effective information from the various information presented in the brain, eliminate various interference information, and remember the feeling when effective information is generated, thereby stabilizing this state. In the future, whenever they need to use the right brain, they can quickly enter this state and perceive correct information.
Children capable of Blindfolded Reading describe that when they touch a red card, some children present the image of a red sun in their brain, some present a red strawberry or a red apple, and some simply have the color red appear in their brain. When touching a blue card, some children present the image of a blue sky, some present the blue sea or a blue lake surface, and some simply have the color blue appear in their brain. When asked where in the brain the image is seen, the vast majority of children see it in the middle of the brow. And extending deep into the brain center from this position is the location of the pineal gland.
Using the right brain can form clear images. For people with balanced left and right brain development, using the right brain to remember these images is far easier and faster than remembering text. Therefore, children feel very relaxed when using the right brain during the memory and learning process. In the learning process, this sense of imagery also makes children feel that learning is very interesting, no longer facing rigid text and numbers.
When Tianyi was doing some mathematical multiplication calculations while blindfolded, whenever the answer appeared, it was always like a funny cartoon story, with numbers singing and dancing vividly, even accompanied by music, appearing on the “screen” on the forehead.
Do Not Miss the Critical Period for Right Brain Development
The powerful functions of the right brain are more obvious during infancy. The CCTV program “Zhuangyuan 360” once aired an episode titled “Magical Nanny” (http://v.qq.com/page/j/i/a/j0185475via.html), which featured a flash card recognition activity. Children were asked to memorize a flash card with 90 to 100 dots within a few seconds and then select the card with the correct number of dots from a randomly shuffled deck. The flash card activity demonstrates that the right brain possesses the function of instantly memorizing vast amounts of information, yet this task is almost impossible for adults. As a child grows physically and psychologically and their thinking patterns change, some functions of the Pineal Gland are gradually lost, and the channel connecting the Pineal Gland to the brain gradually calcifies and closes. However, if a child can persist in Right Brain Development and the use of the Pineal Gland before the age of 12, these functions will not be lost. Based on our case studies of hundreds of individuals developing their right brains, all children under the age of 12 were able to activate the Blindfolded Reading function, but the process is very slow for children who are more mentally mature, have complex thoughts, and lack confidence.
When student Yiwen started the Right Brain Development course, she was two months shy of turning 12. This girl had a shy personality, seemed to have a lot on her mind, and was not bold in her actions. Feeling that she was about to turn 12, she lacked sufficient confidence in learning right brain skills. Because her home was far from the training school, she came for training once a week, while her parents trained her at home the rest of the time. However, the teacher felt that the child was not making much progress. Every time she arrived at the training center, the Instructors had to spend over two hours making her happy and sparking her interest in Blindfolded Color Discrimination and Blindfolded Reading training. Whether training at home or at school, her state was consistently unstable; sometimes it was good, sometimes bad.
It wasn’t until three months later that the accuracy of her Blindfolded Reading stabilized at around 80%.
However, there are also cases where children over the age of 12 successfully activated their right brains. The oldest child for whom we successfully activated the Blindfolded Reading function was 15 years old.
Student Xiaoyun, a third-year middle school student, was already 15 years old when she activated her right brain. Xiaoyun was simple-minded, well-behaved, straightforward, bold, and lively. She didn’t care much about anything and had poor grades, but she liked drawing and dreamed of attending an art college in the future. She was very interested in developing her right brain, so we trained her. Surprisingly, her right brain activated very smoothly and succeeded on the first try. Moreover, her right brain imagination, comprehension, and thinking abilities all improved significantly, making her feel the joy and ease of learning.
There is a viewpoint that Right Brain Development is relatively easier if started during the 0-6 age period (when the right brain plays a dominant role). Once in elementary or middle school, it becomes difficult, and after reaching adulthood, one need not even mention it. After reading articles stating that the right brain occupies a dominant position before age 6, many parents believe their children are already too old to start right brain training and that it is too late. They become very anxious or simply give up. This approach is wrong. In fact, there is no such thing as “too late” in right brain education. As long as one does right brain training, everyone can use the right brain. However, this type of right brain training can often only be based on the level of imagery training.
On February 6, 2015, in the second season of “The Brain,” a 73-year-old man named Wu Guangren, who had recently suffered a cerebral infarction, took the stage. Mr. Wu challenged himself to memorize 5,000 decimal places of Pi, using place names and people’s names to remember the numbers. Dr. Wei excitedly affirmed: “He fully utilized a principle of the brain—neuroplasticity. Humans have an aging process, but we can delay this process through memory training. This is a perfect display of neuroplasticity. We do not passively wait for aging; we can delay it through acquired training and effort to build our own strongest brain!”
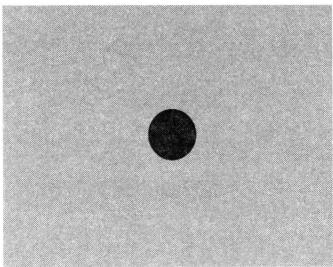
For older students or adults, generally speaking, being able to activate and maintain the function of Brain Imaging reproduction can lead to tremendous improvements in Image Thinking ability, memory, learning ability, and comprehension. However, merely making the brain present clear image reproduction is also very difficult for many people. We can do an experiment looking at a Yellow Card (as shown in the figure):
(1) Take three deep breaths, relax your body and mind, and think of nothing;
(2) Look at the Yellow Card for about 30 seconds. Be careful not to turn your gaze during the process and try not to blink. You can stare at the circle in the middle.
(3) After looking, close your eyes and quietly think of nothing. Pay attention to the front (note: eyes are closed), looking at the eyelids. At this moment, observe whether what appears before your eyes is the same color as the Yellow Card (called the Original Color Card), or if a Complementary Color Card appears before your eyes (a Complementary Color Card is a card with a yellow circle and blue background)?
Children under the age of 6 and those who have undergone Right Brain Development see the Original Color when looking at the Yellow Card, while most people over the age of 6 who have not developed their right brains see the Complementary Color Card. Moreover, the Afterimage of this Complementary Color Card seen by most adults disappears after only about 10 seconds. However, children who have undergone Right Brain Development can not only see the Original Color Card, but their visual persistence time is very long; they can even arbitrarily change the color and shape of the yellow they “see.”
The right brain follows the “law of receding talent”; the older the age, the lower the activity of the right brain. After birth, everyone’s right brain function slowly degenerates to varying degrees due to the influence of left-brain thinking education (language, competition, materialistic reality, etc.). The Five Senses of the right brain in ordinary people are controlled and suppressed by the rationality of the left brain, making it difficult to exert inherent potential instincts. However, those who know how to make good use of the right brain are often the so-called geniuses and elites in various fields.
”The Brain” and the Right Brain
Since 2014, Jiangsu Satellite TV’s annual “The Brain” is the first large-scale scientific reality show in the country, showcasing science and brainpower. Contestants appearing on the show are not only tested on spatial perception and Photographic Memory but must also undergo the most authoritative brainpower tests from prestigious universities like Peking University. These performances are brilliant, and it seems there is no commonality between their abilities. However, in fact, most of the programs demonstrate super-strong memory, and the “geniuses” with various characteristics are actually mostly memory masters. Their super-strong memories have all been trained through hard work after birth. Their training in mnemonic arts also cannot be separated from right brain memory, because only by using the right brain can their memory speed and memory capacity reach such heights.
The various abilities of “The Brain” contestants are the result of balanced development of the left and right brains, with their use of the right brain far exceeding that of ordinary people. They rely on mnemonic arts and mind maps—that is, using imagination and images—to turn information into deeply impressed long-term memories for those incredible massive memory feats. Therefore, mnemonic arts and mind maps are the secrets of various top exam scorers and memory masters, and they are also effective learning methods for activating the right brain. In addition, these two learning methods can strengthen the connection between the left and right brains (i.e., associative ability), which can reflect a person’s information extraction and conversion speed. Using the right brain to memorize is neither boring nor feels very hard.
After student Yiran practiced right brain exercises for a week, her mother was pleasantly surprised to find that Yiran’s speed of reciting texts or ancient poems by “feeling” was at least five times faster than before. Meanwhile, Tianyi’s mother, when asking Tianyi to “feel” ancient poems, generally only has Tianyi describe the images presented in his brain to enhance the child’s understanding of the poems.
The functions of the left brain are easily replaced by modern information technology, while the functions of the right brain are not easily replaced by modern information technology. Currently, education in cultural courses is mainly left-brain learning and development. However, functions of the human right brain such as Image Thinking, intuition, premonition, and creativity are not easily replaced by modern information technology.
The elementary school stage is the critical period for Right Brain Development. For infants aged 0-6, the brain usage mode is primarily right-brain based. Before entering school, one only needs to undergo left and right brain thinking training to enhance the connection of nerve cells. For functions like Blindfolded Reading, any child with normal mental capacity can achieve this through simple guidance. After children enter the elementary school stage, pressure in learning increases dramatically: reading aloud, reciting, doing exercises, writing, and so on. Life scenarios also differ significantly from before elementary school: parents start paying attention to grades, start noticing the child’s calligraphy, and begin criticizing or correcting the child more often. These are all changing the child’s brain usage mode. Their brain usage mode begins to transition from a right-brain biased type to a left-brain biased type. To ensure a child has a brain with balanced and developed left and right hemispheres, we cannot miss this opportunity. This is especially true for students in the fifth and sixth grades of elementary school. As the use of the left brain intensifies, some children’s brain usage modes have already spontaneously transitioned to the left-brain biased type during this period. If we do not seize this critical opportunity and miss the Right Brain Development, it may affect the child’s lifelong development.
The Significance of Right Brain Development
Developing the right brain is the ultimate expression of brain potential and the improvement of intelligence; it is the fundamental guarantee for preventing and overcoming the weakening of the right brain and forming a scientific brain usage pattern. Teaching children to use the right brain will significantly improve their learning efficiency and fundamentally reduce their academic burden. For children with a left-brain bias, especially those of the left-brain type, the right brain is long inhibited by the left brain, and their Image Thinking ability, creative thinking ability, and macro decision-making ability are significantly reduced. This is the physiological reason for their “high scores but low ability.” Children with balanced and developed left and right brains are the most superior in terms of understanding ability, memory, creative thinking ability, macro decision-making ability, as well as learning efficiency and even future work efficiency. It must be made clear that a developed right brain is crucial, as human creativity originates in the right brain.
Children of the left-brain type are slow in memory, reading, and doing exercises, and have low learning efficiency. When reading texts aloud or reciting them, they always “get stuck,” and often cannot finish the questions when the exam time ends. Some children do not pay attention to memorizing Chinese characters, lack interest, are lazy, and are not diligent. This leads to a situation where they recognize many common characters when they see them, but cannot recall them when writing homework, resulting in the phenomenon of having to think for every character written. This is precisely caused by using the left brain too much (serial thinking). In the long run, this forms a left-brain usage pattern in writing. If one memorizes foreign words letter by letter, one will use the left brain more when memorizing words, forming a left-brain usage pattern in word memorization, which often makes memorizing words relatively slow. Furthermore, some children do not like reading texts aloud, which leads to slow reading speed and “getting stuck” when reading aloud, thus forming a left-brain biased or left-brain type usage pattern in reading aloud. (Chuan Wen. Brain Imaging · Decoding the Information Codes that Control Life, Tianjin Science and Technology Press, 2012.12, p. 308)
Next, let us summarize the significance of activating the right brain:
1. Activate Right Brain Mental Imagery Ability and Unlock the Treasure Trove of Brain Potential
The inspiration of Mental Imagery functions is the foundation for various higher potentials such as human super-memory ability, high-speed reading ability, and wish-fulfillment ability. Through Right Brain Development training, the child’s powerful Mental Imagery Ability will be developed, enabling them to easily see various clear images in the brain, thereby surpassing their original brain information processing speed and effectively exerting various brain potentials.
After student Siheng learned Right Brain Development, he also learned “Wave Speed Reading.” He could finish a novel in just a few minutes and recount more than 70% of the plot. When reading, he almost flipped through it quickly over and over, rather than reading page by page.
2. Achieve Balanced Brain Usage and Improve the Child’s Learning Efficiency
Right Brain Development training will promote the balanced use of the left and right brains, making the “information highway” between the left and right brains smoother, and the brain’s efficiency as a whole will multiply. Children will be better at using the entire brain to memorize, calculate, understand, and reason. This is a significant improvement in both quality and speed compared to using just the left or right brain alone for learning, thereby improving learning efficiency and alleviating academic pressure.
Student Siheng learned Right Brain Development in the fifth grade of elementary school. He is now in the second year of middle school, and his grades have always been at the top. His mother says she almost never sees Siheng doing homework or studying at home. Homework is basically completed at school, and knowledge is digested in class. At home, he basically does things he likes.
3. Enhance the Child’s Self-Confidence and Concentration
After a child’s brain potential is activated, their learning efficiency improves, the child no longer fears learning, and will appear more confident. Brain tests have found that during Right Brain Development training, a child’s brain will be in an Alpha Wave state that is conducive to learning, relaxed, and focused. Usually, after 3 to 6 months of training, an improvement in the child’s concentration can be observed.
Middle school student Fu Zhen was not confident, had a slightly introverted personality, did not love to talk, was fragile inside, and sometimes cried when criticized by the teacher. He was a bit like a girl, kind-hearted, and simple. In the first two days of Right Brain Development, the results were average, but then he progressed quickly in the next two days. After Right Brain Development, the training time was short and the frequency was low, but his right brain ability remained relatively stable. After a period of time, teachers, classmates, and parents discovered that Fu Zhen started to become confident, cheerful, and brave, and could also chat happily with strangers.
4. Improve Children’s Calculation Power and Memory
The human ability to remember images is one million times that of text memory, and image memory is more solid and less prone to forgetting. Right Brain Development training can effectively activate the image thinking ability of the right brain. Anything seen or heard at a glance can be reproduced by the right brain in the form of an image on the brain’s “screen”. Whether it is a large amount of text, numbers, or symbols, they can be quickly stored in the brain as images, while simultaneously performing high-speed calculations.
The mother of a sixth-grade girl, student Xin Cheng, wrote out some two-digit multiplication problems for her to calculate; she needed to use the vertical column method to calculate them. However, after putting on the eye mask and feeling the questions with her hands, she was able to say the answers directly. The time it took to get the result was 10 times faster than using traditional methods.
5. Improve Children’s Foreign Language “Language Sense”
In the process of learning English, although many children can skillfully memorize vocabulary and grammar, their reading comprehension ability is very poor. This is a manifestation of a weak comprehensive grasp of the English context. Brain neuroscience tells us that the left brain analyzes information, while the right brain synthesizes it; the right brain possesses the ability to integrate different independent factors to grasp the whole. In other words, in foreign language learning, the child’s left brain is responsible for understanding the meaning of individual words, while the right brain is responsible for the connection of context and the grasp of the context. Through a large amount of left and right brain balance training, not only can the child’s ability to memorize words be strengthened, but it can also help the child improve the overall understanding of foreign language articles.
6. Improve Self-Discipline and Interpersonal Relationships
By using and exercising the left and right brains in a more balanced manner, promoting the communication of information between the two brains, the child’s logical thinking and image thinking will develop in a more balanced way. After continuous training, the child’s self-discipline ability will be enhanced, and interpersonal relationships will also improve.
7. Improve Children’s Imagination and Creativity
For children, if they lack innovation, they will forever only be a numb “sponge” receiving knowledge. After entering society, at best, they can only become a “knowledge worker” working according to others’ instructions. The so-called innovation is actually being good at “connecting” and “combining”. It is the ability to connect and “splice” together things that seem “unreasonable” and “illogical”. Right Brain Development training inspires the child through their Mental Imagery Ability, making the images seen in the brain clearer and more vivid. The world of imagination will become increasingly vivid, realistic, and full of creativity.
When sixth-grade student Wei Bo started touching text cards, although he was somewhat unconfident, under the teacher’s encouragement, it became very interesting. Every character he saw was a small story, and by the end of the story, that character would appear. For example, when touching the character “关” (close/off), he could see a child playing on the computer, and the computer suddenly shut down. He told me the computer was broken. I said, “And then?” He said, “No, actually it turned out someone turned off the power strip switch.” I asked, “So what character do you think this is?” He said, “It’s either open or close.” When touching the character “纸” (paper), he could see someone cutting down trees, and then the trees were sent to a printing factory to make books. You see, the image was very close; with just a little guidance, he said the word “paper”. This process of touching characters was very happy because he could see all kinds of interesting little stories with his eyes closed. Later, as the training strengthened, touching characters gradually produced the characters directly.
Nikola Tesla was a pioneer in the field of electrification. He invented and created the alternating current system, invented motors and high-voltage transformers, and had a profound impact on modern world industry. Tesla created the first radio-controlled machine, principles of robotics, solar-driven engines, X-ray equipment, energy meters, automobile speed meters, cold light lamps, electronic clocks, and electronic therapeutic instruments. He achieved approximately 1,000 inventions in the fields of science and engineering. The scientific invention system of today’s world is still built upon the legacy left by Tesla. Concepts proposed by Tesla include the electron microscope, laser, television, mobile phone, internet, and many other things closely related to our daily lives. From the research perspective of our Right Brain Development training education, what makes Tesla particularly interesting to us is his incredible imagination. When he started thinking about something, a bright light would flash before his eyes. Subsequently, Mental Imagery would begin to appear in his mind. This ability never disappeared throughout Tesla’s life. He said: When inventing and creating, often without even a model of the invention, let alone a sketch drawn, or experiments done, he could already clearly see the completed shape appearing in his brain. It was precisely these magical imaginations that gave him extraordinary learning ability and thinking ability, and more importantly, an endless creativity that transcended the times. CCTV Channel 10 once produced two episodes specifically introducing Nikola Tesla. ([Person] Science “Superman” Nikola Tesla. Part 1 http://v.qq.com/page/y/p/5/y018557yvp5.Html. [Person] Science “Superman” Nikola Tesla. Part 2 http://v.qq.com/page/v/f/6/v01858zf5f6.html)
8. Improve Children’s Intuition and Insight (i.e., Spiritual Quotient)
Intuition power, also known as intuitive power, is one of human instincts. Right Brain Development training accelerates the speed of information exchange between the child’s left and right brains, enhances the child’s perception of subtle changes in surrounding things, thoughts, emotions, and time and space, enabling the child to infer many things from one clue and draw inferences about other cases from one instance. Even if they cannot explain why, they can answer questions correctly, thereby increasing learning efficiency and fun, and improving learning enthusiasm.
After half a year of right brain practice, student Zi Han once went home with his mother. Outside the door, Zi Han told his mother that there were guests at home, a total of four men, and one of them was wearing yellow clothes. When they opened the door, sure enough, four of his father’s friends were sitting on the sofa, and one of them was wearing a yellow T-shirt.
Once, student Yi Wei’s father could not find his keys no matter how hard he tried, so he asked Yi Wei to close his eyes and look for them, to see if he could discover anything. Yi Wei closed his eyes and after a while said, “I see the keys seem to be in a cloth bag or in one of the clothes pockets.” His father took out the jacket he wore the day before and checked the pocket; the keys were indeed in the pocket.
9. Improve Children’s Artistic Appreciation
Right Brain Development training promotes the balanced use of the left and right brains, making children better at viewing things and judging their pros and cons from both rational and emotional perspectives. In other words, children who use their brains in a balanced way can not only efficiently learn and master artistic skills such as instruments, painting, and dance, but also deeply understand the charm and realm conveyed behind various “artistic symbols”, thereby breaking away from the mechanical imitation of specific moves and truly “understanding” art from the bottom of their hearts, realizing and enjoying art.
10. Improve Children’s Adaptability and Self-Rescue Ability
Right Brain Development training can make a child’s response sensitivity to sudden events much stronger than ordinary people, and their sixth sense is more intensified. It stimulates the potential for premonition of sudden events and psychological preparation; invisibly increasing the child’s self-help ability in unexpected events. In terms of survival mode, because thinking power and concentration power are improved, their independent survival ability is correspondingly improved.
Secrets to Success in Right Brain Development
The secret to the success of Right Brain Development training is a relaxed environment and a persistent attitude. Right Brain Development training requires a relaxed environment, especially to keep children away from pressure, criticism, and accusations during the training process. Right Brain Development training requires not only the training of Instructors at the training school but, even more importantly, the child’s persistent training at home. Moreover, most of the training after the activation of the Pineal Gland is completed at home at any time. Because the time required for daily training is very short, about 20 minutes is enough. During training, the child’s concentration will be very high, and the brain consumes a relatively large amount of energy, so if the training time is too long, the child will feel very tired. Aside from needing to go to the training school for new curriculum training and understanding the child’s progress, persisting in training at home is particularly important.
Student Zi Heng is very smart, learns everything very quickly, and has very good grades. Although he is only 8 years old, he is excellent at singing and playing the drum kit. The child’s daily schedule is packed full; besides going to school and doing homework, he is busy attending various training classes and interest classes. Just after the Pineal Gland was activated and the state had not yet stabilized, he had to go to a performance. After returning from the performance, before he could even enter the state, he had to go out for travel. When with his parents, there was simply no time to train, and ultimately, this state could not be normalized.
Parents must trust, encourage, and appreciate their children. The success or failure of a child’s Right Brain Development training has a very important relationship with the parents’ attitude. If parents have positive energy and firm confidence in Right Brain Development training, the child will move towards persistent training and happy training. Parents’ constant suspicion, accusation, and criticism of the child will only cause the child to choose to escape and refuse right brain training.
The 6-year-old “Little Cherry” couldn’t leave computer games for a moment when she first came to the training school; as long as it was break time, she had to use the teacher’s computer or mobile phone to play games. During training, the Instructor had to spend a long time attracting her attention to the training before it could begin. This child’s Right Brain Development basic training took a relatively long time, taking nearly two weeks. But this result was quickly destroyed by her mother. When “Little Cherry” started training at home, her mother thought the child was cheating and peeking. So she stuffed cotton, tissues, etc., into the eye mask. If one layer wasn’t enough, she wanted two, three layers, and even wanted to cover the child with a quilt. Not to mention what the child’s mother said at the time, just her behavior alone had seriously hurt the child’s self-esteem. As a result, the child could not enter the state of blindfolded brain training when at home with her mother nearby; she could only enter a good state when the Instructor was training her, and her mother could only secretly enter the classroom to observe the child’s performance. Although she did not train at home after the basic training, the child’s attention still had obvious improvement, and she was basically no longer obsessed with computer and mobile phone games.
If “Little Cherry“‘s mother does not adjust her mindset and cannot treat the child with correct methods, the child’s optimal state of using the right brain will never reach normalization.
Right Brain Development training must rely on the student’s long-term continuous practice at home. Right Brain Development training can only serve as a supplement to education in institutional schools, making up for the lack of right brain education in schools, thereby enabling students to develop their left and right brains in a balanced way.
Professor George Xie Zuoqi, President of Northwestern Polytechnic University in the United States, once pointed out during a visit to China: Chinese education is very rigorous, possessing very tight logic and rich knowledge. The students cultivated have relatively strong abstract thinking abilities; obviously, the left brain is more developed, but hands-on ability and expressive ability are relatively weak, indicating a lack of right brain training. He has mentored many Chinese international students; most of them have excellent written test scores, but their ability to solve practical problems and collaborate is relatively poor. For example, some have very poor self-care abilities, some are not good at cooperation, and some are terrible at 3-minute impromptu speeches. He believes: The root of the problem is the imbalance in left and right brain training. Experts in the education field have made suggestions on quality education reform many times. However, the problem that has existed in our country’s education for a long time—left brain training being stronger than right brain training—has not changed much.
Right Brain Development training is a remedy for the lack of right brain training for infants under 6 years old, an extension of right brain early education for infants under 6 years old, and a supplement to school education. This kind of training is difficult to offer in schools. An Instructor cannot train more than 5 students at the same time; otherwise, the teaching rhythm will be difficult to control, and the effect of the child’s training will be difficult to guarantee. The individual differences between students are very large; some are age factors, some are psychological and physiological differences. Some students can almost awaken the function of the Pineal Gland only through the Instructor’s verbal guidance, while other students need a longer time to stabilize the state of blindfolded training through the comprehensive application of light training, listening to Alpha Wave Music, and other training. Some students continuously train but only reach the level achievable by basic training, while some students can achieve Photographic Memory and Wave Speed Reading in a few months. Therefore, training must be tailored to the individual and taught according to their aptitude. And this is impossible to achieve in institutional schools.
Key Points of This Chapter
How do children see while blindfolded? How they see colors and text cards is not important; many books on right brain training have relevant introductions. The purpose of our research and training is that children can improve their attention, imagination, understanding, memory, etc., through the training of blindfolded color discrimination and recognizing text cards, thereby making learning easy and happy.
This set of training methods is more suitable for children aged 6 to 12. For children under 6 years old, the channel connecting the Pineal Gland, Midbrain, and the brain is still unobstructed; they only need to use conventional right brain training methods for persistent training. Using the training methods introduced in this book for people over 12 years old will not have any negative effects. Even for adults, following the training in this book, as long as they have enough perseverance to persist, they can still achieve impressive results.
Our hundreds of successfully trained children can prove that Right Brain Development training is undoubtedly helpful to children, especially in establishing self-confidence, and improving attention, emotional regulation ability, imagination, memory, and learning ability, it has very significant effects. After the child’s abilities are improved, the improvement in academic grades is inevitable.
Theories related to the right brain, Midbrain, and Pineal Gland are not the focus of this tutorial. How to evaluate the results of the child’s training from the perspectives of pedagogy and psychology is what we really need to pay attention to.
Why can’t Right Brain Development training be carried out in public schools? Right Brain Development training can currently only be a supplement to institutional education. An excellent Instructor for Right Brain Development training can train at most 5 students at the same time. In the beginning, daily training is required, and the individual differences in student learning are relatively large, making it more suitable for individualized instruction. This teacher-student ratio and teaching method are difficult to achieve in public schools.
Chapter 2 Right Brain Development Training Course Standards
The potential of the right brain is immeasurable. The results of Right Brain Development training are closely related to the child’s growth environment, the child’s persistence in correct training at home, and the guardian’s attitude towards Right Brain Development. The goal of the Right Brain Development training course is to improve a person’s concentration, memory, comprehension, creativity, and emotional control abilities, build self-confidence, improve brain state, and become a person with balanced and developed left and right brains. Once the right brain is activated (functions such as Blindfolded Reading), the child’s abilities in rapid memory, massive memory, speed reading, mind mapping, and rapid calculation can be rapidly improved. In other words, Right Brain Development training is the foundation for other right brain application courses. Once this foundation is solid, learning other subjects will naturally follow, and learning results will be事半功倍.
Requirements for Instructors
The enlightenment teacher for a student’s Right Brain Development training is the Instructor. An excellent Instructor will give the child lifelong wealth. Whether a child can move from Right Brain Development training to easy and happy learning also depends on the quality of the Instructor.
As an Instructor, you need to teach children the following ten character strengths:
-
A Joyful Heart: Be happy, loving, and willing to share.
-
Relaxed: No tension, no pressure, no fear.
-
State of Excellence: The happiest and most blissful moments are our strength to transcend ourselves.
-
Open Mindset: Think outside the constraints of convention; anything is possible.
-
Perseverance: Do not give up, do not lose heart, do not be disappointed.
-
Self-Confidence: Fearless, believing in oneself, and marching forward courageously.
-
Practice, Practice, and More Practice: Make good use of time and persist in integrating practice into daily life every day.
-
Healthy Mindset: Positive, optimistic, and cheerful.
-
Healthy Lifestyle: Balanced nutrition and daily exercise.
-
Filial Piety: Obey parents, love parents, and make parents happy.
Qualification Standards for Right Brain Development Training
The national Right Brain training industry generally defines six levels for Right Brain Development blindfolded perception:
Level 1 Identification of two colors via Smell, Hearing, Vision, or Touch (any one)
Level 2 Identification of four colors via Hearing, Vision, or Touch (all)
Level 3 Distinguishing Poker card colors and numbers
Level 4 Distinguishing Poker card colors, shapes, and numbers at a distance of half a meter
Level 5 Basic reading, walking, and character recognition
Level 6 Reading, writing, drawing, and normal walking
This Right Brain Development training tutorial is divided into two parts: training by a professional Instructor and training at home. According to national Right Brain training industry conventions, an Instructor training a student to the following standards is considered qualified:
-
The blindfold difficulty level is Level 1 (blindfold plus a pad with tissues covering both eyes), and the student must not cheat.
-
The assessment content is Blindfolded Color Discrimination. The color discrimination item can be any one of Color Cards, Color Blocks, or Color Rods.
-
The qualification standard is that the one-time accuracy rate for both items reaches or exceeds 70%, and the observer can supervise the entire testing process on-site in a silent environment.
-
Students who pass this assessment twice consecutively within two weeks are recognized as having reached the qualification standard for Right Brain Development training.
After reaching the Instructor training standards, parents should consciously and actively carry out expansion and enhancement training at home according to this tutorial, and the child will benefit infinitely.
Due to individual differences among children, such as the amount of things the child has accumulated and observed, differences in psychological qualities, physical health status, the child’s will quality, differences in family growth environments, and different parental education styles, these will all affect the speed at which the child achieves blindfolded perception. Some children may not even successfully activate their blindfolded perception ability. According to the author’s statistics, about 4% of children do not reach the standard of activating blindfolded perception after a period of training. For this part of children, due to various reasons, they have not activated this ability. The child is simply the same as when they had not received this training, and this will not affect their learning and life.
Preparation Required for Right Brain Development Training
Right Brain Development training requires choosing a quiet and comfortable environment. To avoid interference during the training process, some preparations need to be made. For example: turn the mobile phone to silent mode, avoid other people suddenly coming over to talk during training, etc. Do not let the room get too hot or too cold, and do not let direct sunlight shine into the room; it is better if the room is somewhat dim. Keeping the student in a calm mood for training is key, so the environment must be adjusted within the limits of one’s ability.
Teaching aids should be prepared before Right Brain Development training. Including: 60-watt light bulb, blindfold, Yellow Card (or image files played on a computer or TV), Color Card (or Color Block, Color Rod), Text Card, Alpha Wave Music, Midbrain Music, and player, Mandala Card (or image files played on a computer or TV), large screen monitor or TV, 3D images (you can buy the book “Improve Vision and Enhance Attention 3D Puzzle Games”), hand-brain exercises teaching video, and teaching aids related to expansion training.
The blindfold used during training is a ordinary sleep blindfold that is comfortable to wear, or you can fold soft cotton cloth into a long strip that completely blocks light and tie it around the eyes. After the student passes the basic training, it is recommended to add a few of layers of soft wood pulp tissue between the blindfold and the eyes during enhancement training. Firstly, this can avoid light leakage from under the eyes, affecting the child’s peace of mind; secondly, it can completely avoid the situation where the student might peek. When demonstrating to parents, to further explain that no light enters the eyes, you can also use tape to stick the lower edge of the blindfold to the face and nose. For demonstration purposes, you can also paint swimming goggles completely with black paint, so that they are neither light-permeable nor air-permeable. However, this kind of demonstration is best performed after the student’s Right Brain training state is stable, because such blindfolds are not comfortable to wear during normal training.
Color Cards can be made by cutting colored card paper to a suitable size. Color Cards should be in six colors: red, yellow, blue, green, black, and white. Pay attention to choosing pure colors. Color Blocks or Color Rods can be purchased at toy stores.
Yellow Cards and Mandala Cards can generally be downloaded directly from the internet and played on a computer, TV, or projector. You can also buy beautifully printed paper Yellow Cards on Taobao or download Yellow Card training, Mandalas, and other APP games on your mobile phone, which is more convenient for training anytime and anywhere.
3D images can be purchased by buying the book “Improve Vision and Enhance Attention 3D Puzzle Games” or other 3D images, or you can download APP games like Right Brain Terminator on your mobile phone.
Please avoid training when the student is very full or wants to sleep.
If the student can directly see the Yellow Card’s original color after the light-gazing training, it indicates that the child’s Pineal Gland has been activated, and it won’t be long before the child can touch Color Cards.
Before the student reaches a stable state of Blindfolded Color Card Touching, observation of training by students, parents, etc., is not allowed.
Before the student reaches a stable state of Blindfolded Color Card Touching, do not demonstrate or train at home.
Instructors must ensure daily contact with parents during the basic training and enhancement training stages. The situation of training at the school should be told to parents in time so that parents understand the student’s training progress and performance. Regarding the situation of home training, the Instructor must also be very clear, supervise the student’s daily home training, and even require parents to send photos and videos of home training for filing. Only by giving wholehearted attention to the student can the child feel the Instructor’s care and love, and the child can quickly enter the best state for the next training. Only then can the Instructor prepare lessons more appropriately and prepare the tasks for the next training.
Right Brain Development Training Curriculum Setup

Continued Table

Continued Table

Basic Teaching Process
I. Basic Training Phase
-
If conditions permit, an EEG Brainwave test should be performed via an EEG Brainwave instrument before training. After the end of the basic training phase and after the end of the enhancement training phase, EEG Brainwave tests should be performed again. Through the results of the three EEG Brainwave maps, the differences in the student’s attention, left-right brain balance, and learning ability before and after can be compared.
-
If brainwave testing is not conducted, the Instructor can lead the student to start with relaxation games. The purpose of relaxation games is to let the child relax their body and mind as much as possible, and develop a sense of trust and liking for the Instructor, the training environment, and the course. Relaxation games must be played before every training session. The first relaxation game is particularly important and can take a relatively long time; the Instructor may let the child play to their heart’s content. In a half-day or one-day training course, alternate games and training, with game time greater than training time. Instructors can also call individual training items “playing games,” so the child will complete the training unconsciously.
-
Light-Gazing Training. For younger children, Light-Gazing Training only needs to be done once, with the standard being able to see the Yellow Card’s original color each time. However, for older children to enter a stable blindfolded training state (a stable state means being able to successfully perform blindfolded training at any time for a consecutive week), slower ones may need multiple Light-Gazing Training sessions. However, at most one Light-Gazing Training session should be arranged per training course. Once the student enters a stable blindfolded training state, there is no further need for Light-Gazing Training.
-
Yellow Card Training. Being able to see the Yellow Card’s original color with eyes closed is an important standard for measuring whether blindfolded training can be activated, and is also one of the standards for whether the Pineal Gland is activated. If, during Light-Gazing Training, the child can change the color of the light spot at will, then each training session can start with Yellow Card Training.
-
Imagination Training. Imagination Training is the core course of Right Brain Development training. Imagination Training must be interspersed into Light-Gazing Training and Yellow Card Training. An important function of the right brain is to form clear images in the brain; first, it is reproduction, and further, it is creating images. Imagination Training is a mandatory item every time the Instructor trains. The content of the imagination is adjusted according to the student’s progress. At this stage, it is mainly visual imagination training.
-
Abdominal Breathing. If you want the student to maintain a stable blindfolded training state, you must let the student master Abdominal Breathing. Abdominal Breathing can be practiced once a week, for 15–30 minutes each time. If the student is arranged to take a nap at the training school during the first class, they can learn Abdominal Breathing before resting.
-
Blindfolded Color Card Touching. From the start of learning to being able to touch Color Cards while blindfolded, some students can reach a stable state in half a day, but they still need consolidation and stabilization before training at home. Once they can touch Color Cards blindfolded, after a few days of consolidation and stabilization, they can generally touch Text Cards. Some students can also touch Text Cards the day after touching Color Cards; this depends on the student’s state and is determined by the Instructor. After being able to touch Color Cards blindfolded, in each training session, after adjusting breathing, proceed directly to the Color Card Touching training. At the beginning, students may be unclear between blue and green or mistake them for each other; this is a normal phenomenon, and Instructors should pay attention to careful guidance and correction. When demonstrating in public, it is recommended that students start with Blindfolded Color Card Touching, which is more conducive to a stable performance.
II. Advanced Training Stage
-
Before each class, some inspirational stories (such as “The Flying Spider,” “Rain Man,” etc.) can be used to introduce the course. The purpose is to attract students’ attention and bring their focus to the course training. At the same time, training specifically requires persistence; only through persistence can one achieve better results. Using some inspirational stories to motivate students is an excellent method.
-
Yellow Card Training. In the advanced training stage for the Instructor, each training session can start with Yellow Card Afterimage training, or skip the Yellow Card training and start with Blindfolded Color Card Touching training. For home training, proceed directly to Blindfolded Color Card Touching training.
-
Blindfolded Reading. When conducting Blindfolded Reading training, the Instructor must stabilize the student’s emotions, instruct the student to carefully observe the images presented in the brain, and abstract the touched text based on these images. Whether in Instructor-led training or home training, whenever Blindfolded Text Card Touching is performed, try to have the student describe the visual images they see. This is very beneficial for the child’s future speed memorization and speed reading. Some students progress very slowly in Blindfolded Reading; the Instructor must have sufficient patience to guide them. If the state of Blindfolded Reading is unstable, daily training must be ensured, and the Instructor must maintain good communication with parents.
-
Imagination Training. Imagination training in the advanced training stage should focus on the imaginative abilities of the Five Senses, namely visual imagination, auditory imagination, gustatory imagination, olfactory imagination, and tactile imagination. Each Instructor-led training session must design appropriate training content based on the student’s specific situation. For home training, parents can independently choose or create imagination training content for their child based on the guidance in this manual.
-
Relaxation Breathing Training. Relaxation breathing training in the advanced training stage can be conducted once every two weeks. Each time, try to choose different relaxation methods for training so that the child can experience their favorite relaxation method.
-
Right Brain Music. Right Brain Music is divided into Pineal Gland Activation Music, Imagination Training Music, Memory and Comprehension Enhancement Music, and Alpha Wave Music. Pineal Gland Activation Music is used for students who cannot see the original colors on the Yellow Card or those progressing slowly with touching Color Cards or Text Cards. Imagination Training Music is used by Instructors to enhance students’ imagination; based on the student’s condition, it can be conducted once a week. Memory and Comprehension Enhancement Music can have specific time arranged for students to practice alone. The playback time for this type of music is relatively long; children often either become impatient listening to it or fall asleep while listening. It is suggested to listen to this type of music continuously for 5–7 days, and students’ concentration, memory, and comprehension will achieve a certain improvement. Alpha Wave Music is generally used at home; it can be played on a loop at an appropriate volume while the child is studying, eating, or resting.
-
Hand-Brain Exercises, Dual-Tasking, and 3D Images. After the Instructor has taught the students these contents, they should instruct the students and parents to practice them anytime during breaks, when interacting with classmates, or while playing. The Instructor should teach these items to students as a form of game, entertainment, and leisure. Once students “play” with these items well, they will naturally achieve better results in Right Brain Development. The Instructor can organize competitions for these items once a month to enhance motivation to practice.
-
Meditation Training. Once the student’s state of Blindfolded Reading is stable, the Instructor can arrange a few meditation sessions to let students and parents understand the methods of meditation. Parents can perform meditation at home on their own using the meditation guided words provided in this manual. The more frequently meditation training is done, the greater the benefit to the child. Furthermore, a permanent habit of meditation can be formed, benefiting the child for a lifetime.
-
Blindfolded Reading. Blindfolded Reading is the core training subject of the entire Right Brain Development training. After students achieve the ability of Blindfolded Reading, they must persist in daily training, and the training time should be no less than 15 minutes. The reading content can be texts assigned for memorization at school, preview texts, English, ancient poems, extra-curricular books, classics of Chinese studies, etc. When Blindfolded Reading, students are required to have both images and text simultaneously in their brains. Once Blindfolded Reading reaches a stable state, students can try playing mobile games, drawing, threading a needle, playing chess, roller skating, riding a bicycle, etc., while blindfolded.
-
Mandala Cards. Mandala Cards can be used as a late-stage training subject in the advanced training stage. Mandala training can be conducted once every two or three days, or practiced on a mobile phone for 5 minutes a day as a game.
Precautions for Right Brain Development Training
-
Must ensure training is conducted for more than 15 minutes every day. The more diligently the Right Brain Development functions are practiced, the stronger the functions become, and the more surprises you will gain. Therefore, please ensure persistent and scientific training.
-
Please let the child train in a healthy, happy, voluntary, relaxed, and free manner. Combine training with games to make the training process feel like playing games to the student; the training effect will be better.
-
Right Brain Development basic training is completed independently by the Instructor. The Instructor should control the training rhythm well, ensuring the child accepts it happily while gaining something from each training session. It is better to let the training process be slower rather than being eager for quick success, and absolutely do not exert too much pressure on the child.
-
Since brain training requires a high degree of concentration from the brain, fatigue will be felt after a long time. If parents have not undergone professional study or in-depth research, the daily practice time can be controlled at 10–30 minutes. It is not recommended for parents to conduct training with the child for more than 30 minutes.
-
When the child closes their eyes, do not say they are “wrong.” During Blindfolded training, if the child touches incorrectly, never say they are wrong. The key is to give encouragement when they touch correctly. When they touch incorrectly, simply record their answer, then ask them to touch again. Or give the student a small hint to see if the child can touch correctly on the second, third, fourth, or fifth try. If they haven’t touched correctly after five times, still do not tell the child they touched incorrectly; instead, proceed to the next card. The point is, when the child is blindfolded, do not say they touched incorrectly, as this will lower the child’s confidence and expectations of themselves. If the child touches correctly, let them know and remember the feeling that produced the correct answer, so that the correct sensing can be reinforced.
Adults must firmly believe that every child is born a genius; if it weren’t for growing up, they would still be geniuses now. The criticism of parents and teachers interferes with the child’s development. “If you keep dawdling, I won’t care about you anymore!” “You are not allowed to leave the house today!” “No TV for a week!” “How can you be so stupid!” “Don’t give me that nonsense!” “Go to sleep right now!” These will all belittle the child, making them feel they haven’t done well enough, thereby suppressing the child.
Geniuses need to be valued. Others’ recognition of their achievements and appreciation of their abilities reinforce their special skills and expertise, allowing the genius to continue developing.
In short, when the child closes their eyes, never say to them “You are wrong.” Similarly, whether the child’s eyes are open or closed, do not belittle them. Reinforce the child’s confidence and self-esteem, so their confidence will say to the brain: “You are the best!” The brain will naturally perform outstandingly.
If the genius baby discovers that your expectations for their future achievements have lowered, this is the worst thing. Let the child know that you have high expectations for them; this can support the development of a genius. Regarding the child’s shortcomings, do not blame or criticize them. Try to avoid negative comments and emphasize positive performance. If the child has shortcomings, find ways to let the child discover and recognize them themselves, and leave the child a certain amount of time and process to correct them.
-
Do not conduct training when the child is fatigued, drowsy, or in poor physical condition. When the child is fatigued, drowsy, or in poor physical condition, the images formed in the child’s brain are blurred or unrelated to the target information; this kind of training is ineffective. At this time, the Instructor and parents should pay more attention to the child’s physical condition, understand the details of the child’s body, and help the child relax, rest, or receive treatment. Absolutely do not make the child more fatigued, unhappy, or in worse physical condition for the sake of training, or even cause adverse psychological effects.
-
Do not conduct training when feeling depressed, emotionally low, nervous, stressed, overly excited, in a state of agitation, or under forced practice.
-
The Instructor should design training content based on the student’s actual level and inform the parents, avoiding behaviors that are eager for quick success and premature growth (pulling up seedlings to help them grow).
Chapter 3 Relaxation Games
The purpose of relaxation games is to let the child relax their body and mind as much as possible, and to develop a sense of trust and fondness for the Instructor, the training environment, and the course. Especially when the child comes to the training school for the first time to meet the Instructor and classmates, relaxation games can help the child relax completely psychologically and physically, and obey the Instructor’s commands. For the first relaxation session, you can choose several games to let the child play to their heart’s content. Relaxation games can also be interspersed during breaks in other training.
Game 1: Writing Numbers with the Body
Game Purpose: Relaxation, Entertainment, Cultivating Creativity Game Time: 5–10 minutes Game Rules and Procedure: Use the buttocks in the middle of the body to imitate the tip of a pen and write a number requested by everyone on a plane perpendicular to the ground, such as 8 and Chinese characters. The standard is that everyone can guess it; the criteria can be moderately relaxed.
Game 2: Group Number Formation
Game Purpose: Cooperation, Cultivating Creativity, Creating a Happy and Relaxed Atmosphere Game Time: 5–10 minutes Game Rules and Procedure: Two people form a group. The Instructor says a number, and the two work together to form this number. The group that forms it fastest and best wins.
Game 3: Darwin’s Theory of Evolution
Game Purpose: Getting to know each other, Creating a Happy and Relaxed Atmosphere Game Time: 5–10 minutes Game Rules and Procedure:
- All students start as “Eggs” and are squatting.
- Students pair up and use “Rock, Paper, Scissors” to decide the winner. The winner can stand semi-upright, becoming a “Chicken”; the loser remains an “Egg.”
- Next, Eggs compete with Eggs, and Chickens compete with Chickens. The winner moves up a level, and the loser moves down a level.
- The entire order is Egg, Chicken, Eagle, and Human. Eggs must squat; Chickens stand semi-upright with hands under armpits acting like chickens; Eagles can stand with arms spread out flying; after evolving into a Human, one can exit the competition.
- Students at each stage can only compete with students at the same stage. Result: The final result should be one Egg, one Chicken, one Eagle, and the rest are Humans.
Game 4: How Much?
Game Purpose: Training mental agility, adaptability Game Time: 5–10 minutes Game Rules and Procedure:
- Male members are worth 50 cents, female members are worth 1 dollar. (Can be adjusted at will)
- The host calls out a number, and male and female members form groups freely according to the number. For example: 3 dollars means three females, two females and two males, or six males.
- Call out different numbers as quickly as possible each time, and members must form groups quickly.
- Those who cannot form a group lose. Variation: The prices for males and females can be swapped at will. For example: Male is 1 dollar, Female is 50 cents.
Game 5: Threading a Needle
Game Purpose: Cooperation and Tacit Understanding Game Time: 10–20 minutes Material Preparation: Needles with small eyes, thread Game Rules and Procedure:
- Two people in a group. A holds the needle, B holds the thread.
- After the Instructor gives the command, B runs towards A and threads the thread through the eye of the needle as quickly as possible, then runs back to the starting position with the needle and thread.
- The first group to return to the starting position wins.
Game 6: Passing the Food
Game Purpose: Exercising Team Spirit Material Preparation: Easy-to-pass food, such as apples, bananas, biscuits, etc. Game Rules and Procedure:
- The whole group sits in a circle, divided into two groups from the middle.
- At the start of the game, the first person of each group starts passing the food to the next person. Hands cannot be used; only the mouth can be used to hold it.
- The next person can also only receive it with their mouth. When the second person has received it, the first person must bite off the part they have bitten. This continues in turn. The one to pass to the end the fastest with food remaining wins.
Game 7: Name Chain Game (also known as the Snowball Game)
Game Purpose: Enliven the atmosphere, break the ice, accelerate understanding between students. Game Rules and Procedure: Group members form a circle. Arbitrarily nominate a student to introduce their unit and name. The second student introduces themselves in turn, but must say: “I am XXX behind XXX.” The third student says: “I am XXX behind XXX behind XXX,” and so on. The last student to introduce must repeat the names and units of all previous students.
Game 8: Human Camera
Game Objective: Exercise trust and cooperation between trainees, and train the trainees’ Mental Imagery, reflection, and meditation.
Game Rules and Procedures:
-
Divide into pairs. Trainees choose a partner and decide who will play the camera first, while the other plays the photographer.
-
The camera player’s eyes represent the lens, and their ears represent the shutter button; the photographer stands behind the camera (facing the camera player’s back).
-
After roles are selected, the photographer guides the camera by the shoulders to various locations to frame shots. Before pressing the shutter to take a photo, the camera’s eyes are closed. When the photographer presses the shutter, the camera’s eyes open quickly to record for about one second, then close again. The photographer then guides them to another location to frame a shot.
-
After the photographer finishes recording photos, the two swap roles.
-
Please pay attention to safety during the framing process.
Instructions:
a. Usually, this activity is arranged at the end of the course. Through the activity, trainees are prompted to review and summarize the learning process of that session in a timely manner. At this point, the number of photos to be taken can be set, and themes can be assigned. For example, invite each trainee to take two photos: one that had the deepest impact (or was most meaningful) on them during this learning process; the other is a photo they most want to give to the team during this learning process. When taking a photo, the photographer describes the meaning of the photo to the player acting as the camera, and then the camera player verbally describes this photo.
b. Another method is to adopt a multi-shot approach (the number is set by the Instructor). The camera simply and faithfully records the images, recording whatever is seen (like a blank sheet of paper, without any preconceived notions). Use this method to practically experience viewing things without prejudice, “seeing” through others’ perspectives without a preset stance, and truly understanding what the “truth” of things is. When a person faces a new problem, only by being free of past experiences can they truly see the truth of the problem, allowing creativity to be exerted and the problem to be solved.
Game 9: Memory Test
Game Objective: Exercise the trainees’ imagination, memory, and listening.
Game Rules and Procedures:
-
Everyone forms a circle. The first person starts by saying “Today I ate one AA” (AA is an arbitrary food name).
-
The second person continues saying “Ate one AA, two BBs” (BB is a different food name).
-
The third person says “Ate one AA, two BBs, three CCs” (CC is a different food name).
-
Continue passing it on like this. Each person must repeat the previous food names and add a new food name.
-
Continue until someone makes a mistake and is out!
-
Trainees should try to choose some difficult food names, dish names, or some foods that are not usually eaten. Example: Scrambled egg with dried scallop and beef soup.
Game 10: Regardless of Three Times Seven
Game Objective: Exercise the trainees’ rigor, listening, and rapid calculation.
Game Rules and Procedures: Start counting from 1. Whenever a multiple of 3 or 7 is reached, it cannot be spoken. The speed must be fast. Those who foul are eliminated. The final winner is the victor. Those who report incorrectly leave the team and stand to the side; the remaining people continue counting. This continues until a winner is produced.
Game 11: Banana Exercise
Game Objective: Cooperative tacit understanding. Material Preparation: Several bananas, several ropes. Game Rules and Procedures:
- Two people form a group. Tie their right hands together; the use of the right hand is not allowed. 2. Each group holds a banana in their left hand, then starts to let them cooperate to peel the banana skin using only their left hands and eat the banana as fast as possible. 3. The fastest group wins.
Game Objective: Let trainees realize the importance of cooperation.
Game Rules and Procedures:
-
Two people form a group, sitting back-to-back on the ground with arms interlocked, then exert force together to stand up relying on each other.
-
If the two cooperate successfully, they can try adding one or more people.
-
The more people in this game, the harder it is, and the more tacit understanding is required.
Game 13: The Magical Wizard
Game Objective: Understand the impression teachers leave in students’ minds and let students have unconstrained associations.
Game Rules and Procedures: Tell students that if you were a magical wizard and could turn the teacher into an animal, which one would you choose? Whoosh—I change, I change, I change change change, I turn the teacher into… what? Why does this make you associate the teacher with this animal? What feeling does this animal give you? Draw what you have changed.
Game 14: Hunter Shoots Rabbit
Game Objective: Let trainees experience the reaction of rapidly switching between left and right hands.
Game Rules and Procedures:
-
Extend your right hand, make a fist, extend your index and middle fingers to form a “V” shape (representing a rabbit), facing yourself. Then extend your left hand, make a fist, extend your thumb and index finger to form a “pistol” shape (representing a hunter holding a gun), facing yourself.
-
When the left hand (representing the pistol) approaches the right hand (representing the rabbit), the right hand must run. While running, say: “Hunter chases, rabbit runs; hunter chases, rabbit runs.” When reaching the far side, swap left and right hands, i.e., the left hand suddenly becomes the rabbit, the right hand suddenly becomes the pistol. Keep repeating until all trainees can change proficiently.
Game 15: Finger Elongation
Game Objective: Exercise the trainees’ imagination and meditation sensitivity. Game Rules and Procedures: The Instructor provides verbal guidance, students cooperate.
Guidance Script: Let’s take a look at whether the students’ bodies listen to the teacher, okay? (Okay!) Okay, very simple. Just like me, put your palms together. Let’s see if our hands are the same size. Are they? (Yes!) Okay, very good. Next, take out any one of your hands and point to the sky like me. Okay, very good. Now I want you to focus all your attention on your fingers. Yes, very good. Next, I want you to use your maximum imagination. There is a force from your belly passing through your arm, making your fingers get longer and longer. Yes, use your maximum imagination, let your fingers get longer and longer, this force will also get bigger and bigger. Yes, very good, exert force, very good. Okay, now, 1 centimeter, 2 centimeters, 3 centimeters, 5 centimeters, getting longer and longer. Okay, very, very good. Yes, very good. Use your maximum imagination, let your fingers elongate, longer and longer, 10 centimeters, 20 centimeters. Okay, very good. Now let’s bring our hands back, place them in front of our chests, and put our palms together again. Have your hands become longer?
Game 16: Hand Stuck to Head
Game Objective: Exercise the trainees’ imagination and meditation sensitivity. Game Rules and Procedures: The Instructor provides verbal guidance, students cooperate.
Guidance Script: Let’s take a look at whether the students’ bodies listen to the teacher. Your hand can stick to your head, okay? (Okay!) Okay, very simple. Put your hand on top of your head (holding the subject’s hand). Okay, next, take a deep breath, close your eyes. Next, I want you to use your maximum imagination. Your hand and the top of your head have been firmly stuck together by a strong glue. Yes, very good. Use your maximum imagination, your hand and the top of your head are firmly stuck together. Okay, very good! Next, I want you to continue using your imagination. Your hand and your head have firmly grown together. Now your hand and the top of your head are one whole. Very good. In a moment, I will perform a test. I will gently pull your arm, and you will discover that your hand and the top of your head are firmly grown together. Okay, very good! In a moment, I will count three numbers. I will gently count three numbers, but you will find that no matter how you pull, they cannot be pulled apart. Okay, very good. Next, start! Get ready, 123, 123, 123. Okay, very good. In a moment, I will count three numbers. When I count to 3, you will gently take your hand off the top of your head. Okay, start getting ready now, 1, 2, 3, take down your hand.
Chapter 4 Activating the Pineal Gland
During the process of Right Brain Development training, the Pineal Gland is gradually activated. After closing the eyes, various scenes can be seen in the pitch-black darkness of the eyelids. In the field of parapsychology, this visual experience is called “Mental Imagery”. The appearance of Mental Imagery during the right brain activation process is divided into 7 stages:
- Close both eyes, pitch black, nothing can be seen;
- In the pitch black, it feels as if something is moving;
- Able to see blurry or unclear stable images, or able to see bright light;
- Begin to see clear, still, colored images;
- Able to see movie-like animated images;
- Able to arbitrarily create and see image scenes one wishes to see;
- Able to see image scenes related to information sources.
After a person’s right brain is trained and the Pineal Gland is activated, their Brainwaves can resonate with waves of a wider frequency range in the universe, converting them into images and sounds in the brain. Therefore, even with eyes blindfolded, one can easily perceive the external material world. Ordinary Right Brain Development reaches at most the 4th or 5th stage. Reaching this stage allows for the good application of some memory techniques, mind maps, etc., and a foundation for this can be laid by training with 1,000 images. However, after activating the Pineal Gland, a person’s focus and self-confidence can reach a higher level. It is of great help for the improvement of self-awareness, thinking, behavioral habits, and personality. Only then can groups with HSP (clairvoyance, telepathy, tactile force, precognition, psychokinesis) and Photographic Memory, Wave Speed Reading, and Photographic Memory (never forgetting) be cultivated. Therefore, the activation of the Pineal Gland is required for the complete development of right brain functions.
There are generally several ways to activate the Pineal Gland:
- Light Gazing Training.
- Vocal chanting and reading.
- Tapping and vibration.
- Other methods: such as electrical stimulation, Qigong, meditation, accidental injuries, etc.
Fundamentally, no matter which method, it cannot be separated from the relaxation, focus, and imagination of the body and mind. When the Pineal Gland is activated, the person’s back neck and Yuzhen position will have obvious current pulsing reactions or physiological phenomena such as accelerated heartbeat. This part may experience meridian pulsing or even electric-shock-like sensations (children almost never feel these). At this point, memory, self-confidence, and imagination feel multiplied because the brain system of “Right Brain - Midbrain - Pineal Gland” for processing information has been activated and begun to adapt.
Being able to do Blindfolded Color Discrimination indicates that the Pineal Gland has been fully activated, the foundation for all right brain functions has been laid, and the channel to human brain potential has been opened. Whether moving towards Rapid Memory, Photographic Memory, Wave Speed Reading, or ESP extrasensory abilities, it is no longer an unattainable thing. For adults, being able to see clear images created at will with closed eyes means the Pineal Gland has been fully activated; there is no need to overly pursue the ability of Blindfolded Color Discrimination.
Light Gazing Training
Using Light Gazing Training to activate the Pineal Gland and develop the right brain is the most common initiation training. This method borrows from Makoto Shichida’s method of Right Brain Development for young children. This method makes children full of curiosity, fun, and feels magical, so children do not feel bored using this set of methods, thus conducting training happily and activating the Pineal Gland.
-
Let the children play happily and relax themselves; there must be no mandatory regulations. 2. First look at a light bulb (60 watts, about 1 meter away), without blinking, for about 30 seconds. Then, let the children close their eyes. T: Now there is a very bright, very red small red dot in front of your eyes. Look clearly. Very good. Now turn it into green. Can you turn it into green? S: Yes. T: Hmm, very good. Everyone is great. Now everyone turn it into yellow again. Yellow, like a banana, a very clear yellow dot. Very good. Now change colors at will. Nod if you can change colors at will. Very good. Now everyone turn this bright spot into a red apple and a yellow banana again.
-
Play for a while.
-
Look at the Yellow Card for 30 seconds, close eyes, and only look at the blue center. T: Okay, now look clearly at the image in front of you. What does it look like? S: The middle is a yellow circle, the surroundings are blue. T: Very good. Now students turn it into the same color you just saw, with blue in the middle and yellow on the surroundings. You can do it. Has everyone changed it? S: Changed. T: Okay, everyone is amazing. Now everyone try to keep this image in front of your eyes for as long as possible. (Pause for about a minute until the image disappears). Okay, everyone slowly open your eyes. Did you just see a very clear Yellow Card, especially bright? S: Yes.
-
Look at the Red-Yellow-Blue Card. T: Okay, now let’s look at a Red Card together. Don’t blink (30 seconds). Now everyone only look at the red square. Close your eyes, what do you see? S: A green square. T: Everyone is great. Now you yourself turn the green square into a red square, just like what you just saw. Have you changed it? S: Yes. T: Okay, now everyone freely turn it into yellow, blue, or whatever color you like. Now everyone can already change colors at will. We will now start changing shapes. You can turn it into a red five-pointed star, or a green triangle, or a red apple, a yellow banana, a blue ocean, or a green big tree. (Speaking speed should be slow, control the progress according to the children’s situation).
In addition to the method of activating the Pineal Gadget through Light Gazing Training, there are many other methods, but the author has not tried them in his Right Brain Development training. This manual lists a few of them here for readers’ reference only.
Candlelight Gazing Training Method
Close your eyes and breathe slowly, bringing the brain into a Theta (θ) wave state.
Open your eyes, place a candle upright 1.5 meters away, and gaze at the candlelight for one minute. Then close your eyes and gaze at the afterimage of the candlelight. Repeat this three times.
Please perform this candlelight afterimage training every day. Complete the following afterimage training steps one by one, and then proceed with the white light sphere training.
-
Be able to clearly see the afterimage of the white light sphere for a long time;
-
The Mental Imagery of the candle appears when closing the eyes;
-
A super-golden outline emerges when closing the eyes;
-
Be able to freely transform the golden outline into a triangle or a square;
-
Close your eyes, let blue appear before your eyes, and be able to generate the Mental Imagery of a white light sphere within the blue;
-
Through imagination, be able to lower the white light sphere to the Dantian (about 3 cm below the navel) area, and be able to move the white light sphere to any part of the body;
-
Close your eyes, imagine the sun and the sea, let the seaside scenery appear in the imagination, and be able to let yourself appear in the Mental Imagery of the scenery;
-
Imagine a glowing white sphere in front of the forehead; the sphere descends to the heart area causing the heart to emit light; imagine the heart area emitting light and enveloping the whole body.
The key point of this training is to let the Third Eye open amidst the light, meditate, breathe, and be able to produce the Mental Imagery of oneself being enveloped by white light.
Sun Gazing Method
This method is relatively famous in India and is also used by Qigong masters in China. There is an Android platform mobile app called “Sun Gazing”, which can also help practice the correct way of sun gazing.
Below are the training points for the Qigong method of gazing at the rising sun and breathing.
Training Method:
- Sun gazing should be chosen in summer or seasons with higher temperatures, at the time of sunrise in the morning or sunset in the evening, to avoid strong sunlight injuring the eyes. 2. Face the red sun; sitting normally, sitting cross-legged, or standing in a stance are all acceptable. Relax the whole body, tongue against the upper palate, lips slightly closed, and both eyes gaze intently at the sun without moving. 3. When inhaling, imagine the red golden light and heat of the sun being inhaled into the brain from the center of the forehead (Tianyi point); when exhaling, imagine the golden light and heat staying in the brain, while exhaling the turbid air deeply, evenly, and slowly from the center of the forehead (Tianyi point). 4. Use reverse abdominal breathing until the center of the forehead feels hot and swollen. 5. Usually, when there is no sun, you can also practice facing a lamp. When you can vaguely see your own skeleton with your eyes closed, you have achieved great success.
Essentials: Be empty and relaxed; relax the whole body, and keep the brain free of distracting thoughts. Any occurrence of swelling pain in the forehead, swelling in the Brow, or tearing eyes is a normal phenomenon; do not mind it, and always keep your mind focused on the Tianyi point. The speed of mastery is fast for one month, slow for a hundred days. The speed depends on the strength of willpower, whether the mind is focused, and age is also a major factor; younger ages are faster.
Note:
-
Usually imagine that there is another eye in the brain, experiencing the energy of light sources such as sunlight, moonlight, and lamplight, as well as the light of the universe entering the Tianyi point.
-
After the Opening Eye (a term in Chinese Qigong, referring to the Pineal Gland) is opened, Vital Energy easily leaks away. One must have wisdom but not use it, so as to increase wisdom; otherwise, it will shorten lifespan. Use it less and with caution. 3. Only by emphasizing virtue and the Tao can one consolidate, develop, and improve.
Vocal Music Listening and Reading
In the Right Brain Development training course, the main method is to listen to some mid-to-high frequency music to stimulate the right brain, used to enhance and consolidate the Mental Imagery Ability of Right Brain Development. The method of activating the Pineal Gland through the stimulation of music and recitation has not been deeply explored and researched; it is for reference only here.
Training Process:
-
Instructor’s guide: Next, the game we are going to play is listening to music and sharing happiness. In a moment, we will close our eyes and listen to music quietly for about five or six minutes. After listening to the music, everyone will write down the scenes they saw while listening to the music and share them with everyone.
-
Breathe deeply and relax.
-
Play the music.
-
After the music stops, let the trainees close their eyes to recall and organize the scenes seen while listening to the music for two minutes.
-
Let the trainees write down the content of the scenes they saw for 5 minutes.
-
Let the trainees read aloud the scenes they wrote down and share them with their classmates.
Activating the Pineal Gland with Music
Numerous experiments have proven that the vibration of sound can be converted into activation energy for the brain. In particular, the vibration produced by high-frequency sounds can resonate with the deep parts of the brain and cause changes—and the most obvious area of change is the “Midbrain”, located deep within the brain. Regarding the Midbrain, the physiological characteristics we already know are:
-
Located in the depths of the brain, above the brainstem, it is the collective name for the various thalami.
-
It concentrates all nerves and also controls all endocrine glands.
-
It connects to the Pineal Gland (commonly known as the human Third Eye) and is its terminal device.
Through experience and investigation, it has been found that the Midbrain is the location of spiritual existence, the center of self-awareness generation, and the area where thinking, behavioral habits, and personality are determined. In other words, after activating the Midbrain through auditory stimulation, these can all be improved.
Some institutions use the method of listening to music to achieve the goal of activating the Pineal Gland. These music tracks can be found in large quantities on the internet using the keyword “activate Pineal Gland video”. However, it must be combined with systematic training methods such as meditation to open the Pineal Gland. The author has also tried some music on some adults and achieved certain results. The methods and precautions for listening to this music are as follows:
- Relax the body, empty the mind, keep the brain free of distracting thoughts, and keep the mood calm. 2. It is better to wear high-quality headphones to listen. 3. Close your eyes when listening to music. 4. Focus your attention on sounds that can cause resonance, such as “Ohm”, “Weng”, “OM”, and continue to focus on this sound; if there is light or images in the brain while listening to music, do not panic, this is a good phenomenon. 5. Do not listen to music for more than 60 minutes a day, because the brain needs rest. 6. Do not be impatient or have bad intentions; be grateful to this world. 7. After listening for a period of time, having a feeling of pressure in the forehead area, feeling the Yuzhen point pulsating, etc., are all good phenomena. 8. Keep listening every day until you feel you can see clear scenes created arbitrarily by yourself. 9. Having a crystal ball by your side will accelerate your progress. 10. Pregnant women, pacemaker users, those prone to convulsions, photosensitive patients, and epilepsy patients should not listen to this type of music.
Activating the Pineal Gland through Recitation
Not only music, but also reading aloud and reciting can activate the Pineal Gland. A large amount of repetitive reading aloud can allow you to unconsciously enter a state of selflessness, with complete concentration of attention, unity of consciousness, and the opening of the subconscious circuit.
Example 1:
In fact, since ancient times, there has been a method to open the super-memory circuit called the “Akasagarbha Mantra Retention Method”. This secret method is to recite the mantra “Nan Mou A Jia She Jie Po Ye An A Li Jia Mo Li Sha Wa Ke” (nan móue jia she jie pó ye ane li jia moli sha wake) 10,000 times a day, and 1 million times in 100 days. It is said that the Japanese Master of Laws (Kukai) practiced this method and obtained the ability of Photographic Memory and extraordinary abilities beyond ordinary people.
In fact, many contemporary Buddhist practitioners also mention that reciting ten thousand volumes of scriptures is not as good as the recitation technique of just reciting the sentence “Amitabha”. It doesn’t matter if you understand the meaning; the effect is very good. Therefore, some masters require newly initiated disciples to just recite scriptures aloud according to the rhythm. Physiologically in the brain, doing so can promote the development of right brain nerves.
Example 2:
Zeng Guofan was one of the most influential figures in Chinese history. The Neo-Confucian scholar Wo Ren said of him, “Naturally intelligent, Photographic Memory, rare talent.” However, his childhood talent was not high; he was not the kind of child prodigy with Photographic Memory or the ability to read ten lines at a glance. He was about the same as ordinary children, and could even be called dull. One of the anecdotes about repeated reading during his schoolboy days is as follows:
One night he was reading at home. He had read an article many times repeatedly but still could not memorize it. At this time, a thief came to the house and hid under the eaves, hoping to get some benefit after the scholar went to sleep. But he waited and waited, and the scholar just didn’t go to sleep, still reading that article over and over again. Finally, the thief got impatient, yelled at him, and left.
Example 3:
Ancient teachers would always have their students shake their heads and read poems over and over again. This kind of boring repetitive reading without seeking deep understanding is somewhat similar to the process of chanting. Unintentionally, it activated the child’s Pineal Gland, making them smarter.
From the above, it can be seen that the wisdom of ancient masters was so outstanding because of the popular secret methods of activating potential in early times, while the ancient learning habits ridiculed by contemporary people hide more brilliant effects.
Training points for recitation or chanting:
-
Choose the content of recitation at will; it needs to be simple, and it is best not to understand its meaning. Understanding the meaning too easily leads to distraction and slows down the high-speed circulation of information within the right brain system.
-
The key is persistence and concentration. Growth effects vary from person to person because different people have different levels of Pineal Gland activity.
Just as “a journey of a thousand miles begins with a single step,” when applied to persisting in recitation, the result is that one will produce a powerful resonant sound, activating the rigid Pineal Gland circuit, thereby significantly improving memory, perception, and many other aspects.
During the training process, if you cover your ears with both hands, you can not only concentrate better, but also hear the electromagnetic squeaking sound in your ears after entering the state of unconscious recitation. Entering the state will be accompanied by physiological characteristics such as sweating. In addition, the speed of recitation after entering the state will involuntarily become faster.
Persist in reading aloud for half an hour every day, and the Midbrain circuit (connected to the Pineal Gland) can be opened within 3 months. If you work hard, it can be opened in a few weeks (varies by person). Many early education experts and Sinology experts advocate that children recite Sinology classics from a young age. Just reading aloud loudly is of great benefit to children. In fact, this is a method to keep the information exchange between children’s Pineal Gland, Midbrain, and brain unobstructed.
Reminder: If you are sitting and reciting with your hands covering your ears, it is recommended to get up and adjust within 30 to 60 minutes to avoid poor blood circulation in the lower limbs.
Speed Listening and Speed Reading
Speed listening and speed reading utilize the method of adapting to rapid intake and exchange of information to activate the Pineal Gland. The left brain operates at a low rhythm, while the right brain operates at a high rhythm. When you input a large amount of information into the right brain through the eyes and ears at as high a speed as possible, it naturally promotes the activation of the right brain. Speed listening can promote the activation of the right brain. It can naturally start the massive memory function and massive high-speed automatic processing function of the right brain, causing the entire brain to start exerting its maximum ability.
We should understand that the right brain is a high-speed brain, and to promote the activation of the right brain, ultra-high-speed stimulation is indispensable. The more instantaneous the stimulation, the more it can affect the right brain. Humans inherently possess this ability; for an object glanced at briefly, its entirety can be remembered in the mind. This ability is called Mental Imagery Ability. It is said that Goethe maintained this Mental Imagery Ability throughout his life. We believe that artists and geniuses, for some unknown reason, developed this ability in early childhood and maintained it throughout their lives.
In speed reading training, performing one-minute visual reading training is very important. That is, use one minute to read, then close your eyes, and while letting the text read through intuitive imagery float in your mind, write them down. In such training, perhaps only four or five words can initially float in the mind, but as the practice deepens, the words appearing in the brain’s表象 (representation) will constantly increase.
Using one-minute visual reading to memorize English words is a very good method. Initially, only 10 words, 20 words, and then gradually increase, finally reaching memorizing 100 words at a time. In this training, the key point is to imagine that no matter what the content is, you can memorize it in an instant.
When children do ESP games, Mental Imagery training, and memory games, let the children imagine that they can achieve 100% success, and at the same time, teachers should also imagine this strongly, which can double the effect of training. The same is true when doing speed reading exercises.
The training for speed listening and speed reading is to use the eyes to chase the pictures or text in the textbook as fast as possible, while the ears simultaneously listen to tapes, CDs, or audio files played at double speed, and the mouth recites. At this time, if you cover your ears and speak, you can hear the “internal vibration sound”. It is not enough to use only the eyes to see to remember. Using hearing (preferably vibration sound), making sounds, and imagining at the same time is the good method. This method plays from 2x speed to 4x speed, from slow to fast. As long as you can guarantee 15 minutes of listening time every day, generally speaking, within 2 to 3 months, the user’s nine abilities—concentration, memory, comprehension, self-control, reading ability, expression, observation, judgment, and creativity—will be significantly improved.
In principle, all audio teaching materials can be used as training materials for speed listening. It is recommended to use whatever you are learning as speed listening material. Choose relevant English textbooks for learning English, and management textbooks for learning management. There are many free materials on the internet. In addition, there are many speed listening training software, such as “Feike Visual Reading Speed Listener”, which is also a very good choice to train step by step according to the software.
Tapping Vibration
Tapping vibration, like vocal reading aloud, also causes resonance vibration in the brain nerves. This method is used less frequently and is generally not used alone. For example, in Tao’s Inspiration Learning Method, Teacher Yongdi Tao requires students to follow the music and voice prompts during the student’s wisdom-opening process and use their hands to gently and quickly tap both sides of the forehead for 2 minutes, while imagining the light on the forehead rotating rapidly. This method makes the trainees full of fun during the experience, rapidly improves the speed of Right Brain Development, and can achieve very good wisdom-opening effects.
Other Methods
There are many ways to activate the function of the Pineal Gland. Regardless of the method, the common ground is first, focus; second, concentration; and third, persistence. Of course, the detailed processes of the training methods listed in this book can be searched and investigated by oneself; the author will not elaborate too much here. Remember that practice yields truth. If you are a beginner, do not give up trying and persisting just because of what someone else says. For any training method, the training volume and time should be selected, adjusted, and distributed according to your own situation and environmental conditions. Below, some other methods are listed for readers’ understanding only. Educators and learners of Right Brain Development should not be deliberately mysterious or confused by the multitude of methods, but should grasp the essence. There are no shortcuts here; only gradual progress is the path to success.
Meditation
Ming means to extinguish. Xiang means your thinking and thoughts. Meditation is the act of removing the thoughts and worries you want to think about, to regain perception. It was originally a spiritual cultivation behavior passed down in myths and religions, known as Zen, Qigong, Yoga, Spiritual Practice, etc. Nowadays, it has become a popular way for modern people to regulate their body and mind and pursue spiritual comfort. It is also an important means of developing the Pineal Gland.
The process of meditation should not be understood merely as relaxation, but rather as focusing attention on a single point. In this way, Brainwaves will shift from active Beta waves to the Alpha wavelength, which is the threshold of sleep. Thus, the left brain, which dominates daily thinking, enters a resting state, and the right brain becomes active, thereby activating the entire Pineal Gland system. Of course, the purpose of being focused without distracting thoughts is to prevent entering a sleep state, but rather to remain awake and comfortable while perceiving visible information, achieving a state of self-regulation.
Physiological sensory phenomena produced during the meditation training process: During meditation, one may see light sources of different colors, and even see different scenes; this is due to the perception after the Pineal Gland becomes active. Beginners are prone to sweating and a state of bodily heat at the beginning. In the later stages, when entering deep stillness, the body feels cool and comfortable, and the mindset is stable.
The process of perceptual advancement in meditation can be understood using the principle of computer data decoding. The data capacity required to form an ordinary picture is approximately equivalent to that of an ordinary electronic novel. At the same time, compared to text, images are more intuitive, easier to express, and easier for people to absorb. It can be said that images are a higher form of information composition than text. “Graphic outlines — black and white images — colored images — evolving into realistic scenes” — this process requires more data construction sequentially.
Coincidentally, for an adult with a fully calcified Pineal Gland, the progress in their activation and acquisition of perceptual information involves similar steps: “Black and white blurry outlines — clear black and white static or moving scenes — color realistic scenes (as shown below).” The entire process of perceptual progress is actually the process of the Pineal Gland decoding higher frequency electromagnetic waves.
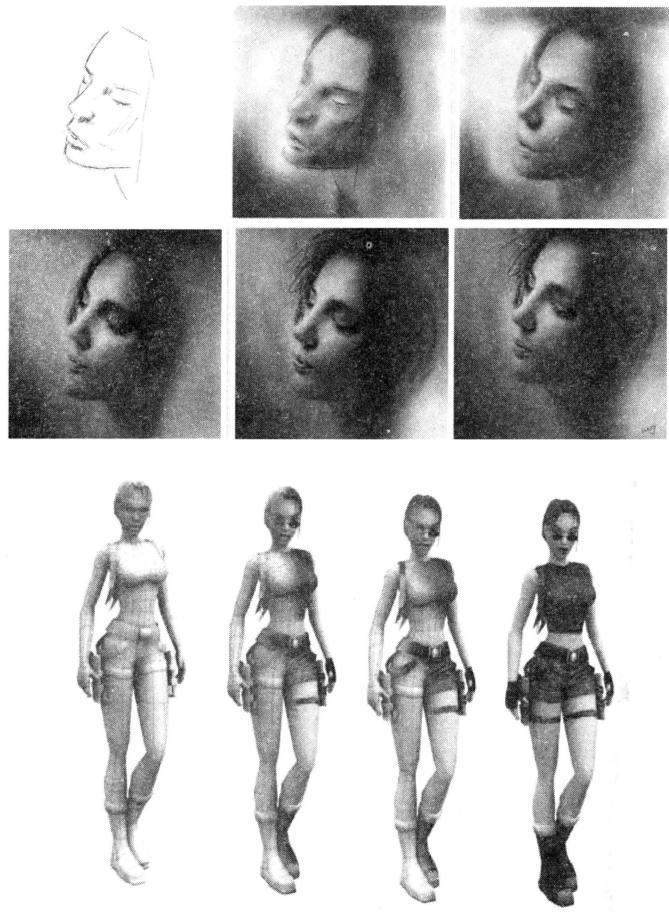
This evolution of meditation perception scenes provides a good reference for beginners. Of course, pursuing the sight of higher-level, clearer scenes is not the most important objective. As long as you can make yourself comfortable and cool during meditation, you are performing self-regulation. In this restless and noisy era, this allows the inner mind to find peace and a place to rest.
At the end of the introduction to meditation, I would like to emphasize that ancient civilizations formed their own meditation systems based on different cultural evolutions, but the purpose is the same: to develop one’s own energy field, activate the Pineal Gland, and obtain higher perception and comfort. Essentially, it is just a conversion of consciousness frequency. Friends interested in developing the right brain through meditation can refer to Meditation: A Magical Psychotherapy by Xu Xu.
Electrical Stimulation
In recent years, people in the Taiwan region have experimented using electrical stimulation methods, and the experiments have achieved certain results.
Through repeated experiments, it was found that high-voltage, low-frequency DC pulses are most sensitive to the Pineal Gland and are the easiest to activate it. The key to the procedure is the grasp of electric quantity, frequency, and discharge time. We randomly selected 6 girls and 6 boys aged 12–15 for Pineal Gland activation experiments. Before the procedure, we first explained the principles to them to eliminate nervousness and stimulate interest in Special Functions. Then they sat upright on an insulated wooden stool, relaxed their whole bodies, and smiled. We placed the bioelectricity “negative” pole on their coccyx and the “positive” pole on the Tianyi (Third Eye). We first used a smaller electric charge to allow for slight adaptation, then used high potential for deep stimulation. At this moment, under the instantaneous bioelectric stimulation, the Pineal Gland showed a lightning-like white arc light, and the degenerated retina was activated. Among them, 7 people instantly opened their Tianyi and developed clairvoyance functions, 2 people developed internal vision, and the remaining 3 people developed light-seeing functions to varying degrees. The entire function development experiment was extremely successful.
(Excerpt from “Right Brain Memory Forum” URL: http://bbs.jiyifa.cn/)
Qigong
Chinese Qigong refers to the process of activating the Pineal Gland as “Kai Tianmu” (Opening the Third Eye). The Tianmu is located at the center of the line connecting the two eyebrows, at the Brow (some also consider the point one inch above the Brow or the midpoint between the Brow and eyes as the Tianmu), also known as the Third Eye, the Sky Eye, or the Clairvoyant Eye. Chinese Qigong is fundamentally based on physical fitness and cultivating character, but regardless of the type of Qigong, it has the effect of “developing wisdom.” The methods of Chinese Qigong, Taoist Qigong, and Buddhist Qigong all lie in “entering stillness” or “entering samadhi,” which is very consistent with the three basic elements of Right Brain Development: relaxation, focus, and imagination. Some attained monks and great Qigong masters who have opened their “Sky Eye” or even have other “Special Functions” do not regard “Opening the Third Eye” or other so-called Special Functions as miraculous, nor do they take the single acquisition of “developing wisdom” as the goal of practice. However, the author still recommends that students learn the “True Qi Circulation Method.” This method is relatively simple and easy to learn. Not only will it be of great help in promoting the activation of the Pineal Gland, but if you persist in practicing, you will inevitably gain immense benefits.
It is precisely based on the principle of activating the Pineal Gland to stimulate human potential that popular early education, prodigy, or Right Brain Memory training classes on the market have similar prompts: “The most suitable group is children aged 1–12.” In fact, every age group needs exercise. If people can know the method of activating the Pineal Gland and apply it in practice, then the brain can become more flexible, and functions that originally operated slowly will also begin to accelerate.
In this way, children with low learning abilities can improve their memory, while adults can greatly improve the efficiency of brain usage and maintain a keen mind for a long time. It will make people’s work, study, and the operation of society simpler, more efficient, and more relaxed. Therefore, education related to stimulating the right brain or Pineal Gland should be popularized and promoted by society.
Chapter 5 Relaxation and Breathing Training
In order to use the potential in our right brain, we must let our left brain rest first. That is to say, to use our right brain, we must make the left brain and right brain rest alternately. There are three procedures for developing the right brain: relaxation, imagination, and suggestion. Relaxation means calming the mind while relaxing the body and mind as much as possible. Adjusting breathing is an effective way to calm the mind and relax the body.
An adult’s brain weighs about 1500 grams, accounting for 2.5%–3% of their body weight, yet the blood flow required by the brain accounts for 15%–20% of the heart’s stroke volume, and its oxygen consumption accounts for 20%–25% of the body’s total oxygen consumption. The brain’s oxygen consumption is relatively high during times of focus. Relaxation and proper breathing methods can obtain more oxygen while reducing the oxygen consumption of body muscles, supplying more oxygen to the brain. Proper breathing methods can also calm the mind and evoke the correct state of focus. To unleash brain potential, relaxation and breathing training are indispensable and important links in daily Right Brain Development training. Below are some methods. These methods are used during the training process to find the method suitable for the individual student and form a habit.
Abdominal Deep Breathing
It can be done while standing, sitting, lying down, or walking, at any time, but lying in bed is best. Lie supine on the bed, loosen the belt, relax your limbs, concentrate your mind, and eliminate distracting thoughts. Slowly inhale through the nose, bulging the belly, hold each breath for 10–15 seconds, then exhale slowly, breathing 4 times per minute. Each session of Abdominal Deep Breathing takes 5–10 minutes, with no limit on the number of times per day. This method of Abdominal Deep Breathing is actually a simplified Abdominal Breathing Method. If you can persist in doing Abdominal Deep Breathing every day for many years, you will achieve the miraculous effect of strengthening the body, which is like “unintentionally planting a willow tree and finding shade.”
Natural Abdominal Breathing Method
- Assume a supine or comfortable sitting position and relax the whole body.
- Observe natural breathing for a while.
- Place your right hand on your navel and your left hand on your chest.
- When inhaling, expand the abdomen outward to the maximum extent, keeping the chest as still as possible. When exhaling, contract the abdomen inward to the maximum extent, keeping the chest as still as possible.
- Repeat this cycle, keeping the rhythm of each breath consistent. Carefully experience the rise and fall of the abdomen.
- After a period of practice, you can remove your hands and just use your consciousness to focus on the breathing process.
- Do not be nervous or force the breathing process. You should pay attention to the practice and its effect on the body. When inhaling, feel the breath start to pass through the nasal cavity and throat and fully concentrate in the lungs. As the lung volume gradually increases and the chest wall is kept still, the diaphragm is forced to sink, and the abdomen bulges slightly outward. When exhaling, retract the abdomen inward and the diaphragm lifts up, expelling a large amount of turbid air from the body.
- Treat the abdomen like a ball, inhale through the nose to make the abdomen bulge, pause for a second or two, then exhale through the mouth until the abdominal wall sinks. About five or six times per minute is sufficient. Generally, twice a day, about 10 minutes each time.
The key to Natural Abdominal Breathing is: whether inhaling or exhaling, try to reach the “limit” volume, to the point where you cannot inhale or exhale any more; similarly, the abdomen should also contract and expand to the extreme point. It is even better if each breath can reach the lower abdomen.
Dantian Breathing Training Method
- Sit upright on a chair, straighten your back, tuck your chin in, and close your eyes.
- Relax all muscles and assume a stable posture. If sitting feels uncomfortable or imbalanced, adjust the posture.
- Use fine, long, and quiet deep breathing. Avoid rapid breathing that makes sound. Keep the mouth naturally closed, relax the cheeks and lips, and inhale and exhale through the nose.
- Breathing speed: For adults, inhale for about 6 seconds, and exhale for twice that time, 12 seconds. For primary school students with smaller lung capacity, inhale for 4–5 seconds and exhale for 8–10 seconds.
- Compared to normal breathing, this will feel quite slow, but after doing it several times, it will become natural. The average person breathes about 17 times per minute. Now this is reduced to 4–5 times, which will activate the autonomic nerves and stabilize the body and mind.
- After exhaling, imagine that about 30% of the inhaled air still remains in the Dantian (about 3 cm below the navel). Importantly, keep in mind that most of the inhaled air has been exhaled, and fresh air is entering the abdomen.
- When breathing, when exhaling, try to contract the lower abdomen inward while forcefully contracting the diaphragm, maintaining the exertion state of the lower abdomen. When inhaling, try to expand the lower abdomen outward, making the lower abdomen reach an arc shape. When exhaling, imagine that the turbid gas in the body is completely expelled. When inhaling, imagine that the energy of the universe enters from the top of the head (Baihui point) into the face, neck, chest, and abdomen, filling the whole body with the energy of the universe.
It is important to learn to do these things in an unconscious state. Because if you add nervous consciousness to your breathing, the door to concentration cannot be opened.
Whole Body Relaxation Method
The Whole Body Relaxation Method is a practice for relaxing muscles. By tensing and relaxing muscles, the body feels a state of relaxation, thereby soothing tense emotions. First, choose a quiet, comfortable environment, then sit on a chair, close your eyes, try not to think, and let your whole body relax. For each muscle tightening action below, maintain for about 5 seconds, relax for about 10 seconds, and repeat 2–3 times.
Hands — Extend both hands forward horizontally, clench fists tightly, then relax. After repeating several times, lower both hands and feel the state of muscle relaxation.
Forehead — Forcefully raise the forehead upward to tighten the muscles, then relax, and repeat the action.
Face — Pull the eyebrows, nose, and mouth toward the center to tighten, then relax, and repeat the action.
Teeth — Clench your teeth forcefully, then relax, and repeat the action.
Mouth — Open your mouth forcefully, press the tongue against the lower front teeth, then relax, and repeat the action.
Head — Sit up straight, tuck your chin against your chest, stretch both arms backward forcefully, pushing the chest forward, then relax, return to the original sitting posture, and repeat the action.
Waist — Sit up straight, bend your waist backward, then return to the original sitting posture, and repeat the action.
Deep Breathing — Take two deep breaths.
Feet — Forcefully extend both feet forward to a horizontal position to tighten muscles, then relax, and repeat the action.
Whole Body Relaxation — Keep the whole body relaxed for about 5–10 minutes.
The entire practice takes about 15–20 minutes to complete. Practice 1–2 times a day, and gradually the skills will become proficient; after proficiency, you can naturally relax the entire body even without doing the tightening actions.
Breathing Relaxation
Before or after the training, the Instructor can use the following language to give trainees some positive suggestions: “After the relaxation training, you will experience an unprecedented feeling of relaxation,” “How did it go this time? You feel very comfortable and relaxed, right?”
Training Method:
-
Sit on a stool or chair with both shoulders hanging naturally. Close your eyes while relaxing the muscles of your whole body, and place your hands flat on your thighs.
-
Inhale through the nose and exhale through the mouth. Slow down the rhythm of breathing; the exhalation speed is twice the inhalation speed. Close your eyes and take 3 quiet deep breaths. At the same time, eliminate distracting thoughts and direct your attention to the edges of your hands and thighs, guiding your mind to the palms of your hands.
-
Soon, you will feel a sense of warmth slowly generating in the part where your attention was first directed, and then gradually spreading to the entire palm. At this time, you can silently recite in your heart: “Calm down, calm down, and both hands will become warm.”
-
Take 5 deep breaths, count slowly to 5, and open your eyes.
-
The entire exercise takes about 7 minutes to complete.
Muscle Relaxation
In today’s training, we have arranged for whole-body relaxation. Whole-body relaxation is one of the relaxation techniques. It achieves the effect of physical and mental relaxation by tightening and then relaxing the muscles of the body.
Training Method:
-
Sit comfortably on a stool or chair, eliminate distracting thoughts, concentrate your mind, and follow the instructions to proceed.
-
Close your eyes slightly, clench your right fist tightly for about 3 seconds, then relax for 10 seconds. At this time, imagine it like a spring that you pulled tight being released. After tightening the muscle, count to 3 in your heart, then relax.
-
After completing the exercise for the right hand, we use the same method to relax the muscles of the left hand, shoulders, face, back, lower limbs, and other parts, so that the whole body gets relaxed.
-
At the beginning, the training time can be appropriately extended. After becoming proficient, 7 minutes a day, once a day.
Self-Hypnosis Method
The biggest obstacle to developing the right brain is the interference from the left brain. Because people are accustomed to using the left brain for language and logical thinking, the functioning of the right brain is hindered. This is the conclusion reached by many researchers. Since the left brain interferes with and hinders the functioning of the right brain, how can we eliminate this interference? An ultimate solution is to train oneself to enter a state of deep hypnosis—self-hypnosis. Because right brain development or right brain education requires passing this hurdle first, so that subsequent exercises will yield twice the result with half the effort.
The self-hypnosis method is a method that uses self-suggestion to focus the mind on a specific goal. There are many methods used for self-hypnosis, such as the Indian “Yoga Practice”, the Buddhist “Zazen Meditation Method”, the Western European “Progressive Relaxation Method”, and the Chinese “Internal Nourishment Qigong Method”, etc. These are all methods that achieve the goal of hypnosis through self-suggestion. Here is a relaxation and calming method from Yoga practice:
“Take off your shirt and shoes, undo your belt and tie, and if you wear glasses, please take them off too. Lie straight on the mattress on the bed. Raise your arms, passing over your head. Straighten your feet, keeping your whole body as stiff as possible. Then, quickly place your hands on your sides and let your whole body relax. Close your eyes, first concentrate your mind on the tips of your toes, and then relax your toes. Imagine your feet, knees, and thighs are all comfortably soaked in water one by one. In this way, all the muscles in your body are relaxed. Next, relax your spine and shoulders, then relax your arms, hands, fingers, and chin. The muscles on your face are also relaxed. Now, imagine your body gradually becoming heavier, finally sinking deep into the mattress. In this way, you no longer feel your own weight. Maintain this state for two or three minutes—completely relaxed, feeling very comfortable. Please imagine that you are a cloud, a particularly light cloud, with all thoughts emptied, floating in the vast blue sky.”
As the above thoughts deepen, the body and mind continue to relax. Using this technique, we can quickly guide ourselves from left-brain consciousness to right-brain consciousness.
Instructor Hypnosis Guided Relaxation
Through the Instructor’s intimate, gentle, yet firm hypnotic language guidance, it can help better adjust the state and allow the left-brain consciousness to further relax. The hypnotic relaxation here can be used for adjustment before intense mental training or for rest afterwards.
Hypnotic Relaxation Script (1)
When starting the practice, please find a quiet environment, lying down or sitting down. Adjust your body to the most comfortable posture, close your eyes, and start to relax your mood. Pay attention to your breathing. You need to breathe very deeply and very regularly. Slowly suck the air in, and then slowly push the air out.
When inhaling, imagine that you are sucking the oxygen in the air into your body. The air enters your body through your nose, flows through the nasal cavity, trachea, enters your lungs, permeates into your blood, and is transported to every part and every cell of your body, making your body feel very relaxed and comfortable…
When exhaling, imagine that you are spitting out all the waste gas from your body, and also sending out all sorrow, worry, tension, and fatigue. Let all unpleasantness and discomfort go away from you. You only feel very relaxed and comfortable…
Every breath will take you into a deeper, more relaxed, and more comfortable state…
Now, continue to breathe deeply. While breathing deeply, listen to my guidance. Naturally, you don’t need to think about anything, and you don’t want to think about anything either. Just follow my guidance, and soon you will enter a very deep, very comfortable hypnotic state…
Now, pay attention to the top of your head, let your scalp relax… relax… your skull also relaxes… relax… Pay attention to your eyebrows, let the muscles near your eyebrows relax… relax… the muscles near your ears relax… relax… the muscles near your face relax… relax… Relax your neck… relax…
Relax your shoulders. Your shoulders usually bear too much tension, pressure, and worry.
Now, put it all down… let it go… Continue to relax your left hand… relax… relax your right hand…
Relax your chest, let every muscle and every bone relax… relax…
Relax your back, let your spine and the muscles of your back relax… relax… Thoroughly relax your abdominal muscles, relax… Your breathing becomes deeper and easier, and your mood becomes calmer.
Relax your left leg, relax…
Relax your right leg, let muscles and bones relax together… relax… Relax your feet… relax… every toe is relaxed…
Continue to breathe deeply (all the muscles in your body are relaxed, and your bones feel heavier and heavier, even unable to be lifted up).
You feel that your mood is very calm, serene, relaxed, and comfortable.
Now you feel very, very relaxed…
(Pause for 30 seconds)
Now, when I count from 10 to 1, you will open your eyes, return to the real world, return to a normal state, and then you will be fully awake, feeling incredibly comfortable.
10, slowly waking up, feeling that body and mind are very comfortable.
9… becoming more and more awake.
8… slowly restoring the normal feeling of the body.
7, becoming more and more awake.
6… heart is calm and serene.
5, becoming more and more awake.
4… feel that the whole body is full of vitality.
3, becoming more and more awake.
2, about to wake up, feeling great.
1… open your eyes, rub your ears, wipe your face, take a deep breath, move your body, you are fully awake.
Hypnotic Relaxation Script (2)
Okay, lie down completely, relax, and calm down.
Gently close your eyes and take a few deep breaths. It feels so relaxing.
Breathe easily, and let each breath take you into a deeper and deeper state of relaxation.
(Pause for 30 seconds)
Now, place your attention on exhalation, and feel the air flowing out of your nasal cavity…
Exhale with concentration, just like the feeling of expelling waste from the body… Every time you exhale, excitement and tension are released… Every time you exhale, emotions and pressure are breathed out… Now, thoroughly expel all waste toxins.
(Pause for 15 seconds)
Breathe easily, you have entered a deeper and deeper state of relaxation. External things begin to slowly move further and further away from you… The mind becomes very quiet.
You keep hearing my voice, and slowly you will only hear my voice. Any other sound will be far away from you. Interference or noise will only make you more focused.
(Pause for 15 seconds)
Breathe easily, you have entered a deeper and deeper state of relaxation. Now, place your attention on inhalation, and feel the air entering the nasal cavity.
Inhale with concentration, just like absorbing specific energy from the air… Every time you inhale, every cell in your body is filled with magical nutrients… Every time you inhale, more energy is injected into your whole body. Now, focus more on absorbing them all in.
(Pause for 15 seconds)
Breathe easily, you have entered a deeper and deeper state of relaxation, feeling very calm…
From now on, you will continue to relax until you hear me say the four words “Prepare to Wake Up”.
But remember, at any time, once you open your eyes, you will automatically return to the state of waking consciousness, immediately and completely waking up, and your body and mind will also adjust themselves to the best condition. (Note: The purpose of this suggestion is that if an unexpected situation occurs and the practice is forced to interrupt, the person can simultaneously disengage from the hypnotic state and return to normal consciousness. This is especially important when practicing alone!)
Okay, keep breathing easily… deeper and deeper… deeper and deeper…
Now, I am going to guide you to feel every part of your body. You will find that their strength rapidly disappears, becoming very loose and very heavy. The more you feel it, the heavier it becomes. Then you will feel more relaxed.
Okay, starting from the left foot. Feel that all strength in your left foot has disappeared… it is very heavy… Feel the right foot… all strength has disappeared… it is so heavy… Feel your buttocks… abdomen… strength has disappeared… very loose… waist… entire back… chest… strength has disappeared… left hand… right hand… strength has all disappeared… Feel your neck… feel your entire head… strength has disappeared…
Feel and see if there are any parts of the body that are still tense. As soon as you feel them, they immediately lose their strength and completely relax…
Now, feel the entire body at the same time. Strength has completely disappeared… thoroughly loosened… completely powerless… all loosened… the body slowly disappears… only breathing remains… very relaxed, unfettered… free… entering a wondrous state.
(Pause for 15 seconds)
Now, listen as I start counting from one to ten. For every number I count, you enter another deeper state of relaxation, and your Subconscious Mind will also become more open. One, deeper and deeper… Two… deeper and deeper… Three… Four… Five… calmer, more relaxed… Six… Seven, deeper and deeper… Eight… Nine… you have entered a very deep state of relaxation… Ten…
Now, imagine, fantasize, or feel that there is a beam of white light, shining straight down from directly above your chest, shining on your chest. The white light penetrates the skin, fills your lungs and heart. The white light fills your chest cavity, your chest is shining…
(Pause for 15 seconds)
The beam of light slowly spreads, gradually enveloping your whole body. Your whole body is bathed in white light. The wonderful fluctuations of the white light fill every cell, every muscle, every muscle nerve, illuminating your spine and the bones of your whole body. The white light carries the powerful life force of the universe, injecting into your blood vessels, nourishing every organ and tissue of your body.
Your whole body, from head to toe, emits white light, as bright and dazzling as a cluster of light.
…The energy of your whole body is unobstructed… full of vitality…
(Pause for 15 seconds)
The white light touches your soul, you feel comfort and courage… The white light surrounds you, conveying the universe’s eternal love for you…
In the next 10 minutes,
Let your body and mind be completely open to the white light. Let everything happen naturally. All experiences will be beneficial to you. Then, we are ready to end this hypnosis.
Okay, now we are going to end the hypnosis.
This experience is causing a wonderful transformation in your body and mind. Everything will happen in the way that is most beneficial to you…
Listen to my countdown, from ten to one. For every number I count, you will become more awake. When I count to one, you will be completely awake and return to your normal state of consciousness.
Now, “Prepare to Wake Up”, ten, start to wake up. Nine, slowly return to the present… return to this moment… Eight, every countdown makes you more awake. Seven… Six, becoming more and more awake, body feels very warm. Five, head feels very cool and comfortable… Four, becoming more and more awake, mind is very quiet… Three, awake. Two, already completely awake, ready to open your eyes, welcome the brand-new self. One, okay, open your eyes.
Chapter 6 Mental Imagery Training
When the object is not in front of us, the image that emerges in our mind is called a perceptual image, or the organizational pattern is called Mental Imagery. Some training institutions call it imagery. Generally, imagery is understood as an objective image created through the unique emotional activity of the creative subject. Imagery places more emphasis on the brain’s creative processing of images. The essence of Mental Imagery or imagery is presenting clear images in the brain. In psychology, it is called Eidetic Imagery. The phenomenon refers to the fact that when the facing stimulus disappears, the subject can still describe everything they just saw vividly and without omission. Psychologists believe that Eidetic Imagery only appears in childhood, and the number of people is about 5%. But in fact, at least 95% of children under the age of 12 can appear Mental Imagery through training, and adults can also appear Mental Imagery through persistent training. Mental Imagery training is the foundation of Right Brain Development. It is indispensable for the training and improvement of memory, reading ability, comprehension, thinking ability, and creativity.
Manifestations of Mental Imagery
In the fields of mnemonics or speed reading, the psychological phenomenon of Mental Imagery is often discussed, yet very few truly master it. Some people are born with Mental Imagery Ability or possess a strong foundation for it, but unfortunately, they do not know how to utilize it, assuming it is just a normal phenomenon. Others know the general purpose of Mental Imagery but struggle to progress due to a lack of cultivation methods, leaving them to sigh in despair. Now, I will lead you into the world of Mental Imagery, unveil its mysterious veil, and help you more easily master this source of power.
Manifestation of Mental Imagery 1: Profound and Direct Mental Imagery
To put it simply, Mental Imagery is the brain reproducing a previously seen picture before your eyes. This picture is the same as what you see with your eyes open, so it can be either three-dimensional or two-dimensional. This is a form of virtual reproduction of impression and sensation by the physical eyes; it is a virtual recollection and reproduction of the memory impressions of the eyes. Similarly, it is possible to reproduce smells you have previously experienced; I can currently recall about 5% of the authentic sensation of original smells (olfactory sense). I can also reproduce about 5% of the sensation of being hit by water while playing by the river (tactile sense). Sound can also be virtually reproduced (auditory sense), as can the sensation of eating food in the past (gustatory sense). Among the five senses, the memory impression of the eyes is the most profound, and the reproduction is the closest to reality. This is the fundamental reason why brain development abilities generally prioritize the development of graphic capabilities.
Manifestation of Mental Imagery 2: Clarity of Graphics is Related to Attention
Another manifestation of Mental Imagery is related to attention. When you see a Mental Imagery scene, it will not be completely clear all at once; only the parts of the scene where you focus your attention will become clear. To make a comparison, when you watch a TV program, you cannot clearly see every person or scene all at once; it is just like how only the place you focus your attention on becomes clear. This is determined by our field of vision. Regarding the relationship between the size of the field of vision and the area of the clear Mental Imagery image, the author is conducting further research. The preliminary theory is that the wider one’s natural field of vision, the larger the clear area when seeing Mental Imagery images. Whether this theory is correct requires everyone to work together to discuss and research.
The reproduction of Mental Imagery is built upon the basis of seeing the impression of an object multiple times before. The graphics of objects seen in daily life also have their clarity determined by attention. As long as we focus on one part of an object in our daily vision, the other places become blurred.
Mental Imagery scenes inherit this characteristic.
Manifestation of Mental Imagery 3: Synchronous Change Ability of Graphics
Once an imagined Mental Imagery picture appears, you can freely change the objects within the scene. Your thought is almost synchronized with the speed of the change in the scene. For example, if you imagine a cow, you can make any change you wish: you can peel off the cowhide, strip away the flesh, and finally take out the cow bones. As long as you can imagine a scenario, Mental Imagery can present this change process to you three-dimensionally and clearly, just like watching TV, and the speed is almost synchronized with your thoughts. As soon as you think of an idea, the graphics will immediately begin to change automatically.
Manifestation of Mental Imagery 4: Color, Texture, and the Five Senses Can All Be Changed at Will
After a Mental Imagery scene appears, we can freely change the colors of specific details in the picture. All five senses can be changed according to your will. For instance, if you imagine trees made of water, we can reproduce the shape of the trees and the texture of water, as well as some of the smell of water or wood. In an instant, you can switch the texture of water to fire. In short, in your Mental Imagery world, you can freely combine various senses to work together. You can combine textures, smells, or appearances that are originally impossible for objects, creating a strange yet clear sensation.
Because of the four major characteristics mentioned above, Mental Imagery is actually the specific manifestation of the body’s five sensory organs recalling and reproducing again. The recollection of physical sensations is what all current brain development pursuits aim for; speed reading and mnemonics are both constantly strengthening these sensations and enhancing their memory and reproduction.
I hope friends who have not yet achieved clear Mental Imagery will have a correct and comprehensive understanding of it and avoid falling into misconceptions.
Core Composition of Mental Imagery
Through the introduction above, I believe everyone has a general understanding. Next, we need to conduct a deeper study of Mental Imagery. Have you considered how Mental Imagery is composed?
Perhaps not many people know. Here, we will start researching Mental Imagery from the most basic place. What exactly is the composition of Mental Imagery? Mental Imagery is a picture, that is, a painting (whether 3D or 2D). A 3D painting can also be expressed in a 2D form, so let us first study the composition of 2D pictures. This simplifies the problem.
Graphics are composed of lines. The lines of our Mental Imagery graphics are the outlines that define the shape. As long as we master the memory and reproduction of these outlines, we master the Mental Imagery that can be seen clearly.
Why can most people’s Mental Imagery not possess the ability to change colors at will? Mainly because they have not achieved clear images. Clear images are composed of outlines. If the outlines are not clear, it is like not having a canvas. The canvas is the picture we imagine in our mind; without a picture, how can one easily apply color?
Therefore, the outline is the key to determining the clarity of the graphic, as well as the substrate for applying color to the graphic. Graphics without outlines are unclear, not easy to color, and cannot display texture. The core composition of Mental Imagery is the outlines of things. As long as you master the outlines, clear scenes will emerge, and you can edit shapes, colors, and textures.
To prove that the outline is the core of Mental Imagery, here are two examples.
Example 1: Please close your eyes and recall the image of a large mountain before your eyes.
Example 2: Please look at the pictures below one by one, then close your eyes and recall the original graphics…
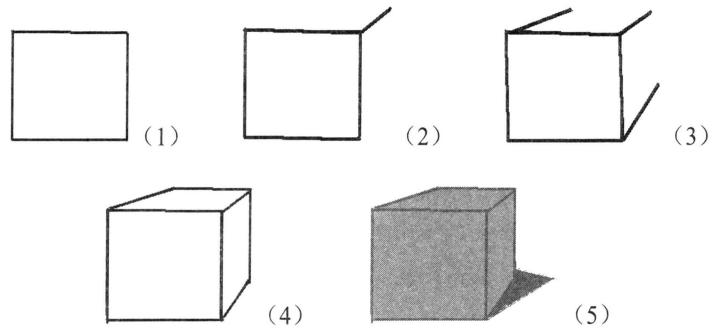
The first example is obviously easier to see Mental Imagery; the second example is also easy to achieve clear Mental Imagery graphics. Why is this? Actually, this is because the large mountain is big, and its outlines are particularly distinct against the backdrop of the sky. The second example follows the same logic: as long as you can remember the impression of the outlines, you can produce a clear graphic recall.
Basic Process and Stages of Mental Imagery Practice
Step 1: Observe the Outlines of Objects
There are two methods available, which can also be used simultaneously.
Method 1: Look at Simple Pictures
Start with 2D pictures, then look at 3D ones, focusing on the observation and memory of the outlines. The requirement is to first be able to have a clear recall. After achieving this step, look at simple 3D drawings, just like the second example above. When you can clearly reproduce 3D pictures as well, then the only remaining parts are: first, the realistic reproduction of the 3D graphic—imagine what the 3D graphic you see looks like when it really exists; this step is the realization and actualization mentioned earlier. Second, add texture and color into the layout of the picture.
Once you have done these, your Mental Imagery is considered introductory. Take it step by step without rushing. As long as you firmly grasp that the line (outline) is the core of Mental Imagery, your Mental Imagery will sooner or later become clear and lifelike.
Method 2: Go and Observe the Outlines of Real Objects
Objects can be encountered in daily life. Coordinate this by recalling when blinking and memorizing when opening eyes. It is best to be able to enlarge the seen image when closing your eyes, as the effect is better.
Step 2: Edit and Imagine
When the first step of practice is mastered, you should possess the basic Mental Imagery Ability, which is the ability to clearly see familiar objects. At this time, you must slowly transition to the application stage of Mental Imagery. In the beginning, it is difficult to freely control the degree and speed of Mental Imagery changes. Here, you must first engage in free reverie. Use the clear pictures you see to imagine scenes you like as much as possible. You can imagine being the protagonist when going to sleep, doing many things you like to do. Imagine mountains and rivers, imagine falling leaves in a bamboo forest. You can listen to music while daydreaming. The requirement during reverie is to be natural and free, not forced. When you are proficient, you can transition to the stage of Forced Mental Imagery. Forced Mental Imagery means you can freely imagine the images you need. Once you achieve Forced Imagination, you can integrate mnemonics with Mental Imagery. At that time, seeing text will automatically cause the graphics represented by those words to appear, allowing you to directly use the graphics to edit stories or scenes. Because the speed of Mental Imagery is fast (almost synchronized with thoughts) and it has the strongest impression among the Five Senses, you can achieve the graphic memory effect you have always pursued.
Mental Imagery Training
To cultivate Mental Imagery Ability, one should first understand that the appearance of Mental Imagery is divided into 5 stages.
(1) Close both eyes, pitch black, nothing can be seen;
(2) In the pitch black, feel as if something is moving;
(3) Able to see static colored afterimages;
(4) Able to see dynamic images like movie scenes;
(5) Able to freely create the images one wants to see.
Children aged 6 to 12, after activating the Pineal Gland through Chapter 2, can quickly possess Mental Imagery Ability through simple training. Students trained through the Tao Inspiration Learning Method can also quickly possess Mental Imagery Ability through simple training. The following training requires long-term persistence for adults to achieve results. For children who have already activated their Pineal Gland and students who have undergone the Tao Inspiration Learning Method training, the following training methods can be used for consolidation training.
White Light Mental Imagery Method
When conducting Mental Imagery Ability training, it is very important to give the suggestion of seeing brightness to the subject. In actual training, if someone can see the appearance of a light sphere in their mental imagery, it indicates that they have achieved significant results in the development of their potential abilities.
Humans are inherently luminous bodies. Light is the fluctuation of cosmic space; through meditation, we can see this fluctuating light. The nature of life is the mind, and it is light. Universal consciousness itself is the harmony of light, love, and the two. Light drives all evolution in the universe, and life on Earth has also evolved thanks to the light of nature.
In ancient times, there was a training method to see a white light sphere appearing within the eyelids through meditation. It is said that being able to see the appearance of a white light sphere allows one to freely utilize the ability of complete memory, while also opening one’s Special Functions (actually opening the sensory system of the Right Brain Development).
So, let us proceed with the mental imagery training to see the white light sphere appearing within the tightly closed eyelids.
Being able to see the white light sphere within the eyelids indicates the completion of the first stage of mental imagery training. Next, you enter the stage where you can freely see mental imagery appearing in your mind. At this stage, you will know that you have mastered the ability to freely control the appearance of mental imagery.
Let us start with the mental imagery training to see a white light sphere. First, record the following content onto a cassette tape, and then practice.
First, sit slowly and comfortably in a chair. Please remove your glasses, slowly and relaxingly close your eyes, place both hands on your abdomen, and then begin deep breathing.
First, exhale slowly through your mouth. While exhaling, contract your abdomen inward. At the same time, imagine that the stale air inside your body has been completely expelled.
Then, inhale slowly through your nose until the chest is saturated. Imagine that cosmic energy is inhaled into the body through the nasal cavity, the top of the head, and the soles of the feet, while causing the lower abdomen to expand outward.
Relax the chest and focus the consciousness on the Dantian (about 3 cm below the navel). After inhaling, hold your breath and consciously imagine the energy inhaled into the body circulating once through the body.
Alright, take another breath with this feeling. Exhale slowly through the mouth while contracting the abdomen inward.
Please imagine that the stale air in the body is completely expelled while exhaling.
Then, inhale slowly through the nose until the chest is saturated, imagining that cosmic energy is inhaled into the body.
Relax the chest and keep your mind focused on the Dantian area (about 3 cm below the navel).
After inhaling, please hold your breath and consciously imagine that your body is filled with cosmic energy. Good, relax yourself completely. You have entered the Alpha Wave state; your mood is leisurely, comfortable, and brisk, and you are in a very relaxed state.
To deepen the depth of hypnosis, let us next perform muscle relaxation activities, return the breathing method to a natural state, and then concentrate consciousness on the top of the head. When consciousness can be concentrated on the top of the head, while exhaling, first perform the training to eliminate the tension at the top of the head.
Okay, now let us consciously eliminate the tension in the temples, inside the eyes, and below the eyes while exhaling. Next are the wings of the nose and inside the nasal cavity. Then slightly open the mouth and eliminate the tension in the jaw, auricles, and inside the ears.
Imagine yourself gradually relaxing.
Keep the neck and shoulders slightly tense, then relax suddenly. At the same time, imagine the neck and shoulders gradually relaxing.
Then eliminate the tension in the wrists and hands. Concentrate your consciousness on the wrists and both hands, keep the tension slightly, then relax suddenly, and you can feel that the tension in this area has been eliminated.
You see, the tension is gone, you are in a completely relaxed state, and you feel very good.
Secondly, in the order of back, chest, and abdomen, move your consciousness to these parts and eliminate the tension in these parts one by one. Good, the tension in these parts has been eliminated.
Again, concentrate your consciousness on the waist, buttocks, and thighs, and eliminate the tension in these parts. Right, then the calves and feet. Finally, perform an imagination to eliminate the tension in the whole body. Good, the unnecessary stiffness and tension in all parts of the body have been eliminated. The whole body is completely relaxed. You are in a good mood and feel incomparably comfortable.
It is as if all sensations have ceased to exist, and the body seems to be floating in the air. The mind feels blank, the mood is very good, the spirit is relaxed, and it is comfortable and pleasant.
Okay, now continue to keep your eyes closed and gaze at the tip of your nose through your consciousness. When you have gazed for a while, the acupoint at the Yintang, slightly above the Brow, will feel a bit itchy. Usually, we say that the Third Eye exists in this part.
Please imagine a small dot appearing before your eyes. A very small dot has appeared, and a luminous round body has appeared before your eyes. When you can feel even a very faint luminous dot, you have completed the first stage of self-concentration.
After you feel the faint light, please constantly imagine that the bright spot is getting brighter and brighter. Then, look, the bright spot condenses, the brightness increases, it gradually becomes brighter, the bright spot gets closer and closer to your eyes, forming a luminous sphere.
Good, the bright spot has condensed into a luminous sphere. You can see a small red luminous sphere, a bright, shining luminous sphere. When you see the red luminous sphere, you have completed the second stage.
Please keep staring at this sphere. Then, the sphere gradually grows larger, appears before your eyes, and fills your brain. Soon, it overflows from your mind, expands into your body, then overflows from your body, completely enveloping your body, making you experience an incomparably comfortable feeling.
Now, you are enveloped by a halo all over your body, in a deep state of haze. You have now entered the third stage. In the deep state of haze, everything in your consciousness will turn into images and appear before your Third Eye.
Good, you are now in a deep state of haze, and the strength of your whole body is completely relaxed, easy and comfortable. Remaining still like this, the light enveloping you gradually gathers again, shrinks into the body, shrinks into the brain, settles down in the brain, and turns into a very, very small dot.
As the dot gets smaller, the brightness increases, flashing with dazzling light. You watch the dot getting smaller and smaller. Finally, it becomes a very, very small shining star, and soon the star also disappears.
The luminous dot has disappeared. The bright spot has disappeared, and it becomes pitch black. Now your body and mind are completely relaxed, in a deep state of haze. It is pitch black before your eyes.
In the midst of the pitch-black barrier, you can see red light, and soon you see blue-purple clouds or blue-purple patterns. Your heart is very calm, and you are watching that blue-purple window with a comfortable and serene mood.
That is a window; it does not just reflect objects or human figures. Opening this window allows you to enter another world. When you stare closely at that blue-purple cloud, those blue-purple patterns, they become brighter, approaching transparency.
Through this window, you see figures and scenery. Please wait a moment and stare closely at this window.
Maybe the window cannot be seen, and you see other images. But do not be surprised; please watch those images as if you are comfortably enjoying a TV program broadcast at night.
Even if you cannot see any images no matter what, it is fine to wait leisurely. Perhaps the blue-purple clouds will swirl, dissipate, and disappear until they are invisible.
Conduct such practice every day. One day, suddenly you will be able to see something, perhaps only a fleeting image. This is your initial experience of obtaining clairvoyance. Having had one experience of seeing such an image, continuous changes will appear in subsequent practices. In the future, without using a tape, enter the state of haze with the same essentials, and consciously let yourself see something.
The more times you repeat, the faster you enter the state of haze, and the earlier the images appear. Close your eyes, take deep breaths, and immediately enter the state of haze; images will appear in your mind immediately. Before practicing, please decide in advance what image you want to see today. Deciding on the image to be seen today is a very effective method.
If nothing appears in that window, it is not because there are no images; on the contrary, it is because too many images appear. There are too many colors and forms, so only a pitch-black scene can appear. When you get used to this training method, the scenery and figures in the images will separate one by one, becoming a picture.
It is necessary to conduct training for 20 to 30 minutes every day. Everyone repeats the training, and soon will be able to see various images from the blue-purple window, improving your clairvoyance. As long as you see one image, it is equivalent to developing your clairvoyance. Therefore, day-to-day training is needed. Persistence is the most critical. Persist for one or two months, and your potential abilities will be improved.
Then, wake up from the haze. Count from 1 to 5 to restore you to your original consciousness. After waking up, you will feel relaxed and happy.
Count to five, open your eyes happily.
(1) Body is relaxed, consciousness returns to sobriety;
(2) Strength in hands and feet recovers quickly;
(3) Vitality fills the body. Now cosmic energy has been poured into your body and your heart; you are full of energy and feel refreshed. Physical and mental imbalance has also disappeared, and the mood is very brisk;
(4) The head becomes light, the mood becomes more relaxed, and the vision becomes clear;
(5) Good, in a happy mood, completely sober. Open your eyes. Stretch out your hands, stretch your back, and move your legs a bit. You have returned to your original physical state, and then please take a deep breath.
Autogenic Training Method
Autogenic Training Method consists of six steps: Step 1 “Arms and legs are heavy”, Step 2 “Arms and legs are warm”, Step 3 “Breathing is smooth”, Step 4 “Heartbeat is steady”, Step 5 “Abdomen is hot”, Step 6 “Forehead is cool”.
Before practicing from the second step onwards, the practice of the previous step must be added. For example, when practicing the sixth step, you need to do the first, second, third, fourth, and fifth steps, plus the sixth step. Take 10 days as a progressive cycle for each step, that is, practice each step for 10 days. The adjustment of psychological state cannot be achieved overnight. The eagerness to change is understandable, but during the adjustment process, this psychological state often affects the training effect.
Experimental research has been conducted on the trainee’s electromyography, body temperature, heartbeat, blood pressure, electrocardiogram, and electroencephalogram using modern scientific instruments, proving that standard training can not only change a person’s psychological state but also change their physiological balance.
Preparation
Try to choose a place with few external stimuli for training, such as a personal bedroom, study, or personal office. Especially at the beginning of practice, quietness is more required. After gaining some experience, even in an environment where other people are present, such as in a car or bus, practice can be done.
During practice, you can adopt a supine or sitting posture. When sitting, place both hands on your knees or rest them on the armrests of the chair. Sit in a relaxed and comfortable manner. When lying supine, place both arms naturally by your sides, ensuring they do not touch other parts of the body, palms facing down, legs slightly apart, feet not touching other parts of the body, with toes pointing outward.
Practice once in the morning, noon, and evening every day. When busy with work, practicing only in the morning and evening, or only before going to bed at night, is also acceptable.
One round of practice takes about 3 minutes. Because it needs to be repeated once, it is about 6 minutes at a time. Adding preparation work, generally it does not exceed 15 minutes each time.
At the end of each session, silently count one, two, three in your heart, while suggesting to yourself “wake up comfortably”. If practicing before falling asleep, it is also good to fall asleep naturally during the practice. You can silently count one, two, three in your heart when waking up in the morning, while suggesting to yourself “wake up comfortably”.
The preparatory posture before training is deep breathing. Lie supine on the bed or sit in a chair, close your eyes, and think “I am about to start self-hypnosis training”. First, try your best to inhale, suggesting to yourself “inhale a little more, inhale a little more”, then hold without inhaling or exhaling, suggesting to yourself “hold a little longer, hold a little longer”, and finally exhale, trying your best to exhale the air from the chest, also suggesting to yourself “exhale one more mouthful, exhale one more mouthful”. When inhaling, it is appropriate to use the nose, ensuring it is even, fine, soft, and long; when exhaling, it is appropriate to use the mouth, ensuring it is even, fine, soft, and long. Perform deep breathing three times in this way.
Step 1: Arms and legs are heavy
After deep breathing, within about 20 to 30 seconds, silently recite to yourself repeatedly: “Right arm is heavy, right arm is sore, right arm is swollen.” Give yourself the suggestion: The right arm has become heavy, it has really become heavy, it has become very heavy. It has no strength, it is drooping down. If it weren’t for the bed board or armrest blocking it, it would fall down. It is very heavy, there is a slightly sore and swollen feeling, I almost have no strength to lift it up.
At this time, concentrate your attention and search for the sensation in the right arm. It is truly heavy, sore, and swollen.
Then transfer your attention to the right leg, and also spend 20 to 30 seconds silently reciting repeatedly: “Right leg is heavy, right leg is sore, right leg is swollen.” Give yourself the same suggestion, and similarly concentrate your energy to search for the sensation in the right leg.
Next is the left arm, then the left leg. The order can also be adjusted according to your habits, for example, left arm - left leg - right arm - right leg, or left arm - right arm - left leg - right leg, or right arm - left arm - right leg - left leg are all fine, but it is advisable to start with the hands.
When searching for sensations, you can consciously focus your attention on a certain part, such as heavy fingers, heavy middle finger, swollen back of hand, heavy wrist, forearm drooping, etc.
For the first 10 days, only practice the first step. You can practice 1 to 3 times a day, but you should persist every day. Repeat the practice two to three times in the order of your own habit each time. Generally, it does not exceed 10 minutes each time.
After 10 days, you will have a feeling. That is, when we perform self-suggestion, the hands or legs will quickly feel heavy, sore, and swollen. At this time, even in an environment with external stimuli, you can practice.
Repeat once in this way. Then self-suggest waking up or go directly to sleep and self-suggest waking up the next morning.
Step 2: Hands and Feet are Warm
After 10 days, proceed to the content of Step 2. That is, during each training session, after completing the requirements of the preparatory posture and Step 1 once, continue lying in bed and repeatedly chant silently for twenty or thirty seconds: “My right arm is warm, my right arm is tepid, my right arm is hot.” Give yourself the suggestion in your mind: “My right hand is starting to get warm, as if basking in the sun, or as if warming by a fire. The firelight shines on my right arm; the firelight is moving; now it shines on my right fingers. The thumb is getting warm, the index finger is getting warm, the middle finger is getting warm, the ring finger is getting warm, the little finger is getting warm, the back of the hand is getting warm, the wrist is getting warm, the forearm is getting warm, the elbow is getting warm, the arm is getting warm.” Focus your attention on searching for the sensation in your right arm. It should be said that after a few days of practice, you will experience the sensation of the arm becoming warm during practice, just like in Step 1. Afterward, practice warming your hands and feet in the order of left arm - right leg - left leg, or in whatever order you are accustomed to.
After finishing one round, repeat the content of Step 2 again. Then suggest yourself to wake up or go directly to sleep and suggest yourself to wake up the next morning.
Step 3: Breathing is Smooth
After another 10 days, you can add the content of Step 3. That is, during each training session, after completing the requirements of the preparatory posture, Step 1, and Step 2 once, continue lying in bed and repeatedly chant silently for twenty or thirty seconds: “My breathing is smooth, my breathing is light, my breathing is slow.” Give yourself the suggestion in your mind: “My respiratory system is very clear, from the nose to the trachea to the lung lobes. My breathing is very even; I can feel fresh air entering through the nose into the trachea and then into the two lungs, while the exchanged waste gas exits the two lungs, passes through the trachea to the nose, and is finally expelled from the body. This kind of breathing brings me energy.” Generally speaking, after one or two weeks of practice, the practitioner’s breathing will become slower, deeper, and more even, which is more conducive to gas exchange.
Since the respiratory tract is not covered with autonomic nerves like the hands and feet, searching for the sensation of the respiratory tract is somewhat more difficult than searching for the sensations of the hands and feet. However, as long as you have seriously practiced Step 1 and Step 2 as required, your ability to analyze sensations at this time is significantly stronger than before practice, so you will also be able to quickly experience the effects of Step 3.
After finishing one round, repeat the content of Step 3 again. Then suggest yourself to wake up or go directly to sleep and suggest yourself to wake up the next morning.
Step 4: Heartbeat is Steady
Starting from the 31st day, you can add the content of Step 4. That is, during each training session, after completing the requirements of the preparatory posture, Step 1, Step 2, and Step 3 once, continue lying in bed and repeatedly chant silently for twenty or thirty seconds: “My heartbeat is steady, my heartbeat is quiet, my heartbeat is powerful.” “Steady” means the heartbeat is balanced and regular; “Quiet” means you are focused, hearing no other sounds but only the sound of your heartbeat “thump-thump”; “Powerful” means the heartbeat sound is strong and firm.
For ordinary people, feeling their own heartbeat is not as easy as feeling their breathing, so it is suggested that when initially starting practice, first place the right hand on the chest position to check the heartbeat situation, focusing attention on the heart area, and gradually let go of the hand to feel it later.
According to experimental reports, after continuous practice for one or two weeks, the practitioner’s heart rate will undergo a certain adjustment. However, it is inconvenient to measure one’s own heartbeat during training, but one can learn to feel one’s own heartbeat through practice.
After finishing one round, repeat the content of Step 4 again. Then suggest yourself to wake up or go directly to sleep and suggest yourself to wake up the next morning.
Step 5: Abdomen is Hot
Starting from the 41st day, you can add the content of Step 5. That is, during each training session, after completing the requirements of the preparatory posture, Step 1, Step 2, Step 3, and Step 4 once, continue lying in bed and repeatedly chant silently for twenty or thirty seconds: “My abdomen is warm, my abdomen is hot, my abdomen is empty.” The abdomen refers to the area between your sternum and navel. This area is also known as the celiac plexus, or “Dantian”, and is a location where autonomic nerves are dense. The nerve bundles here control the involuntary activities of the abdominal organs, making it a very important area.
During initial practice, you can move both hands to your abdomen to experience the feeling of the abdomen being warmed up by the hands. In fact, some more sensitive people will feel the sensation of a hot abdomen as early as when practicing Step 4. Once the sensation appears, move your hands away and suggest to yourself that there is a hot water bottle on your abdomen. Focus your attention on experiencing the warm feeling of the abdomen, as well as the empty feeling of the abdomen and the weightless feeling of the upper body. People with bad stomachs or constipation often react slower because resistance in the abdomen distracts their attention. However, after a period of practice, the same results can be achieved.
After finishing one round, repeat the content of Step 5 again. Then suggest yourself to wake up or go directly to sleep and suggest yourself to wake up the next morning.
Step 6: Forehead is Cool
For the last 10 days, you can add the content of Step 6. That is, during each training session, after completing the requirements of the preparatory posture, Step 1, Step 2, Step 3, Step 4, and Step 5 once, continue lying in bed and repeatedly chant silently for twenty or thirty seconds: “My forehead is cool, my forehead is cold, my hair is smooth.” And suggest to yourself in your mind that you are standing at the bow of a boat, or riding a bicycle down a slope, with a cool breeze blowing against your face, sweeping across the forehead. The wind blows through the gaps in the hair, combing the hair over and over again. The forehead is cool, the person feels very refreshed, and the thoughts become clear.
After finishing one round, repeat the content of Step 6 again. Then suggest yourself to wake up or go directly to sleep and suggest yourself to wake up the next morning.
In Right Brain Development training, mental imagery is difficult to completely separate from imagination, meditation, and visual training; they are often blended together and conducted simultaneously. For example, the Shichida-style Super Brain mental imagery training method includes the White Light mental imagery method and the Afterimage training method of visual training. The Afterimage training method further includes Yellow Card training, Three-Color Card training, Shape Card training, and Mandala Card training. To make the course training as clear as possible, this manual will introduce imagination, meditation, and visual training separately later.
Chapter 7 Imagination Training
Converting information into visible mental images and being able to interpret them correctly is the main purpose of Right Brain Development. To develop Image Thinking ability, imagination training is needed. After relaxing, focusing, and suggesting to relax the mood, apply suggestions in places where imaginative images are prone to appear, and the imaginative images will easily appear.
The content of imagination training is very flexible. It can be practiced consciously anytime and anywhere, guided by an Instructor or parents, or using some computer software for training (such as the Super Memory Hall memory training system, Shuangjie Children’s Spatial Imagination Practice, Adult Brain Training, etc.).
Visualization of Information
The traditional memory of ordinary people occurs in the brain’s Neocortex and belongs to short-term memory, making it easy to forget. If information repeatedly and continuously enters the brain, this information will bypass the memory of the frontal lobe and be transmitted to the hippocampus circuit. The hippocampus is responsible for long-term memory and is the main area for imagination and image memory. Mnemonics and Mind Maps use imagination and images to directly stimulate the hippocampus, allowing information to quickly become impressively deep long-term memory. Therefore, these two methods are the secrets of various top exam scorers and memory masters, and are also effective learning methods for activating the right brain.
The most important thing in storing massive amounts of information in the brain is to develop the ability to think in images. To develop the ability to think in images, one must first convert information, including text, numbers, etc., into images, that is, to create clear and vivid images in the brain. This not only requires the image conversion of specific objects but also requires the skilled use of the Image Method and Meaning Method to convert abstract information into images. And for the brain to get used to visualizing information, it requires a period of training.
During the training process, make the brain very keenly imagine clear and vivid images. For example, when imagining the image of a “bus,” you must clarify whether the bus in your mind is brand new or old? How high and long is the car? Is there an advertisement on the car body? Is the car stationary or moving? Are there many passengers on the bus and it is crowded, or are there few and it is spacious? Is the bus’s whistle hoarse or clear? If it is an old bus, will there be a creaking sound when driving?
The clearer the outline of the image and the clearer the details, the deeper the impression the image leaves in the brain, and the less likely it is to be forgotten. Memory masters use this kind of imaging to remember a large amount of information that ordinary people think is impossible.
For example, when a certain memory master sees the number 1, the image in his mind is a tree; when he sees the number 2, the image of a duck appears in his mind. When he sees the number 11, a pair of chopsticks or a soccer ball appears in his mind. In short, convert the information into images, then use association to connect the images into a vivid plot. After these methods are mastered, the brain will get used to using images to think. When seeing materials that need to be memorized, vivid plots composed of images will immediately appear in the brain. As long as you take a look, you can remember these materials.
Now, let’s play a small game. Please remember the following items within one minute.
Kite, Pencil, Car, Rice Cooker, Candle, Jam.
How is it? Do you feel it is strenuous? How many items did you remember? In fact, you can easily remember all six items, as long as you use your imagination.
You can imagine that you are flying a kite. The kite is flying in the sky. What kind of kite is this? It is a white kite. Suddenly, a pencil is thrown up and pokes a big hole in the kite, so the kite falls down. And the pencil also falls down and hits a car, and the windshield is completely broken. The car has to be put into a big rice cooker. When the car is put into the rice cooker, the car melts and becomes soft. Then, you hold a candle and knock on the rice cooker. The sound of bang bang bang is very loud, and the candle is smeared with jam.
Now recall: What happened to the kite? It was poked a big hole by a pencil.
What happened to the pencil? It hit the car.
What happened to the car? It was put into the rice cooker to cook.
What happened to the rice cooker? It was struck by a candle to make a sound.
What happened to the candle? It was smeared with jam.
If you recall it a few more times, you will remember these six items.
This game illustrates: creating another vivid image and placing information in long-term memory, connecting images with actions in absurd, meaningless ways results in fast recall speed and makes it difficult to forget. Generally speaking, connections with sound are better than those without sound, connections with color are better than those without color, connections with deformation are better than those without deformation, and dynamic connections are better than static ones.
Imagination is a common method used in image memory methods. When one thing is similar to another, it often triggers the association of another thing from this thing. Connecting the memory materials with things you have experienced results in a good memory effect. This is the magic weapon of mnemonics, but in any case, picturing information is an important method of scientific brain usage.
Imagination and Suggestibility Test
Before Right Brain Development training, the Instructor can test the student’s imagination, focus level, the student’s trust in the Instructor, and the student’s ability to accept suggestions to adjust the training plan.
”Sour Lemon” Test for Focus, Imagination, and Suggestibility
Guidance words: Now please slowly adjust your breathing, inhale deeply, exhale slowly, close your eyes, feel very relaxed, very relaxed. Okay, now imagine that there is a lemon in front of you, a very delicious lemon. This lemon is truly right in front of your eyes. Okay, now try to grab it with one of your hands. Imagine that there is a fruit knife in front of you. Use your other hand to pick up this knife. Now please gently cut the lemon open. Okay, now throw away your knife and bring the lemon to the front of your nose—the scent of the lemon enters your nostrils, you truly feel its existence, you feel very sour. You feel its existence very clearly and very realistically, very, very sour. You feel your mouth filled with the sour taste.
Positive reaction: Able to imagine the lemon and fruit knife, and have a sensation of movement in the lips and throat.
Negative reaction: The sensation of the suggested object is not obvious, and the taste performance is not significant.
”Apple Contemplation” Test for Image Visualization Imagination
Preparation before the test: First stretch your body, take a deep breath, and let your body relax. Then sit on a chair or lie on a sofa in the most comfortable way, and place your hands in the most comfortable position.
Okay, continue to take deep breaths. Please close your eyes easily. As soon as your eyes are closed, your whole body follows and relaxes. Imagine that your eyes are gazing at the tip of your nose, focus your attention on the tip of your nose, and continue to take deep breaths…
Now, imagine that an apple appears in front of your mind. I want you to see clearly whether this apple is green or red? Are there leaves? How big is this apple? Okay, do you see it? The clearer the color and the clearer the shape of the apple you see, the better your mental imagery ability is; if you don’t see anything, or the image is not clear, it doesn’t matter, this can be exercised. Every practice will make it easier for you to enter the state, and you will also more easily see clear pictures.
End of test: Very good, take a deep breath, slowly open your eyes, and ask: “Did you see it?” If they saw it, say: Very good, your image visualization ability is not bad; if they didn’t see it, say: It doesn’t matter, go back and practice more. Image visualization ability can be improved through training.
”Arm Levitation” Imagination Test
This test is most widely used in hypnosis and may be the most important sensitivity test. This test can fully assess the subject’s imagination.
After relaxation induction, have the subject stand with their heels on the ground and feet slightly splayed. Hold both hands flat in front of the chest, left palm facing up, right palm facing left with the thumb raised. Then instruct them: Imagine that your left palm is holding a thick, large dictionary, and your left hand will feel increasingly heavy. Imagine that your right thumb is tied to a large helium balloon. This balloon gradually floats upward, pulling your right hand up, making your right hand lighter and lifting it higher. Try your best to imagine this scene in your mind. If the image is not clear, you can also pretend that there is really a balloon tied to your right thumb floating up, and a large dictionary is held in your left palm. Your left hand is getting heavier and heavier, dropping further down; while your right hand is getting lighter and lighter, lifting higher and higher…
After a period of time, when you feel there is a significant gap between your hands, you can bring it to an end.
Now, pause, fix your hands in this position, open your eyes, and see how far apart your hands are. Very good, your imagination is excellent…
Note:
Regular and gradual rising and falling of the subject’s arms indicates good sensitivity.
If the speed of rising and falling is too fast, the student may be pretending or trying to please the Instructor; if there is no movement at all, there may be internal resistance.
After the test ends, remember to ask the student about their feelings and thoughts.
”Backward Fall” Trust Test
Backward fall test: This is a very authoritative test, originally used for stage hypnosis shows. This test requires attention as falls may occur due to poor support.
Ask the student to stand with feet together, ankles fixed, head up and chest out, hands behind the back, fingers crossed, leaning slightly backward with eyes closed. Say: Your shoulders are becoming powerful and hard, your whole body is as hard as steel bars, and my hands are like magnets that will attract your body (the Instructor can also hold the student’s shoulders with both hands and slowly guide them back and forth). My hands slowly move completely away from your shoulders, and you start to fall backward, backward. Imagine yourself falling backward, while I am behind you catching you… You can fall backward without any doubt, I will absolutely guarantee your safety (This is very important; the Instructor must safely catch the student from behind, otherwise danger will occur. It is recommended that only a trained Instructor conduct this test).
”Hands Interlocking” Suggestibility Test
If the student does not respond to the previous tests, this test must be done. It is also a method used to demonstrate sensitivity tests to a group. It is very important to start with a normal speaking tone, then gradually transition to a more commanding tone. Before the test, the Instructor should demonstrate the movements.
Guidance script: Please put down the items in your hands, stretch both hands forward, open your palms, facing each other, spread your fingers, with hands about 30 cm apart. Then I will ask you to close your eyes. As soon as your eyes close, following your breathing, you will feel like there are magnets on your palms, and they start to attract each other, getting closer and closer, closer and closer… Once the fingers touch, they can… Now lock together (the Instructor can assist in tightening them), and clasp tightly together. Very well done.
Imagine your hands are tightly stuck together, like being glued by super glue, getting tighter and tighter, your knuckles are getting tighter, your hands are getting tighter, your hands are tightly stuck together. So in a moment, I will ask you to try to pull your hands apart, and you will find that you cannot pull your hands apart; they are tightly stuck together, so you cannot pull them apart.
Now I am going to count from 1 to 3. When I count to 3, you will try to pull your hands apart, but you won’t be able to; they are tightly stuck. 1, getting tighter. 2, tightly stuck together. 3, try to open your hands but you can’t, try again, you still can’t open them. Stop trying, relax, and slowly let your hands separate.
”White Light Visualization” Image Visualization Imagination Test
Preparation before the test: First stretch your body, take a deep breath, and let your body relax. Then sit in the most comfortable way on the chair, placing your hands in the most comfortable position. Continue to breathe deeply. Please close your eyes gently. As soon as your eyes close, your whole body follows and relaxes; imagine a beam of white light shining straight down from directly above your head, illuminating the top of your head. The beam of light slowly spreads, gradually enveloping your whole body. Your whole body is bathed in the white light. The wonderful fluctuations of the white light fill every cell, every muscle, and every nerve of yours, illuminating your spine and the bones of your whole body. The white light carries the powerful life force of the universe, injecting into your blood vessels and nourishing every organ and tissue of your body. Your whole body, from head to toe, radiates white light, bright and dazzling like a cluster of light. Your whole body’s energy is flowing smoothly, full of vitality…
”Chevreul Pendulum” Concentration Test
This test was invented by the early French hypnotist Chevreul. Because almost all students can succeed, it is very suitable as an initial test.
Preparation before the test: First stretch your body, take a deep breath, and let yourself relax. Then sit down comfortably. Hold your hand above the cross intersection point, keeping it still, and then fix the position of your elbow and arm.
Step 1 Test:
Now please keep your arm and elbow fixed. Take a deep breath and move your eyes back and forth between points A and B (at this time, the pendulum will also follow and move back and forth between points A and B)… Good, you are very focused. Now please speed up the movement of your eyes and see if the amplitude of the pendulum’s swing also increases accordingly. Very good, you are really focused. Now please fix your gaze on the central cross intersection point of the chart, and let the pendulum come to a stop at the same time (if the pendulum does not move or moves erratically, prompt him: “Take a deep breath and thoroughly relax the muscles of your arms, forearms, and back. When you feel very relaxed, please tell me, and we will start over!”).
Step 2 Test:
Continue to take a deep breath, keeping your body muscles completely relaxed. Now let your gaze move back and forth between C and D (at this time, the pendulum will also follow and move back and forth between points C and D)… Good, you are very focused. Now please speed up the movement of your eyes and see if the amplitude of the pendulum’s swing also increases accordingly… Very good, you are really focused. Now please fix your gaze on the central cross intersection point of the chart, and let the pendulum come to a stop at the same time.
Step 3 Test:
Continue to take a deep breath, keeping your body muscles completely relaxed and comfortable. Now let your gaze rotate along A, D, B, C, A (i.e., clockwise direction) (at this time, the pendulum will also follow and swing in a clockwise direction). Good, you are very focused. Now please speed up the movement of your eyes and see if the amplitude of the pendulum’s swing also increases accordingly. Very good, you are really focused. Now please fix your gaze on the central cross intersection point of the chart, and let the pendulum come to a stop at the same time.
Step 4 Test:
Continue to take a deep breath, keeping your body muscles completely relaxed and comfortable. Now let your gaze rotate along A, C, B, D, A (i.e., counter-clockwise direction) (at this time, the pendulum will also follow and swing in a counter-clockwise direction). Good, you are very focused. Now please speed up the movement of your eyes and see if the amplitude of the pendulum’s swing also increases accordingly. Very good, you are really focused. Now please fix your gaze on the central cross intersection point of the chart, and let the pendulum come to a stop at the same time.
Ending the test: Your concentration is very good, you are really great. You have successfully passed this test. Congratulations!
Subject’s reaction: Positive reaction — The pendulum moves completely according to the indicated direction. Negative reaction — The pendulum does not move, indicating extreme resistance; the pendulum moves in the opposite direction, indicating the subject has significant problems accepting suggestions.
Image Thinking Training
Image Thinking is built on the foundation of image association. First, one must form clear images in the mind of the items that need to be thought about or memorized. After relaxation, focus, and suggestion relax the mood, imagined images appear easily. When imagining, children generally lack the initiative for primary imagination and need the Instructor to guide them. This chapter provides many cases of guided imagination and meditation exercises. The Instructor can also write their own guidance scripts with richer and more interesting imaginations based on the child’s interests. When the Instructor trains students, suggestions can be applied under the accompaniment of sound effects or music to form images in the brain and improve imagination. Music such as natural sound effects, Alpha (α) Wave Music, meditation music, Chinese classical masterpieces, and classic piano pieces can be used as background music.
Exercise 1
Listen to appropriate music and imagine. For example: imagine yourself standing in a warm spring field.
Depict the scenery of flowers blooming and butterflies dancing in your mind, and imagine that you are in the scenery feeling infinitely gratified.
Imagine that you have no anger, no anxiety, no dissatisfaction, and your heart is one with the scenery, leisurely and relaxed.
At this time, you can not only see the boundless broad green field, but also hear the lowing of cows coming from afar, smell the scent of grass brought by the cool wind, and feel the butterfly flying onto your nose, ticklish. Take out delicious food from the basket, and your mouth is filled with the aroma of bread, ham, and eggs…
It is very important to use all Five Senses of sight, hearing, touch, taste, and smell in imagination like this.
Exercise 2
Close your eyes, recall people, events, and objects you have seen in the past, and describe the details and colors.
Exercise 3
Ask the child to explain things they have seen on TV or in movies. Let the child close their eyes and describe the details and colors in the movie. There is no need to tell the plot, just describe what was seen, what it looked like, including colors and details.
Exercise 4
Ask the child to close their eyes and ask them to try to change things they have seen in the past. For example, if the child sees someone wearing a green sweater, ask them to change the color of the sweater in their mind, such as changing it from green to red, and then imagine the same person wearing a red sweater. Children can imagine this person wearing a green sweater entering the room, and then coming out having changed into a red sweater.
Practice for at least fifteen minutes each time, once a week.
Exercise 5: Little Person Imagination
-
Meditate and breathe to relax the body and mind.
-
Suggest that the trainer’s body gradually becomes smaller, smaller than a grain of rice and sand, becoming a tiny person the size of an electron invisible to the naked eye, able to enter any place.
-
Let the trainer imagine themselves walking into a closed book to see what story is written inside and what pictures are drawn.
Exercise 6: Stick Imagination
First, put the body in a state of tension, imagining oneself stiff as a stick, and then gradually relax and loosen the body. Repeating the above training repeatedly can help deepen your meditation ability.
-
Lie still in bed. Repeat deep breathing 3 times at your own normal speed.
-
Then return to a normal breathing state. Next, imagine your body turning into a stiff stick. When I say “Start”, try your best to imagine your body becoming as hard as a stick, feeling as if you have turned into a bridge, drawing a resilient arc in the air. Repeat this.
Okay, the body is starting to become stiff and hard.
-
Okay, feel the body starting to loosen and soften.
-
Stiffen and harden again, becoming more and more solid. Okay.
-
Okay, quickly return to a loose and soft state.
-
Okay, become stiff again.
-
Okay, the body relaxes again. Below, repeat deep breathing three times. When exhaling, try to relax at a deeper level, feeling that the brain is in a meditative trance state, and gradually rising to a higher level.
-
Below, I will count from 1 to 10. During my counting, imagine that your meditation level is also gradually improving. Try your best to imagine seriously that your meditation level is constantly deepening.
-
Below I start counting: 1, 2, the meditation level is gradually deepening. 3, 4, further deepening. 5, 6, even further deepening. 7, 8, deepening more profoundly. 9, 10, have already entered a relatively deep level of deepening.
-
Next, let us start the color imagination training. At the beginning, imagine a Screen appearing 30 cm in front of you, and then imagine colors such as red, yellow, and green appearing on the Screen. First, imagine red, and then see red appearing before your eyes. Right, you must try hard to imagine. Have you seen the red!
-
Below, the red disappears and gradually turns into green. Okay, continue imagining.
Have you seen the yellow?
-
Next, the yellow disappears and gradually turns into green. Okay, continue imagining. Have you seen the green?
-
Okay, below start imagining the appearance of your front door. It has already started to gradually become clear, right? The more detailed you think, the better. Until it is completely clearly visible.
-
Below, open the door and walk in to see what the inside of the room looks like.
-
Okay, now you can wake up. I start counting from 10 to 0, feeling myself waking up comfortably. 10, 9, 8, 7, body relaxes. 6, 5, 4, 3, okay, feel yourself gradually regaining consciousness. 2, 1, 0, okay, feel yourself waking up refreshed all over, and your body has completely returned to its initial state.
Exercise 7: Sunset Imagination
The sunset imagination training below is mainly used for training environments where the trainer is at home alone or there are few people around.
It can be said that everyone has had the experience of a sunset scene. While recalling this scene, your body and mind will obtain a kind of relaxation and enter a relatively comfortable state. Through this method, we can let the left brain, which is usually in a relatively active state, rest, leaving the right brain to start working.
The method is as follows:
Adjusting Breathing
-
Sit slowly on a chair, close your eyes, and make every part of your body enter a relaxed state without exerting force, relax…
-
Pay attention to controlling your breathing, inhale deeply, and feel your abdomen gradually expanding during the inhalation process.
-
Okay, hold your breath.
-
Okay, exhale deeply and slowly.
-
Then inhale slowly, okay, hold your breath again, and then exhale slowly.
-
Inhale deeply again, feeling the abdomen expand to the highest point, okay, hold your breath.
-
Then slowly exhale all the air from your abdomen, okay, hold your breath again.
-
Inhale deeply again, feeling your abdomen expand, then resume normal breathing.
Body Relaxation
- Next, when I say “Start”, clench your hands tightly, while striving to put yourself in a state where your whole body is tense. Okay, start, feel your whole body tense.2. Below, when I say “Stop”, immediately release your tightly clenched hands, and let your whole body enter a completely relaxed state without exerting any force.3. Okay, stop! Immediately relax the muscles of your whole body; your body is in a relaxed state.4. When I say “Start” again, immediately clench your hands tightly again, while tensing your whole body.5. Okay, start! Whole body tense, whole body tense, tense.6. Okay, quickly relax your whole body’s muscles, feel your body suddenly return to a relaxed state.7. Okay, tense your whole body again, then immediately and quickly relax your whole body’s muscles again.
Deep Relaxation
- Okay, below, in order to let yourself enter a deeper world of right brain imagery, relax again, feel the muscles of your whole body relax from the top of your head to the tips of your toes, eliminating tension.2. First focus your attention on a single point on the crown of your head, and while exhaling, quickly relax the muscles of your whole body, striving to make yourself feel like you are in a relaxed state, okay, start exhaling now.3. Okay, continue, feel from the forehead to the area around the eyes, and then the eyeballs all suddenly start to relax, yes, suddenly enter a completely relaxed state.4. Next, feel the temples, nose, and nasal cavity all relax at once. Okay, while exhaling, feel the above mentioned parts suddenly enter a relaxed state.5. Then quickly relax the area from the upper jaw to the cheeks, okay, start relaxing.6. Below is the relaxation of the mouth, oral cavity all the way to the throat area, okay, quickly start relaxing. Now feel the entire head is in a relaxed state where no force can be exerted, feel the
The brain is in a somewhat trance-like, absent-minded, but very comfortable state.
- Below, feel that from the head to the shoulders, there is suddenly no place exerting force. Okay, start relaxing from the shoulders, do not use any strength, let both shoulders hang naturally, okay, hang naturally, do not use force.8. Feel both arms start to sink naturally due to gravity, relax, do not use force, feel the sinking.9. Because your palms are integrated with your entire arm, start to feel that all muscles from your fingertips, palms to elbows, and shoulders are in a relaxed state without exerting force, hanging down softly, yes, feel that suddenly the arms become soft due to relaxation, and this soft feeling will gradually expand as you relax.10. Okay, imagine your arms are completely in a relaxed state without exerting force, slowly, bit by bit, withdraw strength from both arms.11. Feel both arms gradually becoming heavy due to no longer exerting force; the wrists start to have a feeling of heaviness.12. Withdraw strength bit by bit, feel the wrists becoming heavy.13. Okay, further relax and withdraw strength, feel the wrists becoming heavier and heavier.14. Below start from the chest to the abdomen to relax and withdraw strength, okay, relax, relax, do not use force.15. Then from the waist to the thighs, from the knees to the tips of the toes, suddenly relax everything at once, be careful not to use force, okay, relax quickly.16. Feel that as all strength is withdrawn bit by bit, the whole body produces a sinking sensation.17. Okay, now there is no part of the body exerting force, breathing has unknowingly become gentle, your body and mind are both in a deep state of relaxation, producing a comfortable feeling.
Sunset Imagination
-
Below I will count from 1 to 5. When I count to 5, you feel yourself suddenly generate a sleepy feeling, while feeling like you are in a dream, able to see various phenomena not seen in real life.
-
Okay, start now, 1, 2, the feeling of wanting to sleep, wanting to sleep more and more… wanting to sleep…
-
3, okay, a comfortable, sleepy feeling.
-
4, now you have opened the eyes of your Subconscious Mind, but can still clearly hear my voice.
-
5, okay, now it is a feeling of being even closer to falling asleep, you will see some things in front of you that you usually cannot see.
-
Okay, now imagine you are sitting on the beach by the sea in the evening, you can see the red sunset in the western sky, the sunset is already halfway below the horizon.
-
Feel as if you are dreaming, you see these scenes in front of you.
-
Okay, the round setting sun sprinkles beautiful afterglow all over the sea surface, golden, sparkling ripples flashing in front of you.
-
The light of the sunset shines on your body, the sunset is dazzlingly bright in front of you.
-
A dazzling, blinding feeling, now behind your eyelids are all sparkling ripples.
-
The dazzling ripples have made it so you can’t even see the sea clearly.
-
Okay, the light is still so dazzling, now you feel that inside your eyelids is completely full of light.
-
Okay, now the setting sun has completely sunk into the sea, looking up at the sky, the sky has been dyed a charming dark red by the sunset’s afterglow.
-
The sunset has completely sunk, the sky gradually darkened, and the light in front of you is also gradually disappearing completely. Now you feel your mood has become very calm.
-
Okay, now let us wake up from the dream. During the process where I count from 10 to 0, you will feel yourself wake up in a very comfortable mood. After waking up, feel that your brain is exceptionally cool and clear.
-
(10, 9, 8), feel the body is very relaxed.
-
(7, 6, 5), feel physical strength has recovered.
-
(4, 3, 2), the surroundings become bright.
-
(1, 0), okay! Woke up, feeling very good.
Exercise 8: Xiaozhen Training
Come on, dear students, please everyone maintain the most comfortable sitting posture, gently close your eyes. Along with this beautiful melody, let us walk together into the hall of relaxation and imagination. Now please pay attention to the rhythm of your breathing, relax your facial expression, unfold your brow, turn the corners of your mouth slightly upwards, let your whole body and mind relax and be happy. Imagine yourself lying on a patch of green grass, soft and fluffy; bursts of fragrance blow against your face, almost intoxicating us. The blue sky is exceptionally clean, without a single cloud, so blue, so blue. A babbling brook flows slowly past your side, wildflowers we cannot name are competing to bloom around us. Look carefully, what color are the flowers, how many petals does each have? We have never seen such small flowers anywhere else! This time we must look clearly and smell their fragrance well. Huh? At this moment, the fiery red sun revealed its face from the east, shining warmly on our faces, like the palms of a gentle mother. Now, feel the light and heat of the sun with your heart, it is granting us the energy of love! Lying on the emerald green soft grass looking up at the clear blue sky, this feeling is wonderful. At this moment, your breathing becomes more even, smooth, and natural, your mind is without distracting thoughts. Enjoying the caress of the breeze, quietly listening to the joyful singing of birds, you also see a group of leisurely horses running not far away, cattle and sheep grazing without worry. The peaceful and serene air flows into your heart like a sweet spring, your mood becomes cheerful and bright, your body and mind are relaxed, and at this moment you are full of confidence and sunshine!
Imagination Training
Below I will introduce two sets of training methods. These two sets of methods are arranged in order from simple to complex. Do not start experimenting with the later methods before you have proficiently mastered the basic methods in the front. Both sets of training methods have very good effects; neither set is better than the other. When choosing exercises, you can also apply both sets of methods in a cross-over manner. Each exercise lasts 5-10 minutes, with one exercise per day.
Advanced Imagination Training
1. Basic Methods
Formal techniques for learning and generating imagery can be divided into several steps. You can learn to control increasingly complex imagery better through these steps. Do not start experimenting with any intermediate and advanced methods before mastering the basic methods. The basic methods are as follows:
Exercise 1
-
Relax body and mind.
-
Gaze for a moment at a red square object placed on the chair in front of you. Then, feel that this red color seems to enter your head as you breathe. Now close your eyes and see this color appear clearly in front of your mind’s eye.3. Keep this color for the duration of three breaths. With each breath, see it becoming clearer and clearer.4. When exhaling the third breath, feel that this color leaves your head. Then you can open your eyes.5. Repeat the exercise from step 2 to step 4 with a series of colors in the following order: orange, yellow, green, light blue, dark blue, purple, white. Then practice in the reverse order.
-
Repeat the entire round of exercises (from red to white and back to red) 2-4 times continuously.
Exercise 2
-
Relax body and mind
-
Close your eyes and imagine a circle on a gray background, let this image remain for a moment.
-
Repeat step 2 with a triangle.
-
Repeat step 2 with a square.
-
Repeat step 2 with a five-pointed star.
-
Repeat step 2 with a six-pointed star.
-
Now see if you can imagine a circle, then watch it turn into a triangle, then a square, and so on, until it becomes a six-pointed star. Let their shapes change slowly, and observe these changes carefully.
-
Now gaze at the six-pointed star, observe it slowly changing back into a circle through a series of shapes. Watch the circle shrink to a point, then disappear.
-
Repeat steps 7 and 8 several times.
Exercise 3
-
Relax body and mind
-
Imagine an apple, and keep this image for about 30 seconds.
-
Repeat step 2 with an orange.
-
Repeat step 2 with a banana.
-
Repeat step 2 with a green leaf.
-
Repeat step 2 with a light blue bird.
-
Repeat step 2 with a bowl of blue ink.
-
Repeat step 2 with an eggplant.
-
Repeat step 2 with a whole egg.
-
You can use any simple object of a color you are familiar with to conduct this exercise.
This entire set of exercises should be repeated at least once a day. To achieve the best results, you had better do it once in the morning, once in the afternoon, and once before going to bed at night.
2. Intermediate Methods
Exercise 1
-
Relax body and mind.
-
Observe a red square object for a moment like in the first set of exercises. Then, feel that this red color enters your body with your breath and descends along the spine until it enters the lower abdomen. Feel it shining there like a bright star.3. Keep this image for the duration of three breaths. Pay attention to any sensations accompanying this imagination process.4. When exhaling the third breath, see this color leave the body with the breath.5. Repeat step 2 to step 4 with other colors in the following order: A beam of orange light enters the abdomen, reaching the place 3 finger-widths below the navel. A beam of yellow light enters the brain. A beam of green light enters the heart. A beam of light blue light enters the chest. A beam of dark blue light enters the throat. A beam of purple light enters the center of the brain. A beam of white light enters the top of the head.6. Perform the entire round of exercises 2-4 times.
Exercise 2
-
Relax body and mind.
-
Imagine a simple teapot. See it slowly turn a full circle, carefully observing its various sides.
-
Now imagine the teapot slowly tilting, so you can see its lid. The teapot continues moving in this direction, so you can see its other side. Then see the bottom, and finally return to the original side. Carefully pay attention to all details of these images.
-
Conduct this exercise using other simple objects you are familiar with. You can rotate the actual object in your hand first, then close your eyes to do the exercise. This might be helpful to you.
-
Imagine you walk up to this object and enter inside to observe the surroundings.
Exercise 3
-
Relax body and mind.
-
Imagine a red circle slowly rolling into the field of vision of your mind’s eye from one side, while a yellow circle enters the field of vision from the other side.
-
Observe these two circles slowly overlapping together to become a single orange circle, then the orange circle rolls out of the field of vision.
-
Imagine a red circle and a blue circle, both overlapping to form a purple circle.
-
Imagine a yellow circle and a blue circle, both overlapping to form a green circle.
-
Now imagine this process happening in reverse. For example, an orange circle separates into a red circle and a yellow circle. Experiment with this process using other colors.
-
Repeat steps 2 to 5 several times.
-
What do you see when a yellow circle, a red circle, and a blue circle overlap? The overlapping should appear slowly, so you can observe every detail.
Perform this set of exercises 1-2 times a day. If you encounter difficulties when you start practicing, you should not lose confidence. Remember that you are developing a new skill, and only through practice can it be perfected.
3. Advanced Methods
Exercise 1
-
Relax your body and mind.
-
Close your eyes and imagine a bright square.
-
A few seconds later, add an orange square above the red square.
-
According to the standard sequence, add various colors from red to white one by one to the top. Therefore, before your mind’s eye, these squares form a rainbow-like column. Easily maintain this image for as long as possible. Feel this set of colors shining upon you.
-
When your attention starts to wander a bit, or when these images fade, re-imagine the squares and rebuild this column of colors. You may have a tendency to do this faster and faster as you do so; do not let this phenomenon happen. There should be an interval of a few seconds each time a new square is added. During the interval, you should admire your “mental masterpiece.”
-
Spend 5 to 10 minutes doing this exercise. If you can only add 3 to 4 squares, do not rush; proceeding at your own pace is also fine.
Exercise 2
-
Relax your body and mind.
-
Close your eyes and imagine seeing a red balloon floating on the ceiling of the room.
-
When this balloon rolls slowly inside the room, observe it with your mind’s eye. You see it bump into walls, furniture, and various objects. Pay attention to the colors and positions of various objects in the room.
-
Use this method to try some other places you are familiar with besides your home. Try to gradually expand your range of perception from the vicinity of the balloon to the broader area of the room, somewhat like the effect of pulling a camera back. Be sure to proceed slowly and pay attention to details.
Exercise 3
-
Relax your body and mind.
-
Imagine a golden crown, studded with gems of various colors. Hold this image for a few seconds.
-
No longer “hold” this image, but continue to pay attention to it. Let it hover in your consciousness. If this image disappears quickly, or your consciousness leaves it quickly, re-imagine this crown, let it stay for a few seconds, and then let it take its natural course.
-
While observing the crown, suggest to yourself that it will turn into something else (but perhaps not immediately). Let this phenomenon happen, passively follow it, and focus your attention on the image formed.
-
Follow these changes in the image for a few minutes. Try to keep your attention concentrated so that you have a living experience, but do not try to guide or retain this image.
-
Use the same procedure to try other guided images, such as: a pebble, a rock, a meditating person, a tree, etc.
Comprehensive Method Training
Exercise 1
-
Relax your body and mind.
-
This exercise is slightly different from the previous color exercises. Successively imagine a series of colors: red, yellow, green, light blue, dark blue, purple, and white. Try to “hear” a piece of music accompanying the appearance of each color. Hear the lowest tone you can imagine accompanying red, and then as the various colors appear in succession, the accompanying tone gradually rises.
-
When white appears, hear a very high, pleasant tone. This tone has reached the edge of the sound wave that the ear can distinguish.
-
Repeat this exercise 2 to 4 times.
Exercise 2
-
Relax your body and mind.
-
Imagine your body filled with soft, ink-black stuff.
-
Imagine a bright white ball appearing in your heart. Let this ball float to the top of your head and jump out from here.
-
At this time, attach your own eyes to the ball. Observe the surrounding situation through the ball, simply treating your own body as another object in the room.
-
Float out of the room with the ball (if you wish, you can go through walls or the ceiling). Try to travel to a place that interests you and investigate it. When you fly toward this goal and observe the surrounding world, pay attention to those vivid images.
-
Return to your body. Enter the body from the top of the head, descend to the heart, and begin to feel your body again.
Shichida Style Imagination Training
Exercise 1
-
Prepare some oranges (or other items) before the exercise.
-
Stare at the orange (or other item) in your hand, repeatedly and carefully observe its shape, color, and texture; then touch its surface texture with your hand to see if it is smooth or rough, and then smell its scent.
-
Close your eyes and recall what impressions this orange left on you.
-
Relax your muscles, eliminate distracting thoughts, and imagine yourself becoming a very, very small person, drilling into the orange. So, imagine what it looks like inside? What do you feel? Is the color inside the same as the color outside? Then imagine tasting this orange and remember its flavor.
-
Imagine yourself walking out of the orange and returning to your original state. Remember everything you saw, tasted, and felt inside the orange just now, then do 5 deep breaths, slowly count to 5, and open your eyes. You will feel your mind is clear and your mood is relaxed.
Exercise 2
-
Imagine a glass of Sprite placed on the table in front of you. The Sprite just poured into the glass, as bubbles burst and diffuse into the air, the nose smells a sweet, icy scent.
-
The weather is hot, the Sprite is crystal clear, and pearl-like bubbles rise in the upper part of the glass. One can’t help but recall the advertising slogan “Crystal bright, refreshing cool.”
-
Take a sip, and the cool, refreshing taste of Sprite enters the mouth, instantly making the whole body feel much cooler.
-
Imagine yourself walking into the world of Sprite, feeling the chill and comfort of being immersed in it, then do 5 deep breaths, slowly count to 5, and open your eyes. You will feel your mind is clear and your mood is relaxed.
Exercise 3
-
First, investigate whether the students have eaten lemons? If not, let the students look at, touch, and taste a lemon first.
-
Imagine there is a bright yellow lemon in your right hand. Touch it with your hand and feel that the lemon has hard skin.
-
Now, the lemon is cut open, and some juice flows down, flowing onto your hand.
-
Bring the lemon in front of your nose, smell the scent of the lemon, now open your mouth, and take a bite of the lemon.
-
Do you feel your mouth starting to sour and saliva flowing out? Let the realistic image stay in the brain for a while. At this time, you have already entered the right brain state.
Exercise 4
-
Imagine a ping-pong ball placed on the table in front of you. The ball rolls back and forth on the table, and it is with great difficulty that you finally stabilize it.
-
Put your hand on the ping-pong ball and feel it. The ball is hard, very smooth, without any edges or corners.
-
Throw the ball from a high place onto the floor. The light ball immediately bounces up and makes a crisp “bang bang” sound.
-
Imagine yourself becoming a small person, smaller than a grain of rice, and drilled a small hole in the ping-pong ball, entering the inside of the ball like Sun Wukong. Imagine what the inside of the ball is like? How is the light? Is the sound heard the same as outside? What does it feel like?
-
Imagine yourself walking out of the inside of the ping-pong ball and returning to your original state. Remember everything you saw and felt inside the ball just now, then do 5 deep breaths, slowly count to 5, and you will feel your mind is clear and your mood is relaxed.
Exercise 5
Have you been to the underwater world? Was it an eye-opener and unforgettable? Today, let’s take a magical ocean journey and try a fresh feeling.
-
Imagine yourself becoming a cute marine animal; a dolphin, a fish, or a sea lion will do. Imagine your legs joining together to become a long tail, and your arms turning into fins that can paddle water.
-
The deep blue sea surface glistens with dazzling light due to reflecting the sunlight. The sea water surges like happy elves, and flying fish occasionally leap from the sea surface.
-
You swam on the sea surface for a while, feeling a bit tired, and want to go play at the bottom of the sea.
-
You can imagine walking on the seabed, chatting with fish, and letting your imagination roam freely.
Exercise 6
I knew about the place of Antarctica since childhood, but I haven’t had the opportunity to go to Antarctica to see it personally until today. Today, please outline the beautiful scenery of Antarctica in your brain.
-
Imagine yourself placed in the ice- and snow-covered Antarctica. You are wearing a thick down jacket, a hat, and gloves. Despite this, you still feel cold. All around are ice and snow, white and very bright, so bright that it is a bit dazzling.
-
Now, beneath your feet is an open space surrounded by icebergs. Looking into the distance, it is white all around, with tall icebergs standing one after another, making one have to marvel at the power of nature’s ghostly axes and magical workmanship.
-
At the foot of the iceberg, you discover a team of penguins moving forward. Their charmingly naive appearance looks exactly like a group of cute children. You pick up your camera and keep them in your memory forever.
-
You may also watch a variety of wonders, such as beautiful sunrises, icebergs in the sea, snow falling in Antarctica, etc. Please unleash your rich imagination, as if you were there in person.
Exercise 7
Imagine if you were standing on the moon, what kind of scene should you see?
-
Imagine you just walked out of the cabin of a spaceship like an astronaut. Due to the loss of gravity, you feel light all over your body. You no longer walk on two feet but fly back and forth.
-
Based on existing knowledge, make an imagination of the scene on the moon. The surface of the moon is potholed, with rising and falling mountain ranges, full of deserts composed of plains, peaks, and valleys.
-
Looking at the earth we live on from the moon, what do you see and what do you think? Please unleash your imagination freely.
Exercise 8
-
Put the five fingers of your left hand together and extend them to a place 30 cm in front of your eyes.
-
Keep both eyes in “open focus,” staring at the fingertips of the five fingers. Place your concentration on the fingertips, try not to blink your eyes, and continue looking for 30 seconds.
-
Imagine smoke with a scent dispersing from the fingertips. After a period of time, you can indeed see the smoke slowly spreading from the fingertips and smell its scent.
-
After you are skilled in this training, you can also use items around you for association training. For example, when seeing an empty bowl, imagine it filled with noodles, steaming hot and fragrant, making one drool.
Exercise 9
-
Imagine you are in a sea of flowers, with flowers of various colors competing in beauty. Under the sunlight, the clusters of flowers are dazzling.
-
The air is filled with a rich floral scent. The scents of roses, Chinese roses, peonies, and other flowers are mixed together. Take a deep breath, and the fragrance of flowers rushes to your nose.
-
Butterflies and bees dance among the flowers, adding a bit of vivid color to the static beautiful scenery. Continue to use your excellent imagination to make the beautiful picture even more wonderful.
-
Imagine sitting on the beach by the sea in the evening, where you can see the round setting sun in the western sky. At this time, half of the setting sun is already below the sea level, and the beautiful afterglow spreads all over the sea surface. Golden, sparkling waves shimmer before you.
-
The setting sun is a bit dazzling before you, and its light shines on your body.
-
The setting sun gradually sinks down, completely sinking into the sea. Looking up at the sky, the sky is dyed a charming dark red by the afterglow of the setting sun.
-
The sky darkens, and the light before you gradually disappears. Now you feel your mood is very calm.
Exercise 11: Cup Imagination Training
-
Close your eyes and imagine a red cup. Imagine it slowly rotating a full circle along the horizontal direction, carefully observing its various sides, focusing on perceiving the handle of the cup.
-
Now imagine the cup slowly tilting, so you can see its inner wall, the snow-white inner wall, a kind of slippery feeling.
-
The cup continues to tilt slowly, so you can see the bottom inside it. Experience the feeling of finally seeing the bottom; there should be that sense of anticipation.
-
Continue rotating in this direction, and then you can see the other side of the inner wall.
-
Rotate 180 degrees, and you can see the bottom of the cup. Focus on perceiving the part in contact with the table surface, experiencing the difference in texture from the cup.
-
Continue rotating 360 degrees to return to the scene you started imagining.
-
Close your eyes and imagine seeing a red balloon floating on the ceiling of the room, experiencing that feeling of floating.
-
When the balloon floats slowly inside the room. You see it bump into walls, furniture, and various objects, experiencing that sense of collision and the rebound after collision.
-
In the places where the balloon floats, pay attention to the colors and spatial positions of various objects in the room. Be sure to proceed slowly and pay attention to details such as the main contours and colors of objects.
-
Use this method to try some places you are familiar with, such as your workplace, school, parks, etc.
-
Try using balloons of other various colors to do the above exercise. As training becomes proficient, you can imagine multiple balloons of different colors appearing at the same time. When the balloons are floating, pay attention to the interlacing between the balloons of various colors.
Note: It is required to “see” the balloon with eyes open. When starting the practice, you can blur your vision (a blank stare) to promote imagination.
Meditation
Meditation is deep concentration on all things. During meditation, brainwaves become stable, the mood gradually becomes peaceful, muscles throughout the body relax, and hormonal secretion activities become active; therefore, the body’s immunity gradually strengthens. During the process of meditation, people unconsciously improve their usual bad personalities and behaviors, making themselves more objective and stable. Moreover, memory, thinking ability, and creativity will all improve.
Persisting in meditation is the catalyst for Right Brain Development training. Meditation allows for deeper relaxation of the body and mind, enabling people to enter a higher state of concentration, making Right Brain Development training faster and more effective.
When meditating, adopt a comfortable posture sitting, lying down, or standing. Relax the body deeply, completely empty the mind, adjust to steady breathing or deep abdominal breathing, and calm the mind to clarity.
The duration of meditation depends on the situation. Short breaks of less than 5 minutes can be used for meditation. If time is ample, it is better to engage in a slightly longer meditation. The important thing is to persist every day. Meditation can be guided by an Instructor or parents, but it is best to meditate on one’s own initiative.
Exercise 1: Meditating by Gazing at an Orange
Sit on a relatively hard chair and place the orange at a position 30–50 cm from your horizontal line of sight, ensuring there are no other objects around to interfere.
Close your eyes and focus your attention on each exhalation and inhalation, slowly relaxing your body. Then, open your eyes wide and start gazing at the orange. Slowly ignore and blur the objects other than the orange, turning them into the background for the orange.
Carefully observe the orange’s outline, shape, and color. Then, close your eyes and use your memory to depict the orange’s outline and color. Then, imagine picking up the orange, peeling it open bit by bit, and putting it in your mouth. Imagine your teeth chewing the orange and imagine how sweet the orange tastes.
If you suddenly get distracted, open your eyes and repeat the above steps until you will no longer forget the appearance and taste of this orange.
Slowly, refocus your attention on your breathing, open your eyes, and end the meditation.
Exercise 2: Sensations of Various Concrete Objects
- Imagine an orange; you must experience a sense of solidity, a feeling of being squeezed.
- Imagine a banana; you must experience the bright yellow color and experience the soft sensation inside.
- Imagine a green leaf; experience the sense of lightness and experience a fresh state of mind.
- Imagine a light blue bird; experience the feeling of flying, focusing your attention on the movement.
- Imagine a bowl of blue ink; experience that full feeling, a calm and deep sensation.
- Imagine an eggplant; focus on experiencing the contrast between the color of the eggplant and the color of its stem.
- Imagine an egg; focus on visualizing the smooth outer contour of the egg.
- Use any simple object of a color you are familiar with to perform this exercise.
Note: Before doing Mental Imagery exercises, you can first rotate the actual object in your hand, then close your eyes and do the exercise. Focus on imagining the sensation of what you actually see, use your own hands to experience the feeling of touch, and experience the sense of strength and smoothness.
Exercise 3: Quickly Improving Confused Thinking
When your thoughts are confused, you can try this set of meditation: Sit upright or stand up straight, close your eyes, relax your body, and adjust your breathing. Imagine a snowflake drifting down in your mind. Place all your attention on this snowflake and “watch” how the snowflake slowly drifts down from the air and slowly lands on the ground. When the snowflake lands on the ground, end the imagination.
A special reminder is to keep your attention focused at all times; persisting for 1–3 minutes is sufficient.
Exercise 4: Green Leaf
Find a place with weaker light and choose a sitting or standing posture. The sitting or standing posture should be upright, with the back straight. Close your eyes, relax your arms, relax your entire body, and regulate your breathing.
Then, cover your eyes with your hands, palms facing inward, without pressing on the eyeballs (or wear a sleep mask). When all visual images fade and there is no stimulation from any light, let the eyes relax in total darkness. When the eyes have fully adapted to the darkness, start to imagine a green leaf appearing in your field of vision. This leaf is emerald green, very healthy, without yellow spots or dust, very clean, and even the veins are clearly visible. Dewdrops are also rolling on the leaf. Carefully observe this leaf. The leaf gets closer and closer to you, and you slowly enter the inside of the leaf; before your eyes is a scene of emerald green.
Meditate for 5 minutes, slowly withdraw your consciousness, open your eyes, and adapt to the light.
Exercise 5: Clear Water Surface
Choose a comfortable standing meditation posture, relax, and ensure that the cervical spine is perpendicular to the ground. Close your eyes and take a few deep breaths.
Imagine that you are now floating effortlessly in very clear water. Against the backdrop of sunlight and water plants, the water surface appears emerald green and sparkling. Bubbles occasionally rise from the bottom of the water, ascend, and then disappear. You gaze at these bubbles, carefully observing the process of their rising and disappearing.
Maintain this imagination for 3–5 minutes. You can also add things you like, such as swimming and playing fish, beautiful corals, the sound of bubbles emerging, etc.
Slowly shift your attention to your breathing, open your eyes, and end the meditation.
Exercise 6: Imagining Seaside Scenery
Imagine that you are on a beautiful beach, bathing in wonderful sunlight, lying on the soft fine sand by the sea. Use all your Five Senses to enjoy all the details in this scene so that you can fully experience this process. You can feel the texture and dampness of the sand beneath your body. Bury your toes in the sand and let the sand pass through your toes. Appreciate the scenery around you—the azure sea and sky, the golden sand, the distant horizon, the white clouds, and the seagulls flying over your head. You can hear the calls of seagulls, the sound of waves beating against the sandy shore, and the sound of the breeze blowing through the leaves behind you. You can smell the salt in the air and taste it with your lips. What else can you feel, see, or hear? Perhaps you can also feel the breeze blowing against your body; you can touch sand grains and small shells of different sizes; you can hear the laughter of children coming from afar; you can smell the smell of the sea; you can feel the passionate sea breeze blowing up your hair.
Once you have established all the details in this lovely scene, enjoy it for a while, and feel calm, satisfaction, gratitude, and relaxation. The purpose of all this imagination is to bring you into this inner world where you know “everything will be fine,” not just now, but also frequently in the future. Before you decide to leave this beach, repeat your “Inner Affirmation” (an idea or determination you have already decided on, for example, “I am very serious when doing problems! I will check every time”) 3 times slowly and clearly, and then gradually let the entire scene disappear. Know that no matter what happens in the outside world, this inner world always keeps its door open for you.
Exercise 7: Head Center-style Concentration Cultivation
This meditation exercise can cultivate concentration and objectivity in dealing with things. The entire meditation process lasts for 10–15 minutes.
When you have cultivated a good ability to focus your attention, you can focus your attention on the center of your brow during meditation.
Choose a comfortable sitting posture, close your eyes, and observe your breathing.
Imagine that there is an energy sphere filled with energy at your coccyx. Imagine the entire sphere gradually moving up to your lower abdomen area, about 3 fingers below the navel. Take a few deep breaths and pay attention to all your sensations. Continue moving this sphere up to your celiac plexus (solar plexus), breathe deeply, and pay attention to experiencing all the sensations of the celiac plexus at the same time. Continue moving the sphere up to the heart area and experience the feeling at this moment. Continue moving the sphere up to the throat and experience the feeling at this moment. Finally, move the sphere up to the center between the eyebrows (brow). Let the sphere stay here; this is the center of your head and the central location where consciousness is generated. Breathe, focus your attention on the sphere of light, and experience how the feeling or quality of this center differs from other places. The head center is a place where you observe your inner mind and external sensations without making any judgments or evaluations. Here, you can objectively and impartially survey the thoughts and feelings you produce.
Turn this energy sphere into a bright blue light, let this blue light turn into a halo spreading to your entire head, and experience the spiritual purification in the halo. Then imagine the light radiating to the surrounding space outside your head. The ripples of light enter your aura, spreading outward like ripples in a lake. The blue light continuously radiates and expands outward with your breathing. As your body increasingly merges into the radiation of the blue light, gradually imagine that the outline of your body begins to blur and dissolve in the blue light. The purity of the mind allows you to clearly realize your physical, emotional, and spiritual experiences. Pull the outwardly radiating and expanding blue light back to your side, surrounding you and covering you, just like putting a comfortable blanket on your body.
Slowly bring your attention back to exhalation and inhalation. By counting down from 10 to 1, bring your consciousness back to wakefulness, then open your eyes and end the meditation.
Exercise 8: Peace Garden
Choose a comfortable meditation sitting posture, close your eyes, and start abdominal breathing. Imagine your breath is a gentle breeze that gently lifts you up. The breeze carries you to the gate of a garden. You can feel that this is not an ordinary garden, but a place full of magic. Here, you can change or create anything through your will.
You walk into the garden, and what meets your eyes are various brilliant flowers. You feel a strong sense of joy amidst the garden full of flowers. Take a deep breath and inhale the fragrance emitted by the flowers; prick up your ears and listen to the songs of birds and the chirping of insects; reach out and touch the flowers and leaves, feeling the delicate touch.
You stroll through the garden, feeling the temperature of the earth. Don’t forget that you possess the ability to change and create things in this garden. You can control the weather (sunny or cloudy), the temperature (high or low), and the strength of the wind. You can rest in your ideal garden without any inhibition.
Finally, take one last look at the garden and prepare to leave. Savor your experience in the garden, gradually shift your attention to your breathing and yourself, and tell yourself that when you return to the waking state, you will be revitalized and full of energy. When you feel that you are fully awake, open your eyes and end the meditation.
Feel the freshness and recovery of energy at this moment slowly, feel…
Close both eyes, adjust your breathing to be even; the breathing must be long and slow. Take a deep breath and imagine that you are walking along a sunlit forest path. The sunlight is bright but soft, and a breeze blows, gently brushing past you…
Walking in the silent path, you suddenly see a sea of flowers. Every flower is fragrant and charming, blooming dazzlingly. Flowers of various colors compete in beauty: white, pale yellow, orange, lemon yellow, bright red, sky blue, dark blue, violet. There are many shades of red alone: vermilion, pink, plum red, peach red, cherry red, orange-red, pomegranate red, date red, lotus red, etc. Some petals are large; some are small; some are smooth; some have visible textures. Green leaves and dense shade set off the sea of flowers, and the air surrounding the garden is fresh and pleasant. You can’t help but take a deep breath, inhaling this fragrance into the bottom of your abdomen, purifying your body and mind.
Your inspiration slowly appears. Every flower is a concept to you, one of your inspirations. Some flowers are a story, some are a memory, and some are a journey of yours. The sea of flowers spreads. You pick the flowers; pick as many as you want, and tie the flowers into a bouquet. The garden is always there, always blooming profusely. Regardless of spring, summer, autumn, or winter, regardless of sunny days or frosty mornings, it blooms all year round, waiting for you to pick. This is the meaning of the existence of every flower, and the purpose of the flowers blooming violently is to help you create creativity.
Whenever you want, you can come to this sea of flowers at any time, weave shapes for the sea of flowers, and use the flowers to create and produce.
Maintain this meditation; the duration depends on the individual. The mood slowly calms down, consciousness begins to return to a normal state, feel the serenity and refreshment of this moment, savor the joy brought by meditation, count silently in your heart, and then return to the waking state.
Choose a satisfactory meditation posture, close your eyes, extend your tongue, and breathe according to your psychological state. At this moment, imagine a beam of warm and bright golden sunshine above your head, and through the power of meditation, guide this beam of golden sunshine into your body through the top of your head.
You will feel a surge of heat flowing at the top of your head; this force relaxes the muscles of your mouth and face. Then, this warm current spreads through the neck to both shoulders; the shoulders naturally droop and relax. The warm current flows towards the chest and the back of the heart, spreading to the arms, and entering the palms through the shoulders and arms.
Slowly enter a state of increasing relaxation. Follow the rhythm of your breathing, guiding the heat flow continuously into the abdomen, buttocks, and lower back. The heat current flows down the legs into the ankles and feet. Experience how hard the ground beneath your feet is, and how gravity is pulling you. As you completely relax, your mind returns to calmness, entering a tranquil world. Count backwards from 10 to 1, letting your spirit drift to a deeper place of silence…
Experience the balanced rhythm of your heartbeat “thump-thump-thump-thump,” and let your breathing accompany this rhythm. Feel this rhythm gently pulsing and surging. Let this rhythm dominate your mind and spirit; think of nothing. Your body also interacts with this rhythm, and this rhythm can take you into a state of deeper and deeper relaxation.
When you are ready to return to a waking state, count from 1 to 10. Slowly feel the freshness and recovery of energy at this moment, and feel the leap of vitality. Adjust briefly to adapt to the external environment.
When your heart harbors negative energies such as pain, anxiety, and fear, you need to expel these negative emotions from your body and replenish your body with new positive energy. The entire meditation process lasts about 10 to 15 minutes.
Choose your favorite meditation posture, close your eyes, and press your tongue against the upper palate. Open your hands and relax them. Observe your breathing, allowing your body to become increasingly steady, peaceful, and warm with every breath rhythm.
Focus your attention on the coccyx (tailbone), feeling that the breath gathers at the bottom of the spine like a pool of water. In your mind, imagine the image of your favorite tree. Imagine the branches and leaves gently wrapping around your coccyx, as if you are also part of the tree; imagine yourself as a child climbing up the trunk and lying on the thick branches, your breathing flowing into the trunk and into the leaves; imagine the trunk is hollow, weaving through soil and rocks, extending all the way to the center of the earth. Your breathing also flows into the center of the earth along the hollow trunk; feel the scorching heat of the earth’s core. You will feel your body getting heavier and heavier, still being constantly pulled by gravity. This hollow trunk is the channel connecting you to the earth. Connecting to the earth acts like a vacuum cleaner, helping you expel unwanted sensations, emotions, or thoughts from your body.
Focus your attention on your body again and search for the pain, anxiety, or fear you wish to expel. Visualize these negative emotions as smoke, and let them be expelled from your body along the hollow trunk, just like bathwater draining from a bathtub. If you still feel there is negative energy in your body, you can repeat this several times until you feel your spirit has been thoroughly purified.
Whenever you expel negative energy from your body, you need to replenish it with new energy. At this moment, imagine a beam of very bright golden sunshine above your head. Inhale this golden sunshine into your body and guide it to the areas where you expelled energy. When you feel you have absorbed enough golden energy, take a few deep breaths, then gently open your eyes to end the meditation.
Through imagination, communicating with your body can help maintain health. For example, if you have a stomachache, keep your eyes slightly closed and visualize the painful area of your stomach. Look for the cause. You can also ask your stomach what the reason for the pain is. Is it because of a cold or eating something unclean? What should be done to restore health? At this time, a huge energy from nature gathers at the painful area, making the painful area warm, getting hotter and hotter. After a few minutes, the disease drills out of the body and falls deep into the ground. Slowly open your eyes, rub your stomach, and feel if there are any changes?
Another example is a headache. Keep your eyes slightly closed and imagine a stream of nature’s essence capable of curing disease spiraling into your skull from the top of your head. This stream of essence spirals in the skull, again and again. During the spinning process, it takes all the pathogenic qi out of the body. The forehead gets warmer and warmer, brighter and brighter. Comfortable, comfortable. The illness is cured, cured.
Chapter 8 Visual Training
Visual training includes One-Point Gazing Training, Eye Muscle Training, Field of View Expansion Training, 3D Card Training, and Afterimage (Yellow Card, Three-Color Card, Mandala) Training. Makoto Shichida and other brain training experts almost universally regard these trainings as the foundation of Right Brain Development. Among them, gazing training, visual span training, and 3D card training aim to expand the range of information reading and improve concentration, while afterimage training aims to exercise attention, imagination ability, memory ability, etc.
Training can be conducted using rapid reading memory training software like Jingyinte, Feike Visual Reading Speed Listening Machine software, Brain Code training system, Eye Expression Rapid Reading training software, Mini Visual Span Training, Speed Eye Training minieye, and other speed reading and memory software, or it can be done using training cards.
One-Point Gazing Training
This training can cultivate concentration and expand the field of view. Performing this training allows the spirit to concentrate naturally, and also builds endurance and mental persistence. Conducting One-Point Gazing Training can improve the function of the eyeballs, enlarge the field of view, expand the range of objects instantly seen onto the retina, and improve the ability to read content information at a glance during speed reading.
Training Method:
- Prepare a white card with a black dot 2–3 cm in diameter printed in the center (as shown in the picture). Place the card about 1 meter away from your eyes. It can be hung on the wall, pasted on a desk, or stuck on a cabinet to look at.
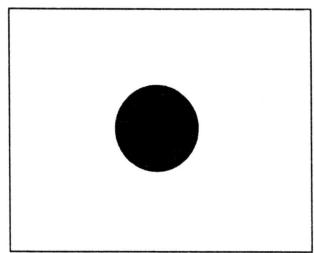
-
Sit upright and relax your body. Focus your vision on the black dot in the center of the card. Do not stare, do not blink, and do not go cross-eyed. Gaze for 1–2 minutes, with self-suggestion: “The black dot looks big, the black dot looks clear, the black circle is getting bigger and bigger.” During this process, your eyes may gradually feel sore or tear up. A faint gray ring will appear around the edge of the black circle. With continuous training, the gray area will gradually turn black, and you will be able to see the enlarged black circle.
-
When a circle much larger than the original appears at the position of the black circle, slowly make it smaller, returning it to its original size. When looking, keep your mind as calm as still water; do not be impatient. Wait patiently for it to happen like an illusion. If you keep paying attention to whether it has gotten big, it may be difficult for it to get big. Your attention should constantly remain on the black dot. When looking, do not stare at one point; place your attention on the entire black dot. The enlargement of the dot will vary from person to person, but generally, it will be more than 1 time larger. Some people, when staring at the dot, will feel the room become pitch black.
-
Repeat this 4 or 5 times, practicing 1–2 times a day. As the number of trainings increases, the time spent staring at the black dot can be lengthened, and the effect of the One-Point Gazing Training will become more obvious. Until you can take out the card and immediately see the enlarged dot, you can stop training.
Eye Muscle Training
Eye Muscle Training is the training of the eye muscles, also known as Viewpoint Movement Training or Visual Span Expansion Training. Reading speed is closely related to eye movement. Wave Speed Reading requires the ability to perform Right Brain reading, so correct visual reading methods become particularly necessary. Eye training can improve the function of the eye muscles. Usually, our field of vision is only focused on the center; the further from the center, the harder it is for the object we are looking at to enter our field of view. Eye training can improve the function of the eyeballs, enlarge the field of view, expand the range of objects instantly seen onto the retina, and improve the ability to read content information at a glance during speed reading.
Visual span development is the starting stage of speed reading training and is also the most important step. However, special attention must be paid: during the process of expanding the field of view, achieving “one line at a glance” or “two lines at a glance,” or several lines, where every word is seen very clearly—almost as clear as the central field of view—is completely wrong. This training is for practicing the mobility of the eyes, allowing your viewpoint to stop instantly, so that you can acquire text the moment the viewpoint stops, that is, the moment the eye stops. In other words, this training is the foundation for expanding the visual span.
The so-called “one line at a glance” or “two lines at a glance” means your visual attention encompasses this much. After cutting off vocalization, the brain will understand it as a whole, but in the beginning, it relies on some guess-reading. As the amount of reading increases later, the peripheral vision will slowly become clearer, and the guessing component will slowly decrease. The so-called “seeing clearly” in peripheral vision, the so-called “knowing what character it is,” is actually more of a habit. But it will never reach the clarity of the central field of view. Although peripheral vision cannot see certain words clearly, experience tells the brain that they are these words. Reflected in reading, when speed reading, one can understand these words very fluently.
Therefore, do not deliberately expand your field of view, thinking that the peripheral vision can see certain things with high resolution like the central field of view.
There are 6 types of eye muscles: Superior Rectus, Inferior Rectus, Medial Rectus, Lateral Rectus, Superior Oblique, and Inferior Oblique. The “Bates Theory” believes that these 6 eye muscles work together to correctly image the image onto the focal point. Training these 6 eye muscles to function correctly can expand the eye’s visual span and cultivate “Photographic Memory”—the ability of the eye to see the content of a whole page of a book and memorize it.
Look at the card without wearing glasses. Open your eyes naturally, do not stare, do not squint, and do not go cross-eyed. Place the card 30–40 cm away from your eyes, keeping your head in the center of the card. During training, due to the influence of viewpoint movement, the face may also move left and right easily; try to keep your face as still as possible. During practice, the eyeballs should move as fast as possible.
When training, do not needlessly prolong the training time; the key is to persist in training every day.
Eye Muscle Training 1: Superior Rectus and Inferior Rectus Training
The up-and-down movement of the eyeball can exercise the Superior Rectus and Inferior Rectus. According to the diagram, look at the black dots on the card up and down along the direction of the arrows. Start from ① and move your line of sight up and down towards ②. Upon reaching ②, move your line of sight in the opposite direction from ② to ①. Completing the movement to ① counts as one exercise, then repeat the previous process. Move the viewpoint as fast as possible, striving to move all points once within 3 seconds. The viewpoint moves up and down along the training diagram. One training session takes about 1 minute.
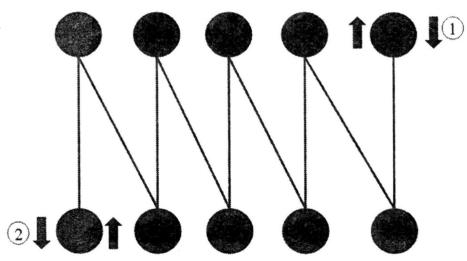
Eye Muscle Training 2: Medial Rectus and Lateral Rectus Training
The left-and-right movement of the eyeball can exercise the Medial Rectus and Lateral Rectus. According to the diagram, start from ① and move your line of sight left and right towards ②. Upon reaching ②, one exercise is completed. This training is different from the Superior Rectus and Inferior Rectus training; do not move your line of sight back to ① when you reach ②. Move the viewpoint left and right as fast as possible, striving to move all points once within 2 seconds. One training session takes about 1 minute.
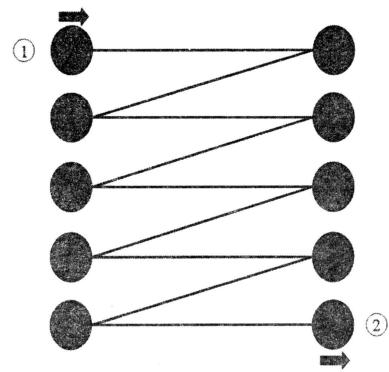
Eye Muscle Training 3: Superior Oblique and Inferior Oblique Training
The diagonal movement of the eyeball can exercise the Superior Oblique and Inferior Oblique. According to the diagram, start from ① and move your line of sight along the direction of the arrows in the order of ①②③④; this is the Superior Oblique movement. Conversely, it is the Inferior Oblique movement. Move the viewpoint up and down as fast as possible, striving to move all points once within 1 second. One training session takes about 1 minute.
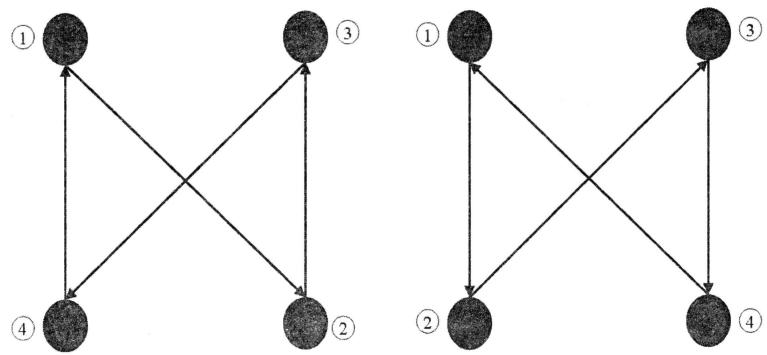
Eye Muscle Training 4: Circular Movement Training
The last type of visual span expansion training is viewpoint Circular Movement Training. This training serves as a cooling-down exercise that makes eye movements light and eliminates eye muscle fatigue. Therefore, it can be used when eye fatigue occurs during eye function training and actual speed reading. According to the diagram, start from the black dot at the top of the training diagram and move the viewpoint clockwise along the circle. Training time is 10 seconds. During this time, move the viewpoint as fast as possible. Next, start from the same black dot and move the viewpoint in a counter-clockwise direction. The training time is still 10 seconds. Close your eyes and let the training diagram appear in your mind. Following the procedure just now, perform the circular movement of the viewpoint with closed eyes. The training time for each is also 10 seconds.
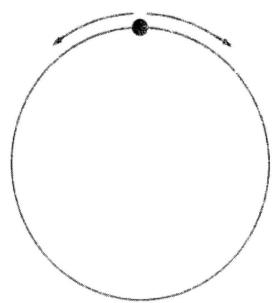
Viewpoint movement training (Eye Muscle Training) has excellent effects on enhancing eye flexibility, cultivating directional search ability, and improving the brain’s regulation of eye muscles, so it must be persisted in every day. Viewpoint movement training is highly actionable and can be practiced anytime, anywhere. At home, you can use the four corners of a wall or the four corners of a window as reference points. When taking the bus, constantly moving your eyeballs left and right to see the buildings on both sides of the road is also a very good method.
Field of View Expansion Training
Training can activate the rod cells in the peripheral field of view, train the peripheral field of view that is usually unused, make the eyes better perform their functions, and also allow the potential abilities of the Right Brain to be developed and utilized.
Drawing Card Training
Prepare a white card with a black dot drawn in the center and different images drawn in the four corners (see Drawing Card 1).
Place the card 20 cm in front of your eyes and confirm that all four corners of the card are within your field of view. Focus your vision on the black dot in the center for 10 to 30 seconds, trying to see all the images on the four corners of the card simultaneously.
Continue training until you are able to see the images on all four corners of the card at the same time.
Note: Try to perform the training in bright light.
Once you can see the images, proceed to the next stage of training using a drawing card where the distance between the black dot and the images is greater (see Drawing Card 2).
Drawing Card 1
Drawing Card 2
Similarly, place the card 20 cm in front of your eyes, focus on the black dot in the center of the card, look for 10 to 30 seconds, and try to see the images in all four corners at the same time to further expand your field of view.
You can also imitate the drawing cards in this book and make some cards yourself, continuously increasing the distance between the black dot and the images to increase the difficulty.
The key point of this training is to concentrate it in a short time. Do not needlessly prolong the time spent looking at the card; strive to read a card within 10 seconds.
Text Card Training
Prepare a white card with a black dot drawn in the center and text radiating outwards around it (see Text Card 1).
Place the card 20 cm in front of your eyes and confirm that all four corners of the card are within your field of view. Focus your vision on the black dot in the center for 10 to 30 seconds, trying to see all the text on the card simultaneously. Continue training until you can see all the text on the card.
Note: Try to perform the training in bright light.
Once you can see the text, proceed to the next stage of training using a text card where the distance between the black dot and the text is greater (see Text Card 2).
Text Card 1
Text Card 2
Similarly, place the card 20 cm in front of your eyes, use the black dot in the center of the card as the focal point, and try to see all the text on the card to further expand your field of view.
Likewise, you can make your own text cards, gradually increasing the distance between the black dot and the text, and continue training to widen your field of view.
The training point is similarly to concentrate it in a short time; do not drag out the time looking at the card, and strive to see the text on the card within 10 seconds.
If your eyes or body feel tired, stop the training, rest and relax for ten minutes or so, and then resume training.
Visual span is the foundation for practicing speed reading. At the same time, visual span expansion is a compulsory course in speed reading training, and it is also a problem that many friends who practice speed reading find difficult but urgently need to solve. If visual span expansion is not passed, then advanced direct reading and Wave Speed Reading are out of the question.
3D Image Training
The so-called 3D card training refers to the training of seeing three-dimensional images. 3D card training is very effective for opening up peripheral vision, cultivating imagination, improving eyesight, and enhancing attention. There are 10 training cards in this section. You can purchase books like “Improving Eyesight and Enhancing Attention: 3D Puzzle Games” (by [Japan] Takahisa Tokunaga) or other three-dimensional stereogram books. You can also search online and view them on a computer or mobile phone. Additionally, there is a mobile game called “Right Brain Terminator” that is also for practicing three-dimensional stereograms.
Human vision is actually divided into left brain vision and right brain vision. Left brain vision belongs to three-dimensional vision, which is the ability to see things that the naked eye can see, while right brain vision is able to see content that left brain vision cannot see.
After visual training, your eyes will be able to see light and colors that ordinary naked eyes cannot see. Once this step is achieved, you can proceed to Wave Speed Reading.
The most important thing in developing right brain vision is to use the “soft focus” visual method during the reading process. The so-called soft focus means not focusing the visual point on a single spot during the reading process, but rather trying to make the focus blurry and dispersed. Through this training, the image seen by your naked eyes is converted into a thinking image, thereby appearing clearly in your mind.
This training method for eye muscle movement is also called the psychological visual input method. Of course, this method is not something that can be mastered very easily by people; it can only be realized on the basis of training again and again. Only through continuous effort can you have the ability to calmly obtain right brain visual images. Not only that, but after a series of advanced training, you can see these images even without closing your eyes.
Slowly enlarge the 3D stereogram until your eyes can no longer bear it and cannot see the 3D effect inside. Using this method to look at images will cause obvious soreness and pain in the eyes within a short time, proving that the regulatory activity of the eye muscles is very obvious, which has a very good effect on the exercise of the eye muscles. After the 3D stereogram is enlarged, the 3D image noticed by the eyes also enlarges. The eyes must adapt to the new picture levels and have to constantly adjust the eye muscles. The enlarged 3D image will drive the expansion of the visual span. Once the eye muscles relax, the eyes have to re-adjust the eye muscles to see the 3D image in the picture clearly. When an image is enlarged to the point where the eyes can just no longer distinguish the 3D image inside, hold for 15 seconds, and then look at the next one using the same method. If you can see the 3D images in 10 3D cards within 1 minute, it will be very helpful for the subsequent high-speed audio-visual speed reading training.
There are two methods for viewing 3D images: the Parallel Method and the Cross Method. Either method can be used to see three-dimensional objects, and both have the effect of restoring vision. However, the Parallel Method may be more effective for improving myopia and is more suitable for beginners.
Viewing Images with the Parallel Method
The Parallel Method refers to looking past the 3D image, giving the eyes a blurry feeling, and then letting the eyes’ focus land on the 3D image. Be careful not to stare at the 3D image itself, but to look through it to the back. The key point of the Parallel Method is not to over-tense the eyes, relax the whole body, empty the mind of distracting thoughts, and not be obsessed with having to see the 3D image.
Generally, when we look at a 3D image, our eyes’ focus falls on the center of the image. When using the Parallel Method, the line of sight should fall behind the image, just like looking into the distance. Successfully using the “Parallel Method” is like the demonstration in the figure below, where you can see the shape or pattern floating out of the picture surface, becoming three-dimensional.
When looking at an image using the Parallel Method, the hidden shape will appear before your eyes. After making the answer into a simple, easy-to-understand illustration (as shown in the diagram), the shape in front of you becomes three-dimensional. The entire picture looks very three-dimensional; besides the 3D image in the middle, you can also see another picture serving as the background.
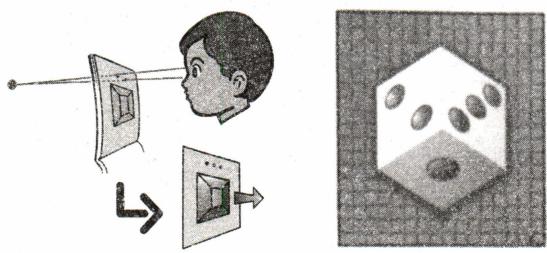
Parallel Method Practice
-
Place the index fingers of both hands about 30 cm in front of your face, with a distance of 5-6 cm between the index fingers. The distance between the face and fingers, and the distance between fingers mentioned here are based on a standard-sized adult and can be adjusted according to your own body shape. If it is a child, please shorten this distance; taller people should lengthen this distance.
-
Focus your attention on these two fingers, then look at a spot a few meters away from the two fingers. It works better to look into the distance casually in a relaxed state.
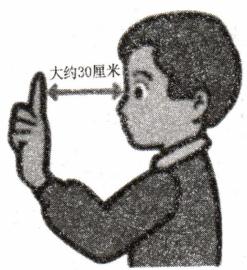
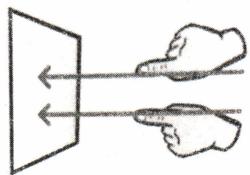
- For the first few dozen seconds, you will see 2 fingers in front of your eyes. Hold for a while until you see the 2 fingers as 4. Some people take a long time to see the 3D image, and many people cannot see the 2 fingers as 4.

Sometimes, if you look too seriously with the thought that “I must see it,” you won’t be able to see it, so a relaxed and happy attitude is better.
- After seeing 4 fingers, similarly pause for a few seconds to a few dozen seconds, then see the 4 fingers as 3. Some people can see 3 fingers soon after seeing 4 fingers, while others need to wait a while to see 3 fingers, so do not be anxious.
- When seeing 3 fingers, use this state of eyesight to look at the 3D image, and you will be able to see the 3D image.
Some 3D images have 2 dots at the top; you can also use these 2 dots to see the 3D image:
-
Relax your eyes, relax your body, and take a few deep breaths.
-
Use the two dots at the top of the picture as the target for each eye to gaze at, then look at the picture using the Parallel Method as if looking into the distance, causing the picture to gradually blur in your field of view. At this time, the 2 dots you are gazing at will naturally separate into 4 dots.
-
Slightly adjust your line of sight to merge the inner 2 dots into 1 dot, that is, shrink the 4 dots formed in the previous step into 3 dots. Then shift your gaze downward, and the hidden 3D image in the picture will naturally appear. Just like seeing 1 finger become 2, in the initial training, for images without dots, you can draw the dots yourself. After mastering it, you can even see them without needing the dots.
-
Note: When looking at 3D images, do not focus your line of sight on a specific point in the image!
-
Key point: When looking at the image, bring the screen closer, close enough like reading a book, otherwise you will get half the result with twice the effort! Also, it is best to enlarge the image! Enlarge to full screen!
-
The method for viewing on a computer and in a book is the same.
Viewing Images with the Cross Method
The Cross Method is exactly the opposite of the Parallel Method; it focuses in front of the three-dimensional stereogram, similar to being cross-eyed. People with hyperopia can use the Cross Method, while people with myopia can alternate between the Cross Method and the Parallel Method. The Cross Method refers to the method of crossing the line of sight in front of the three-dimensional stereogram, that is, looking at the stereogram with cross-eyes. Those who are not good at being cross-eyed can look at the image while staring at the tip of their nose. If the Cross Method is used successfully, the pattern will appear to sink into the screen.
When looking at an image using the Cross Method, the hidden shape appears to be embedded into the picture as a whole. Additionally, the image seen with the Parallel Method protrudes, while the image seen with the Cross Method appears concave (as shown in the figure).
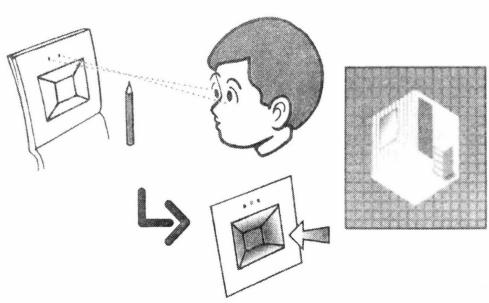
Cross Method Practice
-
Place the index finger of one hand about 30 cm in front of your face (the distance suitable for everyone varies, please find the distance that suits you).
-
Choose a target object a few meters away. The finger, face, and target object must be on the same line. It is recommended to choose an object the size of a clock as the target, keeping the distance between the face and the finger unchanged. Do not place unnecessary objects around the target.
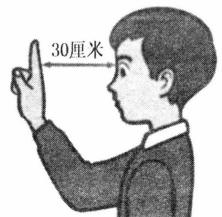
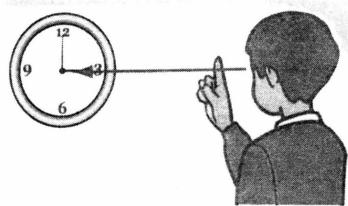
- Focus your vision on the finger and persist for a few dozen seconds until the target object becomes 2. Many people cannot see the target object as 2. You can try to go cross-eyed and focus your vision on the finger. Staring at the finger allows you to see 2 target objects, which means your line of sight is no longer停留在 on the finger.
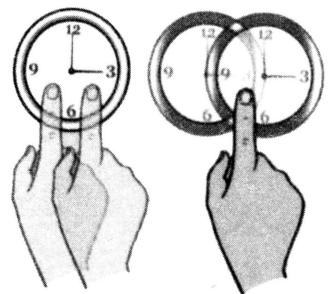
- When seeing 2 target objects, use this cross-eyed state to look at the 3D image, and you will be able to see the 3D image.
Sausage Finger Method
First, put the fingertips of 2 fingers opposite each other and focus your vision on the fingertips. At this time, a “sausage finger” should appear between the fingers (as shown in the figure). This is the simplest way to capture the feeling of three-dimensional stereograms. After seeing the “sausage finger,” we can transition from Parallel Method practice to Cross Method practice.
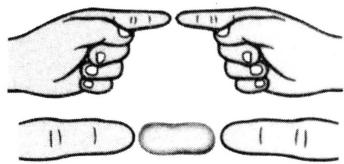
-
Put the left and right index fingers opposite each other, then stare without blinking at the opposing fingertips.
-
Then look into the distance beyond the fingertips, and you will see a “sausage finger” appear at the fingertips.
Mirror Practice Method
Those who are not good at using their fingers to switch their viewpoint can try the “Mirror Practice Method”. This method is very simple. First, stand in front of a mirror and make a mark with your hand (as shown in the picture), then stare at the mark. To practice using the Parallel Method, you must stare closely at the right eye in the mirror with your right eye, and at the left eye in the mirror with your left eye. If successful, you will see the mark turn into 2. When practicing with the Cross Method, you must focus your gaze on the mark, which will allow you to see 3 eyes in the mirror.
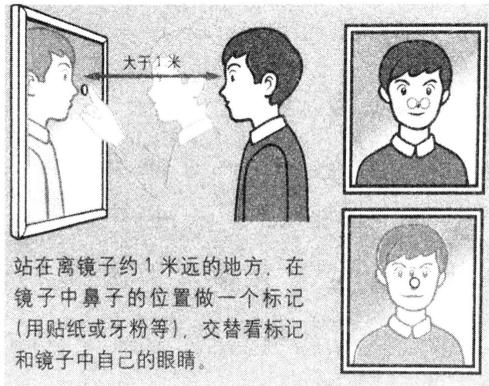
Schulte Grid
The Schulte Grid can exercise the endings of the optic nerve through dynamic practice. In psychology, this table is used to study the speed of mental perception, including the speed of visual orientation search movements. By practicing observation with the Schulte Grid, one can cultivate the ability to control and concentrate attention, and improve visual stability, discrimination, and directional search ability.
For each table, quickly find all characters in order. An average of 1 second per character is considered excellent performance, i.e., 9 seconds for 9 grids, 16 seconds for 16 grids, and 25 seconds for 25 grids. Continuously increasing the difficulty of the task means that while maintaining a high level of concentration, the practitioner needs to effectively distribute attention, shift attention in a timely manner, and handle the ability for dual or even multiple recognition; training with text content adds logical reasoning abilities.
Start practicing; it is very normal not to meet the standard at first, so do not be impatient. You should start practicing with the 9-grid. Once you feel proficient or can meet the requirements relatively easily, then gradually increase the difficulty. Never let your enthusiasm for learning be frustrated by a desire for quick success.
The longer you practice, the shorter the time required to read the table will become. As the practice deepens, the peripheral vision ability of the eyeballs improves. Not only can beginners effectively expand their visual span, speed up reading rhythm, and exercise the eyes for rapid recognition; but also after entering the advanced stage, it is very effective for expanding both horizontal and vertical visual spans simultaneously, achieving the ability to read ten lines at a glance or even a whole page at a glance.

How to Use
① Keep eyes 30–35 cm away from the table, with the viewpoint naturally resting on the center of the table;
② On the premise that all characters are clearly within view, find all characters in order (1–9, A–I; for Chinese characters, be familiar with the original order first), taking care not to focus on one thing and lose sight of another, ignoring other characters just to find one character;
③ After finishing viewing each table, let the eyes rest for a while, either closing them or doing eye exercises, to avoid excessive fatigue;
④ In the initial stage of practice, do not consider memory factors. Look at 10 tables per day.
When using the Schulte Grid, pay attention to the following:
-
Schulte Grid training encourages parents and children to play competitive games together, or competitive training between several practitioners, to enhance the fun and purpose of the training;
-
During training, pay attention to the abilities of different age groups. Avoid being eager for quick success. The time for 7–8 year old children to find numbers in order on a 5×5 table is 30–50 seconds, with an average of 40–42 seconds; for those over 12 years old, the time to look at a chart is approximately 25–30 seconds, with an average of 1 second per character being considered excellent;
-
Train more than 10 times a day and record the results of each training session. The training results may not be very satisfactory in the short term, which is a normal phenomenon. Do not be impatient. Only after the results are stable and you are relaxed and proficient should you gradually increase the difficulty, proceeding step-by-step;
-
When using software for training, pay attention to resting your eyes; when using handmade tables, ensure the handwriting is clear, and you need to frequently change the order of numbers in the table. Do not repeatedly use the content of a single table;
-
When increasing the difficulty with number sequences, letters, or text, explain the rules to the practitioner.
For Schulte Grid training, it is recommended to use computer software (such as Schulte Grid software, brain training programs, Schulte Grid Flash mini-games, etc.) or mobile apps (Schulte Grid, Schulte—Schultz tables, etc.) for practice. This makes it easier to record results, and the training time is more flexible, making the training more interesting.
Afterimage Training
The so-called afterimage refers to the phenomenon where after the visual stimulation of an object suddenly stops, the human’s visual sensation does not immediately disappear entirely, and the image of the object remains temporarily.
Afterimage training is a component of Makoto Shichida’s visual training. It is a very effective basic training method that utilizes the奇妙 visual residual images produced by staring at one or more colors for a long time and then closing the eyes or turning to other planes (a white wall or white paper) to cultivate right brain imagination.
The purpose of afterimage training is to help us rapidly present clear Mental Imagery, allowing us to see the Mental Imagery we wish to see at will, which is also stimulating inner vision, also known as the activation of the right brain. Through this activation, the brain gains Photographic Memory ability and imaginative ability.
Initially, the visual residual image is generally the complementary color of the viewed color. Most children under the age of 12 can directly see the Original Color or see the Original Color after simple training, but afterimage training should be persisted in as much as possible. Adults, however, need to put in great effort for long-term systematic training.
General afterimage training usually goes through five stages:
-
Able to see the complementary color of the object;
-
Able to see the original color of the object;
-
Able to consciously change the color and shape of the appearing afterimage;
-
Able to naturally produce Mental Imagery;
-
Able to see the Mental Imagery one hopes to see at will.
When conducting afterimage training, there are several tricks that can allow imagination to play freely.
-
Change the “I can’t” mindset to “I can definitely do it.”
-
Meditate before training to keep your mind calm.
-
Breathe deeply and slowly.
-
Then imagine that there is a screen 30–40 cm in front of your eyes, and silently chant “appear, appear,” letting the imagined content appear on that screen.
Memory has 3 steps—memorization, retention, and reproduction. After forming right brain memory through a series of afterimage trainings, memorization, retention, and reproduction will become very easy.
First, memorization—it can be completed instantly like taking a photo.
Second, retention—the memory is stored in the brain and can be reproduced at any time in the future through imagination.
Third, reproduction—whenever you want to recall something, you can reproduce the memory through imagination just like looking at a photo.
Once right brain memory is formed, if you want to see yourself in the image, you can see your figure. When you can see your figure, this training can be concluded. If you can imagine yourself scoring 100 on an exam, or achieving success in your career, then these clear and vivid imaginations can motivate you to constantly advance towards your goals.
Left brain memory is linguistic memory and is temporary; right brain memory can reproduce the past like looking at a photo at any time. Persist in training until the imagined content can appear easily, at which point the goal of the training is achieved.
Afterimage training requires the use of Yellow Cards, three-color cards, Shape Cards, and Mandala Cards. For this training, we can use either physical cards or software (there are relevant software available on computers and mobile phones, such as afterimage training software, Mandala training diagrams, etc.) to practice.
Yellow Card Training
In afterimage training, the first step is Yellow Card training. This is the foundation for developing the right brain Photographic Memory ability and is a very important training.
The background color of the Yellow Card is yellow, and the dot is blue. Yellow and blue are complementary colors. During training, the afterimage initially seen is a yellow circle presented on a blue background. Continuing with training, the retention time of the afterimage will slowly become longer, and what is displayed will no longer be the complementary color, but the original color.
After children undergo vision training, they can directly light up the “screen” in their head, and most can easily and directly see the Original Color of the Yellow Card. If an adult can see the original color of the card right at the beginning, this is very good, indicating that your Photographic Memory ability is particularly outstanding.
When the afterimage seen displays the original color, from this moment on, your Photographic Memory ability has begun to function. Even without looking at the Yellow Card, as long as you use your consciousness, you can see whatever color you want to see at will. Please do not give up halfway; persist with the training!
As the retention time of the afterimage gradually becomes longer, we can clearly extract it through consciousness. This is a very natural physiological function of the eyes. Next, we can freely change the color and shape of the afterimage; we can arbitrarily change it from blue to orange, or change the circle into a square, a star, etc.
Below is mainly an introduction to the five-step progression of Yellow Card training for most teenagers and related questions regarding Yellow Card training.
First Stage: Afterimage
a) First, open your Yellow Card image (or open a book containing the Yellow Card) and place the Yellow Card 30–40 cm away from your eyes. Breathing adjustment (calm the mind): inhale (1, 2, 3, 4), belly bulges out; exhale (5, 6, 7, 8), belly sucks in!
b) Look at the Yellow Card for about 30 seconds. You can slowly count 1–45 yourself. During the viewing process, do not move your gaze and try not to blink. You can stare at the circle in the middle.
Tip 1: When looking at the Yellow Card, if your attention is focused, you will see a bright yellow crescent-shaped object around the blue circle.
c) After looking, close your eyes and quietly think about nothing. Pay attention to looking ahead (note: eyes are closed), look at the eyelids. You saw the afterimage, right? At this time, a Complementary Color Card (a Complementary Color Card is a card with a yellow circle and blue background) will appear before your eyes. After a period of training, the Original Color Card may appear. This is normal. In the beginning, the afterimage (the card that appears) may only last for 5–10 seconds. Don’t worry; after training a few more times, the time will get longer and longer.
d) After the afterimage disappears, do not rush to open your eyes. After a brief disappearance, the afterimage will continue to appear. Wait until the card before your eyes completely disappears, then open your eyes and continue looking at the Yellow Card (same as step 2).
e) After looking (without closing eyes), look at white paper or a wall (any light color works). At this time, you can see the afterimage of the card on the paper (wall). After it disappears, repeat training steps b–d, requiring the afterimage to remain for at least 15 seconds or more.
Tip 2: If it disappears, let it disappear. Do not be impatient. If it disappears, just look again. After finishing one session, blink your eyes, roll your eyeballs to rest a bit, then continue training.
Precautions
You can train 10–15 times each time, taking about 20–30 minutes.
After training for 30 minutes, you must rest for more than 20–30 minutes before continuing practice.
Yellow Card training is mainly “small amounts and many times,” a process of accumulation. Short-term massive training will be counterproductive!!
Many friends, after the above standard training, can generally maintain the afterimage for more than 15 seconds after 2–3 days.
Second Stage:
Suitable for students who have just learned for 2–3 days, with an afterimage retention time between 10–20 seconds.
a) First, open your Yellow Card image (or open a book containing the Yellow Card) and place the Yellow Card 30–40 cm away from your eyes. Breathing adjustment: (calm the mind) inhale (1, 2, 3, 4), belly bulges out; exhale (5, 6, 7, 8), belly sucks in. Be slow! Note: While looking at the Yellow Card, do not get distracted by breathing; forget that you are adjusting your breathing.
b) Look at the Yellow Card for about 20 seconds. You can slowly count 1, 2, 3… up to 30 yourself. During the viewing process, do not move your gaze and try not to blink. You can stare at the circle in the middle.
c) After looking, close your eyes and quietly think about nothing. Note: Look ahead (eyes are closed), look at the eyelids. You saw the afterimage, right?
d) Wait until the card before your eyes disappears, open your eyes, and quickly blink hard a few times (3–5 times).
e) After looking, close your eyes and quietly think about nothing. Note: Look at the eyelids. The afterimage appeared again, right!
f) Wait until the card before your eyes disappears again, open your eyes, and look at white paper or a wall (any light color works). At this time, you can see the afterimage of the card on the paper (wall). After the afterimage on the paper or wall disappears, repeat training steps b–f, requiring the afterimage to remain for at least 25 seconds or more.
Third Stage: Flash
Suitable for students who have just learned for 2–5 days, with an afterimage retention time between 25–35 seconds.
a) First, open your Yellow Card image (or open a book containing the Yellow Card) and place the Yellow Card 30–40 cm away from your eyes. Breathing adjustment: (calm the mind) inhale, belly bulges out; exhale, belly sucks in. Be slow! Note: While looking at the Yellow Card, do not get distracted by breathing; forget that you are adjusting your breathing.
b) Look at the Yellow Card for about 10 seconds. You can slowly count 1, 2, 3, 4… up to 16 yourself. During the viewing process, do not move your gaze and try not to blink. You can stare at the circle in the middle.
c) After looking, close your eyes and quietly think about nothing. Note: Look ahead (eyes are closed), look at the eyelids. You saw the afterimage, right?
d) Wait until the afterimage before your eyes disappears, open your eyes, look at the Yellow Card for less than 1 second—just flash it.
e) After looking, immediately close your eyes and quietly think about nothing. Note: Look at the eyelids. The afterimage appeared again, right!
f) Wait until the card before your eyes disappears again, open your eyes, and look at white paper or a wall (any light color works). At this time, you can see the afterimage of the card on the paper (wall). After the afterimage on the paper or wall disappears, repeat training steps b–f, requiring the afterimage to remain for at least 30 seconds or more.
Phase 4: Original Color
Many people practice looking at the Yellow Card for a long time but never see the original color. The basic requirement for looking at the Yellow Card is to see the original color. First, let me explain what the original color is. The so-called original color is the card’s own color. That is to say, you need to see the color on the white paper that is the same as the card in your book. So, how can you see the original color? The basic methods above and the two eye techniques can both reveal the original color. The moment you close your eyes or open them, the original color may appear briefly. Many friends can also maintain the afterimage in its original color for more than 5 to 10 seconds. However, many friends still cannot see it. The main reason lies in the following two words: “Wait” and “Change”.
-
Wait: This means that when the afterimage appears, many friends just mechanically wait for the afterimage to disappear, and as a result, the afterimage disappears.
-
Change: This means that when the afterimage appears, you intend to see the original appearance of the card—the circle becomes blue, the card becomes orange—and as a result, the original color appears.
The change in color may happen in an instant. If it disappears, do not be anxious; blink a few times and continue looking at the afterimage. The “thinking” here is only auxiliary; “Change” must occur while you are introspecting (seeing with eyes closed). Once you understand these two words, you will quickly see the original color!
Phase 5: Blinking
For friends who can maintain an afterimage for more than 30 seconds.
a) First, open your Yellow Card image (or open the book with the Yellow Card) and place the Yellow Card 30–40 cm away from your eyes. Breathing adjustment: (Calm the mind) Inhale, belly bulges; exhale, belly sinks. Be slow! Note: During the process of looking at the Yellow Card, do not get distracted by your breathing; you must forget that you are adjusting your breathing.
b) Look at the Yellow Card for about 30 seconds. You can slowly count 1, 2, 3, 4, 5 yourself. Note: During the process, do not move your gaze, and try not to blink. You can stare at the circle in the middle.
c) After looking, close your eyes and quietly think about nothing. Note to look in front (with eyes closed), look at the eyelids, you see the afterimage, right?
d) Wait until the afterimage in front of you disappears, open your eyes, blink a few times, and roll your eyeballs a few times.
e) Close your eyes, pay attention to looking at the eyelids in front, and try hard to think of the afterimage you just saw. The requirement is for it to appear clearly in front of you again. If the complementary color appears, you must practice converting it to the original color yourself. Repeat training d–e. Until the afterimage no longer appears, train once from b–e, then continue training d–e.
The ultimate training goal is to be able to imagine the original color of the Yellow Card at any time without looking at it. Of course, this “thinking” is under the condition of seeing it with the inner vision. After training with eyes closed for a period, you can try to see the afterimage on white paper (or a wall) without looking at the Yellow Card.
The Yellow Card utilizes afterimages. By practicing to maintain the afterimage, you can open the right brain’s image recall and imagination functions. After becoming proficient, proceeding to recall the original image’s colors can open the right brain’s color recall and imagination function, and proceeding with deformation and color change exercises can open the right brain’s independent imagination function.
Beginners do not yet have good control over their imagination, so the imagination is initially very blurry, floating, and unstable without a center point. However, at this stage, one already possesses a certain degree of Photographic Memory—instant right brain memory—which can be retained for 1–2 seconds before gradually becoming blurry. Therefore, it can be said that the elementary stage of Photographic Memory is impression retention, while the advanced stage is imagination—making the memory image reappear.
The most important thing in practicing the Yellow Card is to be calm: no one disturbs you; the calmer you are, the easier it is for the original image to appear. If the Alpha Wave state is broken, you must re-enter quietness. In fact, the Yellow Card plays a role in assisting Right Brain Development, and this role is significant. When practicing the Yellow Card, you must know the reasons behind it; if you know, the practice will be very fast.
Q&A
Blurry Afterimage
-
When looking at the wall, my eyes are disobedient and always move involuntarily, so the image is very unstable. It appears and disappears, and the image vanishes in 1–2 seconds.
-
My eyes hurt from looking.
-
Every time the afterimage appears, I think “keep it longer” in my mind, and the moment I have that thought, it disappears.
-
When thinking, my attention is on the afterimage.
-
The Yellow Card afterimage I saw before was very blurry. After deep breathing, the afterimage is sometimes very bright but becomes blurry after only a few seconds. I don’t know if the afterimage is really still there; it seems like it is, and then again it isn’t. I just assume the imagination is still there and persist for more than 30 seconds.
-
The complementary color afterimage appears intermittently.
Answer:
First of all, the afterimage is a physiological reaction of the human eye. If you stare at a color for a long time and then look at white, it will definitely change color. For example, if you stare at green for a long time and then look at white, it will become red. Therefore, the afterimage is seen, not imagined. Generally, afterimages only stay for 20–30 seconds.
The afterimage is fixed relative to the eyes. If your eyes can stay still, then your afterimage can stay still. If you move even slightly, the afterimage will definitely move. Also, when the afterimage disappears, it can be re-evoked through breathing.
The method of seeing the “original image” through a double afterimage is not advisable. For example, after closing your eyes, you see a yellow circle and a blue rectangle as the afterimage. Stare at it for 30 seconds. What you are staring at now is not the original Yellow Card color, but the yellow circle and the blue rectangle. After staring at it and looking at white paper, you should see the afterimage of the afterimage, which is the Yellow Card’s original color. Do not use tricks to see the original color in form; the key is the improvement of ability.
The intermittent appearance of the afterimage is because you haven’t concentrated your attention yet. Moreover, after becoming familiar with the afterimage, you must shorten the staring time and try to use imagination to keep the afterimage in front of you. Letting the afterimage last longer is the foundation; you must use imagination! Seeing the original color is built on the foundation of closing your eyes and seeing the afterimage for nearly 3 minutes.
Visual Persistence Issue
-
I saw the “original color” but it turns into the complementary color. It is quite difficult to maintain the original color for a long time, but it is much easier to maintain the complementary color. Sometimes I see the original color, but only the blue dot inside, and it quickly overlaps with the complementary color. Then it is replaced by the complementary color, and the yellow original color of the background can no longer be seen. The vast majority of people can see blue the moment they close their eyes, but it disappears immediately and turns yellow.
-
I see the original color the moment I close my eyes, but the color is lighter than the actual one, and only part of the original color appears (the blue circle and near the blue circle), not the whole.
-
Is the “original color” generated by imagination or visual persistence?
-
I have practiced the Yellow Card for more than ten days, every day, 10 minutes at a time. The complementary color afterimage appeared on the first day, and I only saw the original color in the last two days. After closing my eyes, the original color disappears, and then the complementary color substitutes in.
-
I can “imagine” the original color of the Yellow Card in my mind.
Answer:
It seems that you must treat these cards as a whole or look at them three-dimensionally (using the soft eye method, i.e., the eye method used for seeing 3D images, but try not to overlap the left and right fields of vision). This way of looking will make your afterimage very unstable and the duration short. In fact, the soft eye method is a very good right brain visual input method. Its essence is not to let the afterimage interfere with your imagination. Imagine a white light source, and extend the imagination of the original image from it as the center. Slowly, the white light source will clearly display the original color and shape.
“Seeing” vs. “Imagining”
-
I saw a yellow afterimage. The problem is that the afterimage moves slowly. I have to use my consciousness to control it to bring it back to the middle. Slowly, the afterimage fades, but the moment I concentrate and imagine, the afterimage appears again, lasting about 1 minute.
-
Sometimes I don’t look at the Yellow Card and close my eyes to imagine the afterimage; it is very blurry.
-
Is it a scene “thought of” by the brain, or a scene “seen in front of the eyes”?
-
When I close my eyes, the yellow dot disappears and turns blue.
-
It is impossible to see the original color immediately after closing your eyes; there is a process: first the inverted color, then it changes to the original color. When I stare at the white paper, it is always the inverted color. Only when the afterimage is about to disappear, blinking once allows me to see the original color, but it doesn’t last long, about 3 seconds, and then it’s gone. Then if I blink again, I can see the original color.
-
The inverted color has gradually become reddish when staring at the white paper, and the yellow dot in the middle is also slowly turning blue. Does this count as preliminary success? Or should I see the original image immediately after closing my eyes?
-
After closing my eyes, I first see yellow, then after a thought it turns blue, but this blue is not as deep as the blue seen with the eyes.
-
The duration of maintenance is too short.
-
It mostly appears in front of the left eye…
Answer:
The original image is a scene thought up in the brain; it is very vivid, not seen in front of you after closing your eyes, but it feels very real. It is different from imagining something or recalling a dream in our mind. If you say it is “seen,” it is acceptable, but it is not seen with the eyes, it is seen with the brain. One piece of evidence is that things seen with the brain can be different from what is in front of you. Through training, slowly explore the feeling of “seeing” or “imagining.” That’s right, it is a feeling. Once you catch this feeling, you succeed.
Training cannot be too laissez-faire. To practice the original color, you must think of the original color while looking at the afterimage, imagining that the original color will flow out from the gaps of the afterimage. The original image mostly appears in front of the left eye because the right brain is activating.
There are two sources for the formation of Mental Imagery. One is external stimulation. Through training, one can develop the ability of comprehensive Mental Imagery, which means seeing images with eyes closed that are exactly the same as when eyes are open. The other is through self-imagination or meditation, which is more advanced than the former. When in a good state, it can even create an immersive feeling, like the so-called out-of-body experience.
If you can open your eyes to recall past experiences or perform imagination, then at this time you can easily achieve Photographic Memory or Wave Speed Reading.
You can only see the original image after closing your eyes and imagining through intention. This process requires a high degree of concentration, especially in the initial practice stage. Later on, since your imagination has been activated, it is relatively unnecessary to focus too much on the concentration of attention. At this time, focus your energy mainly on the extension of imagination. This requires a relatively free and relaxed mental state. You can generate the original image without looking at the card, and you can deform and change colors.
The process of seeing the original color: from only having the complementary color to both coexisting, the complementary color slowly fades and the original color slowly becomes clear. Based on the fact that different people have different imaginations, everyone’s training cycle may vary greatly. Some people don’t need to see the original color; they use their own brains to imagine directly, that is, they directly reach Makoto Shichida’s third stage. However, the vast majority of people must persist in training for more than 3 months to see improvement.
It is suggested that beginners try drawing pictures in their brain.
Concentrating Attention
I tried to use my consciousness to change the shape of the complementary color afterimage, but it changed to another shape on its own, which was not what I wanted.
Answer:
Try to control your imagination and do not let the image change back and forth. After looking at the Yellow Card and closing your eyes, do not wait for the afterimage to come out. Instead, search for it. At first, you feel the original image is in your brain, but you just haven’t concentrated your spirit to see it out. I suggest practicing flash glancing, then recalling. After practicing to a certain extent, you will know what the original image is all about.
How long does it take to master the Yellow Card?
Answer:
Get rid of the mindset that “if I practice a few more times, I will definitely see it.” If you are not in the zone for every practice, I think practicing for half a year may not necessarily yield results. Some people say at least 3 months; I think there is no need to set limits for yourself because everyone’s enlightenment is different. Steadily learn the principles and basic methods well, practice well, and master them. You must have perseverance and absolute confidence; if you are not confident, don’t practice.
Don’t Look at the Sun
When I was young, I liked to look at the sun. After looking at the sun for a little while, there was an afterimage in my eyes no matter what I looked at. Whether eyes were open or closed, it could last for at least 1 minute. I wonder if this is the same as the Yellow Card.
I suggest you look carefully at the method I wrote above and operate step by step. It is impossible not to see it when you close your eyes. If you don’t see it, it means you didn’t look concentrated enough for long enough. Anyone will see an afterimage the first time they close their eyes after looking. Note: after looking, keep your eyes closed, don’t open them. Close your eyes and look in front; the afterimage will definitely appear. If the imagination has no color, it indicates a problem with your observation ability. The principle of looking at the sun is the same as the Yellow Card, just that it is too intense; I do not recommend this kind of training.
Color Card Training
After the Yellow Card training, please look at the red, yellow, and blue cards. We will use these cards to perform “Color Afterimage Training”. Color card training is a visual imagery training that stimulates and activates image-receiving neurons to form more stable visual images, thereby enhancing the resilience and function of the eye’s image neurons. Color card training can develop right brain spatial imagination abilities, correct hyperactivity in children, and improve students’ attention. Color card training is necessary for forming visual imagery in toddlers, children, and adolescents alike.
Start with the red card training: Stare at the red card for a while, then close your eyes. After the afterimage before your eyes disappears, open your eyes again to continue gazing at the card; 20 to 30 seconds is appropriate. When gazing at the card, your mind will naturally concentrate, and at this time, your brainwaves shift to an Alpha Wave state. This brain state is precisely one where you can naturally enter a state of imagination. When you first start training, the afterimage may disappear the moment you close your eyes. At this time, absolutely do not give up. After repeating several times, the afterimage will gradually extend its retention time before your eyes to 20 seconds, 30 seconds, and so on. Next, without staring at the red card, simply close your eyes and imagine the color red. Practice until a red card appears before your eyes. After finishing the red card exercise, move on to the yellow card, and then the blue card. Please try to find time to repeat this exercise repeatedly within one week.
For children who have already activated their Pineal Gland and opened the ability for Blindfolded Color Card Touching, color card training is also something that must be persisted with occasionally. For children whose Pineal Gland is already activated, color card training is simply a warm-up exercise for calming the mind and entering the right brain working state. Color cards can also be increased from the original three-color cards to rainbow seven-color cards. However, every time the child touches a color, try to let them describe what image they “see” in their brain, rather than rushing them to say the color. Because if the child only “sees” the color, it is a regression for their imagination ability and Image Thinking ability. Although the child touches the color, they are using the left brain to think and describe.
Shape Card Training
After colors can turn into imagination, the next step is “Image” Afterimage Training. First, gaze at the card for 20 to 30 seconds, then close your eyes to see the afterimage. When looking at the card, please place it in a brightly lit area as much as possible, so that you can see the afterimage very clearly. If you have time, you can practice repeatedly every day. Wait until you can easily see afterimages of circles, triangles, and diamonds, then start using surrounding concrete objects like cups and watches to do afterimage training. Color afterimage training for 1 week, shape training for 1 week, concrete object afterimage training for 1 week; after 1 month like this, you can freely use your imagination.
The shapes on the Shape Cards are mainly to provide a basic image, allowing this basic image to quickly form an image in the brain, and then to use imagination based on this foundation. For students who have already activated their Pineal Gland, Shape Card training is overly simple. Students can directly transform various graphics from color cards, so there is no need to continue training. However, in daily life, it is still very good to let children observe more objects and various shapes to form image memory accumulation in their minds.
Mandala Card Training
Mandala Card Training is a super speed reading method used to activate the right brain. It uses the brain to continuously reinforce short-term memory to achieve long-term memory effects, and stimulates the right brain’s memory effectiveness in the process.
The method of Mandala training is derived from India or Tibetan Buddhism. The ingenuity of Mandala Card training lies in using the four colors that stimulate the eyeballs the most—yellow, blue, red, and green—to allow us to easily see brightly colored shapes on our brain Screen. Although this is just a complementary color, as long as we can see this complementary color, we can learn how to place our attention on this brain Screen, learn to watch and feel this brain Screen earnestly, and then, as we continue, our inner vision will truly be stimulated.
The so-called Mandala Card Training is a training method of staring closely at the Mandala card, memorizing the shape and color of each Mandala, and then reproducing it in memory. If you stare at the Mandala card for 10 seconds and then close your eyes, and can imagine the Mandala’s colors and shapes reproduced vividly, this proves that your right brain imagination ability has been opened. If you continue doing this kind of practice, your right brain super imagination and memory will naturally be developed.
Below are the specific operation methods for Mandala Card practice:
-
Please stare at the Mandala card continuously;
-
Look for 5 seconds, then close eyes for 5 seconds, meanwhile suggesting to yourself that when your eyes are closed, the image remains in front of your eyes for as long as possible. After opening your eyes, look at the black and white Mandala image on the back of the card and recall its color;
-
The key to training is persistence; it must be done for at least 3 months. This method can activate the right brain.
Even students who have already activated their Pineal Gland may not find Mandala diagram training as handy as other training when they start. Because Mandala training also requires memory conversion, especially converting the instant memory of image information such as colors into short-term memory or long-term memory. If using cards for Mandala practice, it is often time-consuming and effort-intensive, inconvenient to check (needing to color in the blank Mandala on the back of the card), and lacks some fun. After training a few times, one is unwilling to continue training, but using cards for training can strengthen memory effects more. Here, the use of mobile phone APP applications is recommended, such as Mandoras. This application sets up hundreds of Mandala diagrams from easy to difficult. Practitioners need to pass level by level, which provides a certain challenge and fun. Moreover, if you have a few minutes of free time, you can practice using your phone.
Everyone can train the above three right brain training methods simultaneously; there is no logical order of priority. I hope every student persists in right brain training as a habit. In this way, our right brains will be better developed, memory ability will rapidly improve with the development of the right brain, and the person’s entire life will also undergo great changes. Right brain development is not only to improve our memory ability; it relates to our entire life. Additionally, especially for children, the effects of right brain development will be more obvious. Right brain education is also not limited to minors; in the adult world, right brain development is also very important. Right brain education for adults is already a global task.
Chapter 9 Using Music to Assist Training
Music is wisdom, and even more so, music is science. Music has its own laws of information and also the physical structure of traditional information. When scientists studied the effects of music on humans, they discovered that the brains of music lovers differ from those of ordinary people in that they have more synapses. A synapse is a substance through which one neuron transmits neural information and exchanges intelligence to other neurons. Research shows that these excess synapses are a type of “spine synapse.” Spine synapses develop slowly. In the process of continuous learning, brain activity increases, and the number of spine synapses also increases, thereby improving human learning ability accordingly. Conversely, if learning stops, the number of spine synapses will also decrease day by day. Therefore, listening to music can develop a person’s musical brain—the right brain, expand the capabilities of the right brain, and thereby develop the right brain. The many connections between music and right brain development indicate a commonality between the two. Learning music or frequently listening to music helps develop the right brain. As the brain of imagination, intuition, emotion, and perception, the right brain coincides with the various ability requirements contained in music in many respects. Therefore, using music to develop the right brain is a very good choice.
What is Alpha (α) Wave Music
The body’s muscles, nerves, and especially the brain all possess electrical waves. Through electroencephalogram (EEG) testing of the brain, brainwaves can be divided into four types:
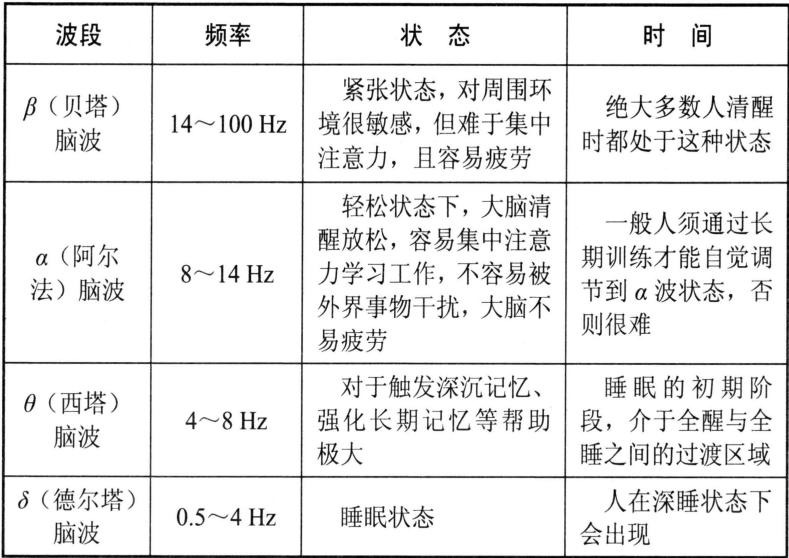
When the brain enters an Alpha Wave state, the body and mind are relaxed, attention is strongest, the brain’s reception and transmission of information accelerates, work and study efficiency improves, immunity strengthens, emotions stabilize, brain potential is fully utilized, thinking is agile, imagination is rich, and inspiration emerges. The Alpha Wave state is also a state suitable for learning.
When the body and mind enter a relaxed state, Alpha Waves are produced. Breathing training and entering stillness training can control the body and mind to enter a relaxed state and produce Alpha Waves. Qigong, yoga, meditation, etc., are all this type of training and can achieve the same effect. There is another simpler method, which is listening to Alpha Wave Music. Listening while studying or when needing to focus on work can allow you to enter the Alpha Wave state, enhancing memory and improving work efficiency. When practicing Qigong, yoga, or meditation, you can also use Alpha Wave Music as an aid for better results.
Simply put, Alpha (α) Wave Music is music with a beat between 60–70 and a frequency of 8–14 Hertz. Through 8–14 Hertz musical fluctuations, the brain is induced to resonate, adjusting brainwaves to Alpha Brainwaves. Creating an Alpha Wave frequency outside the brain stimulates the brain, causing brainwaves to shallowly tend toward a similar frequency. Right brain development music precisely uses the method of music to automatically guide human brainwaves to the Alpha (α) state, thereby promoting the development of individual right brain potential. Therefore, some people also call Alpha (α) Brainwave Music “Latent Brain Music.”
From the perspective of receiving sound frequencies, the sound waves humans can hear are audible sound waves with a frequency range of 20–2000Hz. Infrasound below 20Hz and ultrasound above 20000 Hz are inaudible to us. However, Alpha Waves are 8–13Hz and cannot be heard; a special technology is used here. The principle is roughly this: one ear hears a stable frequency of 510Hz, while the other ear hears a frequency of 500Hz; the two frequencies converge in the auditory system, creating a 10Hz difference, which is perceived by the brain nerves.
Generally speaking, listening to Alpha (α) Brainwave Music often can achieve many different effects:
Enhancing Creativity: Stimulating corresponding Alpha brainwaves through specific audio frequencies.
Developing Concentration, Attention, and Memory: Stabilizing emotions and focusing through Alpha brainwave music to achieve good results in entrance exams, qualification exams, and competitions.
Self-Realization and Personality Improvement: Through the induction of Alpha brainwave music, one’s personal charm is revealed, making one a person with personality charm. There will be more opportunities to realize oneself in the workplace, and the personality will be more cheerful.
Emotional Richness and Success in Career and Social Activities: Alpha brainwave music makes it easier for you to discover your inner potential, evoke self-confidence, generate good interpersonal relationships, and achieve success in your career.
Stabilizing Emotions and Improving Life Adaptability: Alpha brainwave music will help you relieve various tensions and anxieties caused by emotional stress, lift your spirits, and develop your potential abilities. It is sometimes also used to help with weight loss, smoking cessation, or relieving insomnia, etc.
Alpha (α) Wave Music Classification
Currently, Alpha Wave Music used for right brain development can be divided into Classic Music and Resonance Music based on the presence or absence of melody and sound sources.
Classic Music
Classic Music, or “Beautiful Music,” can elevate a person’s spiritual realm, open up a vast space for communicating with the soul, and elevate a person’s spirituality. The brain can convert the fluctuations of Classic Music into bioelectricity, which plays an exciting and regulating role in memory neurons, activating the right brain.
It was the Bulgarian Bazanov who discovered that music helps improve language learning efficiency. Bazanov used classical music (which he called Baroque music), represented by Mozart, to invent the “Super Learning Method,” initiating a language learning revolution among adults. The latest scientific research continues to confirm that music has the outstanding effect of improving memory. French otolaryngologist Dr. Tomatis, through long-term research, discovered that Mozart music not only improves hearing impairments but also has the effect of enhancing memory. Currently, the most popular types of early childhood education music and prenatal education music are also Alpha (α) Wave Music selected from classical music that meets frequency and beat requirements. Some classic music also incorporates sounds of nature, such as frog croaks and waves.
This type of music is generally used as background music for imagining scenes, studying, working, or resting, subtly adjusting the brain’s brainwaves to the Alpha Wave state and activating right brain potential.
There is a large quantity of this type of music, such as “Love and Joy” (Ai He Le), Zhuoren Right Brain Alpha Brainwave Music, most of Mozart’s music, Bandari’s music, and some yoga music. These music possess magical power; they can stimulate the softest desires and sweetest dreams deep in our hearts, making us feel like we are in a dream, refreshed and delighted, and can improve many of our right brain abilities. Below, we also list some music according to different classifications of developing right brain abilities for friends’ reference:
I. Music for Cultivating Perception Ability
-
Madame Butterfly (Puccini)
-
Ocean Waves
-
Spirit Harp
-
Promenade
-
Brandenburg Concerto (Bach)
-
The Shepherd
-
Silent Night
-
Distant
-
Voice of the Ancients
-
Moonlight
-
Time to Say Goodbye
-
Beautiful Hope
-
Mountain Stream
-
The Song of the Earth
-
Annie’s Song
II. Music for Enhancing Memory Ability
- Romance (Mendelssohn)
- Minuet (Bizet)
- Dream of Venice
- Little Fish Frolic
- Sinfonia Concertante in E-flat major (Mozart)
- Slavonic Dance (Dvorak)
- Four Years
- Beautiful Pastoral (Beethoven)
- Winter (Vivaldi)
- Pastoral Symphony (Pachelbel)
- Naughty Kitten (Bach)
- The Nutcracker (Tchaikovsky)
- Swan Dance (Tchaikovsky)
- Happy Bird (Bach)
- Brook (Grieg)
- Frog Waltz (Chopin)
- Love’s Greeting (Elgar)
III. Music to Activate Creativity
- Little Evening Music - Mozart
- Wind Serenade
- Playful Birds - Bach
- Violin Concerto No. 3 in G Major - Mozart
- Fireworks - Handel
- Forest Dance (“Waltz No. 40”) - Mozart
- Sweets from Vienna - Johann Strauss
- Luna
- Venice Barcarolle - Mendelssohn
- Melody and Variations
- Song of the Giraffe
- Elf Concerto - Bach
IV. Music to Enhance Aesthetic Appreciation
-
Rainbow (“Grand Valse Brillante” in E-flat Major) - Chopin
-
Foreign Scenery - Schumann
-
Anitra’s Dance - Grieg
-
Pictures at an Exhibition - Mussorgsky
-
Song of the Flute - Mozart
-
Minuet in G Major - Beethoven
-
First Light
-
High Mountains and Flowing Water
-
Dancing - Susan Xiyani
-
Pure Sky
-
In Your Eyes
-
Bamboo Tower
-
Concerto for Flute and Harp in C Major
V. Music to Shape Good Character
- Maiden’s Prayer - Bądarzewska
- Rustic Style - Mendelssohn
- Twinkle, Twinkle, Little Star Variations - Mozart
- Raindrop Prelude - Chopin
- Snow Dream
- Cat’s Rondo - Sibelius
- Little Pearl (“Sonata”) - Scarlatti
- Forest Path - Schumann
- String Quintet in G Major - Mozart
- Moonlight Lake - Beethoven
- Willow Catkins in the Heart
- Song Dedicated to You
- Firebird - Stravinsky
- Piano Sonata No. 11 - Mozart
VI. Music to Improve Sleep Quality
- Dream - Schumann
- Piano Concerto No. 2 - Rachmaninoff
- Sleeping Little Rabbit - Beethoven
- Brook Concerto - Mozart
- Little Baby is Asleep - Schumann
- Innocence - Mozart
- Ave Maria - Mozart
- Baby Lullaby - Beethoven
- Appalachian Spring - Copland
- Lullaby - Chopin
- Flowing River - Haydn
- Lullaby - Mendelssohn
- Little Princess Concerto - Mozart
- Gentle Dream
- D-Whisper
When listening to this type of music, pay attention to the following points:
-
The volume should be controlled so that you can only hear a little bit of the music. It should be played barely audibly, primarily so as not to interfere with study, work, and sleep. Avoid high volume; even when playing during the day, the volume should not be too loud.
-
Regarding playback time, during the day, you can follow the principle of “musical life and living music.” Listening to music does not hinder the child from doing other things; reciting classics, doing homework, reading, or playing can all be accompanied by beautiful music. It is worth mentioning that potential brain music is also known as educational music for sleep. Playing it continuously while sleeping has the best effect; it not only allows people to sleep soundly but also unconsciously develops the child’s Right Brain potential. Mingbo Education School plays Alpha (α) Wave beautiful music during class, and even cycles the music during adolescents’ lunch breaks or evening rest to help stimulate children’s right brain potential. You can also play it in your child’s bedroom at home.
-
After selecting a few pieces of music, listen to them for two weeks before switching to the next group. Consistent listening is required for results.
-
If some music albums have explicit instructions on their effects, they should be used according to those instructions. The “Zhuoren Right Brain α Brainwave Music Collection” contains six CDs with different functions:
Improving Memory: Start playing 5 minutes before studying or playing; it can be played as background music during the process. Improving Focus: Start playing 5 minutes before studying or playing; it can be played as background music during the process. Regulating Emotions, Eliminating Stress: After studying or playing. Promoting Appetite: Start playing half an hour before a meal; turn it off after finishing the meal. Improving Sleep Quality: Half an hour before going to bed; turn it off after falling asleep. Improving EQ: It can be played at any time; just play it separately from other albums.
Resonance Music
Resonance Music, also known as Subconscious Mind music, basically has no melody, and some people even feel it is noise when they first listen to it. This type of music directly stimulates brain nerves. Its high-frequency overtones quickly activate the interaction of brain neurons, relaxing, balancing, rebuilding, and activating them. You don’t need to do anything special; just open your heart and listen—letting nature take its course—and the sound will bring an extraordinary experience to your brain and life. This sound can take people from shallow levels to the deepest core of total relaxation; generate the power of inner transformation; release stress and negative energy; and allow life to return to the embrace of health and joy.
The use of music to activate the Pineal Gland introduced in Chapter 4 generally refers to this type of music. In addition to activating the Pineal Gland, we also often use this type of music to stimulate students’ imagination, perform healing, nourish depleted mental power, relax overactive thinking, and release deep-seated painful memories and emotions, as well as for deep relaxation and coordinated integration of brain areas.
This type of music includes Pineal Gland music, “Whole Brain Activation Music” (Voice of Life), ESP Potential Music, Midbrain Development Music, Alpha Dual-Brain Synchronization CD, some meditation music, Sanskrit music, OM chanting, some yoga music (Yoga Sanskrit chanting), and Chakra activation music.
If you want resonance brainwave music to exert better effects, the choice of environment and preparation beforehand are very important:
Indoor lighting should be bright and soft, not too dim. The air should be fresh; it is best to have some flowers and plants indoors to make the environment vibrant. Before starting to listen to music, it is best to wash your face to wake up your mind; or rub your hands together until warm and massage your face with your palms for a few minutes, which will enhance the effect. Close your eyes to rest your mind, sit quietly for a moment, take a few deep breaths, and relax your mood. Adopt a positive attitude and immerse yourself in the music, which can lead to the improvement of emotional intelligence. External frequencies produce an inductive effect. To ultimately enter a relaxed state and generate Alpha Waves, the cooperation of subjective consciousness is needed. First, you must believe in the effect of Alpha Wave music. If you hold a skeptical attitude, a tense brainwave will be generated when listening, and the brain cannot possibly resonate. When listening, you must have subjective association. Alpha Wave music does not only generate Alpha Wave frequencies; it also creates a quiet environmental atmosphere through melody and sound effects. When listening to Alpha Wave music, associate yourself with being in a quiet, pleasant environment where your body and mind are relaxed.
Precautions for Listening to Alpha (α) Wave Music
-
Choose the Alpha Wave music that suits you. The principles of Alpha Wave music are the same; only the melodies vary. Everyone’s hobbies are different, and the same melody may not suit everyone. If you feel that a certain piece of Alpha Wave music is not pleasant, then choose another one. For example, a book I bought came with an Alpha Wave CD, but I didn’t like it after listening to it. Later, I downloaded a set of Alpha Wave music from the internet that suited me better.
-
Choose high-quality Alpha Wave music. The production of Alpha Wave music has relatively high requirements and requires precise control over the frequency of the music. The preferred playback medium is naturally a CD. However, CDs are inconvenient to carry. MP3s are easy to carry; so, is it okay to make them into MP3s? I think it is okay, as long as high-bitrate compression is used. Ultimately, playback depends on the device; if the medium is good but the playback device is poor, the effect cannot be achieved. If the MP3 compression quality is higher and the playback device is better, choosing a good pair of headphones can guarantee the quality of the Alpha Wave music.
-
Listening with headphones yields the best effect. Why use headphones? The principle explained earlier states that Alpha Wave music does not have Alpha Wave vibrations before entering the two ears; it is the frequency difference received by the two ears converging in the brain that forms Alpha Waves in the brain. If played through speakers, the audio from the two channels mixes together before entering the ears, greatly reducing the effect.
The sound should not be too loud. If the sound is too loud, it will not produce relaxation waves but will instead make the auditory nervous system tense. Long-term listening can also damage hearing.
-
If the surrounding noise is too loud and there is too much interference, try not to listen.
-
Do not listen when you are fatigued; go to sleep or rest instead.
-
Before starting “Super Right Brain” training, prepare your favorite Alpha Wave music first. Use Alpha Wave music to quickly enter a state of relaxation and focus, releasing the brain’s potential. Training in this state is more effective.
Music and Imagination
Music has a unique efficacy for developing the thinking of the Right Brain. The role of Image Thinking managed by the right brain is in no way inferior to the abstract thinking managed by the left brain. Scientists have discovered that often Image Thinking comes first to trigger inspiration, followed by abstract thinking. As for music, it is even more the creation of emotional forms to express feelings. In this sense, Image Thinking is the source of scientific discovery and artistic creation. Therefore, developing the Image Thinking of the right brain must not be ignored. Music expresses emotion; it belongs to Image Thinking, and Image Thinking occupies a large proportion in a person’s life. Music is full of fantasy, imagination, and pursuit. When people appreciate music, the rich and harmonious harmony and multi-layered polyphony, the beautiful and varied timbres, and the melody that expresses emotions and touches the heart are always linked to people’s self-experience in life. For children who embark on the path of music from an early age, music can inspire them to think about problems, because the melody is always in constant change, but its various changes are very coordinated, and its harmony is always in motion. The law of unity of opposites in music is precisely the reflection of the objective world. When people appreciate music, music influences and induces your wisdom with the entity of sound. When you are calm, music will give you full of passion, guide you to create, and enhance your pursuit and motivation for the unknown world. Music appreciation coordinates with the left brain and generates imagination through Image Thinking, causing the silent left brain to become active as well.
Below are some examples of using sound effects music as background music to guide imagination.
1. Improve Memory (Sounds of Frogs, Memory Enhancement)
The gentle wind lightly brushes across the fields, green grass and red flowers, and the refreshing fragrance dances in the wind. From the sky comes the laughter of birds, the tinkling of stream water, and amidst the fragrance of rice flowers, the sound of frogs is like a tide. Amidst the sound of frogs, life is gestating, willow branches are dripping green, and the earth is busy growing green. Amidst the sound of frogs, plum blossoms are white, peach blossoms fall red, rape flowers shine yellow, and a hundred flowers bloom. Amidst the sound of frogs, the small lotus leaf reveals its tip. The fish in the pond will probe out of the water to absorb the spiritual energy of spring. The seedlings in the field are growing strong, and the simple villagers are full of hope. The sounds of frogs croaking, memory enhancing. Listen quietly to the frogs, perceive life, and feel spring.
2. Enhance Learning Ability (Birdsong at Dawn, I Love Learning)
When the Morning Star draws out the first ray of dawn, the earth gradually wakes up. The birds, who have been silent for the night, open their eyes and sing to the rising sun, thanking it for bringing light to the world. The sound of “cuckoo” echoes across the fields, urging people to seize the spring plowing. Sparrows swoop down to the threshing ground, witnessing a new round of bumper grain harvests. The gray magpie’s voice is low, like a festive sonata. The birdsong wakes up the dawn, and I move forward in my studies.
3. Improve Thinking Ability (Cicada Sounds Surrounding the Ear, the Heart Becomes Quieter)
In early summer, the fields are full of vitality—there is gurgling water, greenery as far as the eye can see, and flying birds and cicadas singing. The threads of cicada chirping, faint and visible, are like distant music coming from the horizon. The mood also fluctuates with the melody and rhythm of the cicadas, and the irritable heart will gradually calm down. Listening to the sound of cicadas, there are no worries or helplessness; all melancholy and unhappiness drift away beyond the sky. Restrain the mind, focus on one realm, listen to the cicadas, and harvest tranquility. Cicada sounds surround the ear, but the heart becomes quieter.
4. Promote Appetite (Babbling Brook, Hearty Appetite)
A clear brook babbles towards the distance. The green grass and green trees that embrace it are draped in the golden light of the sun. I want to walk barefoot accompanied by its murmuring flow. I want to gaze at the golden yellow of this forest every day. The flowers are smiling, the birds are singing, and the imaginative soul soars in space. The brook babbles, appetite opens wide.
5. Improve Sleep (Dripping Water Tinkling, Accompanying My Sweet Dreams)
The moon rises, scattering a clear radiance. The wind becomes gentle, blowing lightly across the fields. The frogs put away their horns, and the cicadas also rest. In the forest, the birds who sang happily all day have long entered dreamland. The vines entangled under the trees also lie in the embrace of the mother tree. The happily rushing stream also slows down its pace, and the babbling water turns into a spring tinkling. The brilliant starry sky, the lush night color, the dripping water tinkling, accompanying my sweet dreams.
6. Improve EQ (Improve EQ, Mind as Vast as the Sea)
Walking barefoot on the soft beach, the damp sea breeze gently slides past my side, warmth spreading in my heart, worries and sorrows are all gone. The waves beat against the rocks, splashing water spray. The waves surge up, leaving seashells and conch on the beach. A fish jumps out of the water, and the cry of a seagull comes from afar. My soul is as vast as the ocean, facing the sea, with spring flowers blooming.
Developing the Right Brain with Hypnotic Music
Hypnotic music, also known as healing music or therapeutic music, differs from common music; it is neither pure music nor background music used by singers. Instead, it is music that slowly guides the brain from an excited state to a calm state. Academically speaking, it guides brainwaves from β waves to θ waves (sleep state) or α waves (meditative state).
Hypnotic music and New Age music are one and the same, mainly categorized into three types: environmental music (sounds of frogs, crickets, birds, seagulls, flowing water, dripping water, and ocean waves), space music (creating a vast sense of space, making the listener feel comfortable and ethereal), and spiritual music (capable of releasing negative emotions and inspiring confidence).
However, hypnotic music is not sung by vocalists; rather, it is accompanied by the voice of a hypnotist. The hypnotist’s language is slow-paced, monotonous, and repetitive, allowing the listener to gradually relax physically and mentally and implant beautiful dreams. During this process, the listener may fall asleep due to the brain becoming too relaxed at any time. Generally, after practicing more than 5 times, the listener’s mental chatter will be effectively controlled, and after about 15 times, they can eliminate sleep disorders and smoothly enter beautiful dreams without the hypnotist’s help.
Regardless of the type, all hypnotic music can play a role in relieving physical and mental fatigue and purifying the soul. However, not all types of hypnotic music require entering a sleep state; for example, daytime hypnotic music is only suitable for short daytime breaks without the need to enter a sleep state.
Some hypnotists with great love have recorded hypnotic CDs for self-hypnosis at home, some of which can be used for Right Brain Development. Some can improve certain abilities, while others can highly develop imagination. For example: Liao Yuepeng’s “α Wave Brain Synchronization Series,” “Practical Hypnosis CD Series,” Su Yinhua’s “Subconscious Mind Hypnosis Program,” Zhang Defen’s “Huangting Zen Meditation,” “Relaxation Meditation,” and so on. However, since these hypnotic CDs are quite long, they are not very suitable for young children. If instructors or parents need to use them, they can select a specific part to use.
The numerous connections between music and Right Brain Development indicate that there is a commonality between the two, and also explain why learning music or listening to music frequently helps in Right Brain Development. As the brain of imagination, intuition, emotion, and perception, the right brain coincides with many of the ability requirements contained in music. Therefore, using music to develop the right brain is a very excellent choice.
Chapter 10 ESP Games
ESP (ExtraSensoryPerception) means Higher Sensory Perception. It is an extrasensory perception that integrates abilities such as telepathy, clairvoyance, tactile force, precognition, and psychokinesis. It is related to what we usually call sensing ability, intuition, the sixth sense, and telepathy, and belongs to the field of parapsychology. In different countries, ESP is also known as HSP (Heightened Sensory Perception) Higher Sensory Perception, SSP (Super Sensory Perception) Super Sensory Perception, and SSP (Secondary Sensory Perception) Secondary Sensory Perception.
Through ESP games, children undergo multi-faceted perception training, allowing the child’s right brain to obtain rich imagery. These images are then transformed into “representations.” Representation refers to the image of an object that appears in the mind when the object is not present. Only the accumulation of rich representations can provide a vast scope for Image Thinking. Therefore, through ESP game training, children accumulate rich representations, laying the foundation for the development of Image Thinking. At the same time, it can also improve the child’s ability to perceive and predict things in daily life, making their intuition sharp and enabling them to make predictions about an event in advance. A child with strong perception has strong intuitive judgment and analysis regarding surrounding dangers, subconsciously seeking advantages and avoiding harm, thereby guiding out potential memories through intuition for use. Causing the brain to exhibit perceptual abilities beyond the normal Five Senses can also enable the left and right brains to achieve balanced development and usage. It improves the speed of information exchange between the left and right brains, multiplying the unified, holistic work efficiency of the brain. Consequently, various learning abilities such as memory, calculation, comprehension, and absorption are improved by several times.
ESP games aim to train and improve the student’s concentration, Mental Imagery Ability, perception, and self-confidence, with the fundamental purpose being the student’s concentration. During the training process, some parents or others may not believe that one can touch and identify characters or play various games while blindfolded. For friends holding such views, there is no need to persist in arguing or correcting their views, because our focus is the child. We hope to improve the child’s concentration and self-confidence through this training. ESP games can also make the brain very actively use imagination. This training is not satisfied with the vague imagination generated in the brain, but rather cultivates a high degree of concentration, mobilizing all sensory organs to engage in very vivid and realistic imagination. One must use all senses to imagine, causing the body to produce physical or chemical reactions; for example, saliva is secreted in the mouth when imagining a lemon, etc.
ESP training does not guide or cultivate psychic powers such as clairvoyance or precognition; such abilities require profound moral cultivation as a foundation.
The ESP games introduced in this chapter are all trained and explored on the basis of being able to touch colors and touch characters while blindfolded with the visual channel closed. The training possesses a certain level of fun and challenge, and children generally like it. Instructors or parents can use them alternately. The difficulty of some games is also very high and is not necessarily suitable for all students who have the ability to identify colors blindfolded. For learning and work, there is no need to pursue being able to do all games. ESP ability will atrophy with age. Children between the ages of 5 and 12 achieve particularly good results participating in the training, because the Midbrain of children in this age group is more easily awakened from a dormant state, and they possess the mental level to participate in the course. However, if the Pineal Gland brain is still in a dormant state between the ages of 12 and 16, its surface cells will slowly calcify until completely closed, making it very difficult to activate. Therefore, it is better to conduct these game trainings as early as possible; through training, this ability can be retained.
Blindfolded Color Card Touching
Touching color cards is the foundation of Right Brain Development training. Being able to correctly identify the color of a color card while blindfolded indicates that the Pineal Gland has been activated, the Pineal Gland’s own function has been switched on, and ESP ability has been initiated. The most important thing is that the Brain Imaging ability is already present; the trainee can already arbitrarily create and see the scene images they want to see in their brain. Blindfolded Color Discrimination and Blindfolded Character Discrimination training are to strengthen this Mental Imagery Ability and the feeling of correct identification.
T: Children, close your eyes and put on your eye masks. Okay, dear children, relax first, don’t think about anything. Do you still remember the abdominal breathing the teacher taught you?
S: I remember.
T: Come, let’s do it together. Put your hands on your lower abdomen, inhale deeply through your nose, making your abdomen bulge. Okay, inhale until you can’t inhale anymore. Then slowly exhale. When exhaling, don’t let it all out at once; exhale slowly, exhale until you can’t exhale anymore. Inhale again.
T: Okay, very good, everyone is amazing! Keep it up!
T: Everyone focus your attention on your forehead, continue deep breathing, slowly turn up the brightness of the light ball in front of your eyes, make it very bright, continue deep breathing, make your entire forehead bright, getting brighter and brighter.
T: Okay, now the teacher will teach you how to touch color cards. Do you want to learn?
S: Yes!
(Hand red card to student)
T: Okay, then let us carefully and seriously touch the card in our hands. First from top to bottom, then from left to right, focus your attention, and carefully look at the image presented in the small TV in front of your forehead. What do you see?
S: Teacher, I see a red apple, it is red.
T: Correct, awesome! Let us remember the feeling of touching the red card. Let’s do another one.
(Hand green card to student)
T: Carefully look at what image is in the small TV in front of your forehead?
S: Teacher, I see a yellow banana, it should be yellow.
T: Okay, very good, adjust your breathing, focus your attention, look carefully, very good, see if the yellow banana has any changes? Did it change?
S: Teacher, it turned into a green big tree, it is green…
T: Hmm, very good, everyone is amazing! Let us touch it again and remember the feeling of the green card. Then we will touch the next one.
Continue with cards of various colors…
When students are touching color cards, the instructor or parent must be filled with loving emotion, and the dialogue with the student must be gentle. When the image seen by the student is different from the color of the color card, do not negate the child. Instead, encourage the child to continue “looking” at the image in the picture until an image matching the color of the color card appears. Whether the child’s answer is correct or wrong, encouragement must be given. When the image described by the student never has an image matching the color of the color card (about 3-4 images), say to the student: “Hmm, relax for a moment, take a deep breath, let us change to a different card, believe that you are amazing!” At this time, a different color card should be swapped for the child to touch. If the student cannot find the correct feeling for more than 3 consecutive cards, consider whether the child is tired or has some physical or emotional condition, and then take measures such as resting or playing games. If there is no problem with the child’s condition, perform the Gazing Light Training or wait until the Yellow Card Training state is stable, then start the Blindfolded Color Card Touching game practice again. When the student touches the correct color, be sure to give him (her) sufficient time to feel this correct feeling again, and ask the student to remember this feeling. Calculate the accuracy rate for every 15 cards in a round. After each round, the child can rest for 1-2 minutes. The entire practice process should not exceed 30 minutes.
Blindfolded Text Card Touching
After the student’s state of Blindfolded Color Card Touching is stable for at least one day, and seeing that the child is very confident and has a strong interest and desire to try touching text cards, you can start the practice of touching text cards.
Below, using the case of touching the character “门” (door), let’s look at the guidance for students touching characters:
T: Children, close your eyes and put on your eye masks. Okay, dear children, relax first, don’t think about anything, take a few deep breaths.
T: Does anyone know how to touch text cards?
S: Teacher, I know. First from top to bottom, then from left to right.
T: That’s awesome, great! Now let’s touch text cards.
S: En.
(Hand text card to student)
T: Carefully look at what image is presented in the small TV in front of your eyes? What is there? Deep breathing to make the forehead bright, carefully look at the image in front of your eyes, what scene is there, say it out.
S: Teacher, I see, my mom went to the vegetable market to buy vegetables.
T: En, very good! What else? Look carefully.
S: Teacher, my mom walked into a house with many doors. The house is full of “Door” (Men), it should be “Door” (Men).
T: En, correct, that is really amazing!
When touching text cards, the scenes seen by students may be more numerous, and there will be many scenes unrelated to the characters. Because they have gone through the process of touching color cards, children can often easily find images related to the characters, some of which will be very vivid and interesting. For the relationship between these vivid and interesting images and the characters, give the student a little more time to see the image clearly and remember this feeling. Instructors and parents should record such cases, as children will maintain a better state for learning when they see them later. If the student cannot correctly touch images related to the character for a long time, the instructor or parent should ask the child more about the images they “see.” You can zoom out the lens so that he (she) can see more things, thereby providing guidance. If they still cannot correctly touch the character, refer to the method for “Blindfolded Color Card Touching” when the color cannot be correctly touched.
Blindfolded Color Discrimination
Blindfolded Color Discrimination refers to identifying the color of all colored items. For example, touching and identifying the main colors of books, printed materials, and various items. In the practice of Blindfolded Color Discrimination, several layers of tissue paper can be placed between the eye mask and the eyes to reduce gaps. The practice method refers to “Blindfolded Color Card Touching.” This game is recommended to be practiced after being able to perform Blindfolded Text Card Touching.
Blindfolded Reading
Blindfolded Reading refers to the practice of reading while blindfolded. Blindfolded Reading is generally carried out after the student can very proficiently touch colors and touch text cards. Because when a student can very proficiently identify colors and text cards, they can generally also identify smaller text at a very fast speed, even without needing to touch with hands, just as if they could see with their eyes. Blindfolded Reading generally has two benefits: first, the student’s ability to understand reading materials is enhanced; second, the speed of memory is fast. This is mainly because during Blindfolded Reading, images related to the text content will appear in the student’s brain, and these images will help the understanding and memory of abstract information. For some students, the images in the brain not only contain pictures but also text and sound. This multimedia information is very beneficial for the student’s memory. Also, when the student is blindfolded or has their eyes closed, the interference of environmental information on the student is reduced, and the student will be more focused. At this level, it is easy to understand the improvement of the child’s comprehension ability and memory speed.
Blindfolded Drawing, Coloring
Drawing with the visual channel closed while blindfolded, using colored pens as much as possible during drawing. Because drawing, especially relatively exquisite and large-scale paintings, requires being blindfolded for a long time, it exercises the student’s long-term concentration and willpower. When drawing, place colored pens and other materials on the table. The light in the room should not be too bright or too dark; just not dazzling is the standard. After the student puts on the eye mask, clearly tell them the size of the paper, try to fill the paper, pay attention to composition and proportion, and draw out the scene they have in mind.
This game can also involve coloring and handicraft making. Handicraft making can include stickers, sand paintings, etc. Be careful not to use tools such as scissors that may cause danger.
Blindfolded Homework
Some students do not really like to do Right Brain Development training at home. When the learner possesses the ability of Blindfolded Reading, parents can let the child do homework blindfolded at home to replace right brain exercises. Doing this not only improves the effectiveness of the student’s homework but also exercises the learner’s perception and concentration, which is an excellent choice.
Playing Mobile Games Blindfolded
After learners are able to read and draw blindfolded, playing mobile games while blindfolded also becomes a very simple task. Sometimes, students will look at photos on a guest’s mobile phone while blindfolded to show them to the guest, which indicates that the student is able to perceive information on the phone’s screen. Many mobile games are suitable for playing blindfolded, such as Rhythm Master, Subway Surfers, Piano Tiles, etc. When children are unwilling to practice at home, they can also practice by playing mobile games blindfolded.
Blindfolded Chess
Playing Gomoku, Go, Checkers, or even Chinese Chess blindfolded requires not only a high level of perceptive ability but also the use of spatial imagination and logical thinking abilities.
Blindfolded Poker Playing
When playing poker blindfolded, one must be able to “see” one’s own cards clearly, as well as “see” the opponent’s cards from a relatively far distance. This places a relatively high demand on perceptive ability. When the learner truly cannot perceive the opponent’s poker cards, the opponent can also tell him/her, but they need to remember the poker cards the opponent has played. This is of great help in improving memory.
Blindfolded Threading a Needle
Threading a needle while blindfolded requires even greater mental calmness, physical relaxation, and a high degree of concentration. If one can distinguish characters blindfolded, as long as training is persisted in, threading a needle can be achieved very quickly.
Brow Color Discrimination and Character Discrimination
When using the brow to discriminate colors and characters, the color card or text card is placed on the brow for perception. Some learners with strong concentration and perception abilities can achieve this. However, using the brow to discriminate colors and characters generally takes a relatively long time.
Behind-the-Back Color Discrimination and Character Discrimination
When blindfolded and touching color cards or text cards, sometimes it is observed that learners will tilt their heads back or to the side to look for “light”. Perceiving colors and characters through finger touch behind the back has nothing to do with “light”. However, this requires even stronger concentration, perception, and mental power. To reach this level, long-term persistent practice is needed.
Ear Listening to Color Cards and Text Cards
This exercise is to be done blindfolded. Place the color card or text card by the ear (the distance varies from person to person; some students can perceive information more easily by the ear, while others need a greater distance to perceive it). Use a finger to flick the card gently to produce a sound. If the sound is too loud or too soft, the child will generally inform you proactively. The interval between flicking the card twice should not be too rushed. Parents or Instructors should not be too eager to ask or guide. The younger the child, the easier it is to cultivate the ability of ear listening and behind-the-back color and character discrimination, but persistent practice is still required, otherwise it cannot be sustained.
Blindfolded Sports
Some children, when in a blindfolded state, are not affected in functions such as movement, direction, balance, and control, and can engage in activities such as walking, cycling, roller skating, and playing ball. However, this places higher demands on physical functions. For some children, when the visual channel is closed, their direction, balance, and control cannot adapt.
ESP Contact Sensing Training
Contact sensing is the ability to sense information about people or events related to an object by touching or being close to the object.
Training Method: The child places an object in their left hand, then enters a meditative state and projects their mind onto the object. Actively think: Who is the owner of this thing? What do they look like? What are their personal traits? And so on.
Is the owner of this item male or female? Think about what a boy looks like, then think about what a girl looks like. You will feel which one is correct. Is the person young or old? Think about both possibilities, and you will have a sensation and obtain the correct information.
Once contact sensing is learned, and when you are relatively proficient and confident, it can be applied in more places, such as finding missing persons or items. When you are sensing, you can imagine looking at things through the other person’s eyes and feel where the other person is, so you can know the location of the missing person.
ESP Card Games
The ESP card training curriculum selects cards with single colors, bright colors, and image and shape symbols. You can purchase ESP training cards for training.
ESP training is very simple, and parents can also imitate it to train their children at home.
-
Select 3 cards with single, bright colors, such as an apple, a tomato, a duck, etc. Show the 3 cards to the child respectively, then show the backs to everyone, shuffle the order, draw one from them, show the back to everyone, and let the child say which one was drawn.
-
Select one card from several cards, with a single color and bright color. Stare at the graphic on the card, let the child close their eyes and imagine which picture the teacher (or parent) is looking at, while the teacher (or parent) also closes their eyes and tries hard to imagine the picture on the card, mentally suggesting to the child which card is in their hand. Then, let the child open their eyes and say their answer.
-
Solo training. Select 3 cards with single, bright colors, such as an apple, a tomato, a duck, etc. Let the student look at the content of the three cards, ask them which one they like best, then place them face up, quickly shuffle the order, arrange them, and let the child select the one they like best. You can shuffle the order multiple times to let the child look for that card.
-
Take out 3 pairs of cards. First, place 3 of the cards face up on the table, then let the child place the 3 cards in their hands on the corresponding cards based on feeling. After that, flip the face-up cards over to see if the child matched them successfully. As the accuracy rate increases, you can increase the number of cards to play.
-
Take out 3 pairs of cards. The teacher (or parent) holds 3, and the child holds the corresponding 3. The teacher (or parent) randomly draws one, shows the back to the child, and mentally suggests the content of the card in the teacher’s (or parent’s) hand. Let the child select a card from their own cards to see if it can match the card in the teacher’s (or parent’s) hand. This can be played repeatedly multiple times.
Sticking Coin Game
-
Prepare a coin.
-
Feel whether your brain is breathing comfortably and freely.
-
Gently rub your forehead a few times with your hand, then place the coin in the middle of your forehead and press it with your finger.
-
Release your hand after a while. Is the coin still sticking to your forehead?
-
If the coin sticks to your forehead without falling off, it shows that you have concentrated your attention highly.
-
If the coin falls off as soon as you release your hand, you can try sticking it again.
-
If the coin still falls off, then move on to the next game with a peaceful mindset.
Is the coin sticking to the forehead because of sweating or the stickiness of the skin?
It is indeed possible for the coin to stick to the forehead for the above reasons. But even if the grease on the forehead is wiped clean, or even powder is applied, the coin is still likely to stick. Therefore, in certain situations, what matters is not the principle of the coin sticking to the forehead, but the effect of momentary whole-hearted high concentration when sticking the coin.
It is difficult to clearly explain what the concentrated state is like, and it is difficult for others to see whether the practitioner is in a concentrated state, and the practitioner does not easily know the degree of their own concentration. Therefore, in the process of improving concentration ability, it is necessary to adopt measurement methods that can be directly seen with the naked eye. The sticking coin training mentioned earlier, and many training items to be introduced later, belong to methods of determining the degree of concentration using physical means. Through these items, practitioners can confirm the possibility of what level their brain concentration has reached, thereby generating a firm will to develop the brain.
Sticking Spoon Game
-
Prepare a few of the most common metal spoons at home.
-
Feel whether your brain is breathing comfortably and freely.
-
Place the spoon on your forehead and press it for a while.
-
Release your hand after a while. Is the spoon still sticking to your forehead?
-
If so, it indicates that the brain’s attention is highly concentrated.
-
If it falls off, then test again.
-
If it falls off after several attempts, please reflect on whether you have the following thoughts in your brain:
“How strange it is to stick a spoon on the forehead!”
“What if it sticks?”
“Can a spoon really stick to the forehead?”
-
Eliminate the above distracting thoughts, focus your attention on the brain, and try again. The direction of the spoon and the position on the face do not matter.
-
If the first spoon sticks, try sticking the second and third ones. Compared to doing this exercise alone, it will be more effective if the whole family helps each other.
-
If no matter how hard you try, the spoon still cannot be fixed on the forehead, do not be angry or disappointed. It is recommended to proceed with other game training first.
The relationship between the spoon sticking to the forehead and concentration:
It is difficult to clearly explain what the concentrated state is like, and it is difficult for others to see whether the practitioner is in a concentrated state, and the practitioner does not easily know the degree of their own concentration. Therefore, in the process of improving concentration ability, it is necessary to adopt measurement methods that can be directly seen with the naked eye. The previous sticking coin and sticking spoon trainings belong to methods of determining the degree of concentration using physical means. Through these items, practitioners can confirm the possibility of what level their brain concentration has reached, thereby generating a firm will to develop the brain.
Telepathy Game
1. Animal Card Game
Prepare a set of 5 cards each for the parent and child, such as a panda, a giraffe, an elephant, a bear, a deer, etc. Place the 5 cards face up in front of the child, while place the cards face down in front of the mother. The parent draws a card from them, stares at the pattern on the card, creates an image in the mind, and then says to the child: “Choose the card that is the same as the one I am holding.” Try 5 times. For the first 5 times, guessing correctly once is enough; gradually, all 5 times can be guessed correctly.
2. Mind Reading Game
The parent imagines using telepathy to transmit the image to the child’s forehead, and imagines a screen appearing on the child’s forehead with the image. Transmit the image and confirm whether the child can say the image projected on the forehead screen correctly.
Tactile Force Game
Open a round hole in a sealed cardboard box that only allows a hand to pass through. Put five balls of different colors into the box. Let the child reach into the hole and guess the color of the ball caught. Calm down, catch the ball, feel it well, and say the color.
Talking to Plants
Place two plates in the room. Spread cotton on the plates, wet the cotton with water, and place a few soybeans (or seeds of other plants) on the cotton. Observe the germination situation every day. Every day, say words of praise to the soybeans in one of the plates and tell them to grow well, while saying harsh words to the soybeans in the other plate every day. Play this simple game for 5 minutes every day and observe whether there are differences between the soybeans in the two plates.
Chapter 11 Expansion Training
After activating the right brain, the child gradually enters the right brain state. Expansion training includes Dual-Tasking, Finger Exercises, sensory exercises, intelligence exercises, etc. The training methods for expansion training mainly come from Feng Xiaolan’s “Super Right Brain Photographic Memory Training” and “Willpower Training — Improving Personal Willpower with Haddock’s Training Rules” (USA, Franco Haddock). In the right brain state, performing some expansion training is very interesting and also challenging. It requires the cooperative work of the left and right brains, which can exercise the right brain unconsciously and make the left and right brains develop in a balanced way. These exercises do not necessarily have to be conducted as strict training courses; they can be used as leisure games to exercise when time is abundant.
Dual-Tasking
In the writings of Jin Yong, there is an “Old urchin” Zhou Botong. He has a unique original skill called “Mutual Combat of Left and Right” — the left and right hands can strike different moves at the same time, making it difficult for opponents to parry, forcing them to flee in defeat. This “Mutual Combat of Left and Right” is the best embodiment of Dual-Tasking. The Old urchin taught Guo Jing the hand mutual combat technique, starting from “left hand draws a square, right hand draws a circle”.
In fact, neither “left hand draws a circle, right hand draws a square” nor “Mutual Combat of Left and Right” can prove whether a person is smart or not. Of course, in some intelligence tests, there are also items that examine attention distribution ability, which can be said to be a component of operational intelligence. The core point lies in attention. Research shows that children who can easily complete “Dual-Tasking” training, when they need to concentrate attention in reverse, often persist for a longer time, have faster brain reactions, more coordinated body movements, stronger memory, and are more creative.
Training Precautions:
Prepare a piece of white paper and two pens (ballpoint pens or gel pens are recommended; do not use fountain pens and pencils).
Please prepare a folder or a relatively heavy object to clamp (press) the paper.
Draw with both hands at the same time, practice repeatedly until the drawn graphics are perfect. Swap hands after drawing.
Training time is unlimited, but it is recommended to train at least once a day.
Training Content:
Monday Left hand write — Right hand write | Train once again in reverse Tuesday Left hand write △ Right hand write | Train once again in reverse Wednesday Left hand write □ Right hand write △ Train once again in reverse Thursday Left hand write □ Right hand write ○ Train once again in reverse Friday Left hand write △ Right hand write △ Train once again in reverse Saturday Left hand write △ Right hand write ○ Train once again in reverse Sunday Left hand write ○ Right hand write ○ Train once again in reverse
Finger Exercises
As the saying goes, “A nimble mind comes from nimble fingers.” Brain scientists believe that fingers occupy the largest proportion in the sensory and motor functions of the cerebral cortex. Frequently moving the fingers to stimulate the brain can delay the aging of brain cells and improve memory and thinking ability. Finger exercises require the coordinated use of both hands, which is beneficial for the coordination of the left and right brains. Efficient finger activity increases brain vitality more than ineffective studying and rote memorization.
Generally, finger exercises can be performed before, during, and after formal study sessions.
This plays a significant role in developing the non-dominant brain, improving communication between the left and right brain hemispheres, enhancing attention, relaxing the mind, and eliciting brain Alpha Waves.
Dr. Masahiro Kurita from the Faculty of Medicine at the University of Tokyo in Japan proved through years of practice: “Finger exercises can improve human intelligence. After 20 hours of ‘finger exercises’ practice, reading speed increases by an average of about 10 times, with effective cases reaching 28 times.” Kurita stated that this exercise is particularly effective for children. He conducted a 6-day seminar totaling 18 hours for elementary and middle school students, achieving an average reading speed increase of 50 times.
There are many methods for practicing finger exercises. Here are a few common finger exercise games that can be practiced for a few minutes daily, or played with friends during breaks between classes or work.
1. Keller Finger Rotation Method
Extend both hands with fingertips touching each other, forming a hollow sphere shape. Then, perform reverse rotations with corresponding fingers one by one, from the thumb to the little finger, 10 times each. The speed should be as fast as possible. Try to maintain the spherical shape of the hands without fingers touching. Once proficient, you can also practice in reverse and with eyes closed.
2. Finger Matching
The thumbs of both hands take turns touching the other fingers of the opposite hand, repeating the cycle. The faster, the better.
3. Finger Pendulum
Make fists with both hands, palms facing yourself. Extend the left thumb and right little finger together, then retract them. Then extend the left little finger and right thumb together, then retract them. Accompany this with an 8-beat rhythm to make it rhythmic. The faster, the better.
4. Arabic Counting Method
Extend one hand, with the thumb representing 1, the index finger 2, the middle finger 4, the ring finger 8, and the little finger 16. Bending a finger represents the corresponding number. Bending the thumb indicates 1; bending the thumb and index finger together indicates 3, and so on, counting from 1 to 30. Once proficient, you can increase to 100.
5. Rock Paper Scissors
Play Rock Paper Scissors with the left and right hands. The speed should be as fast as possible, and the left and right hands should be different as much as possible.
6. Difficult Shapes
While one hand draws a circular shape with its fingers, the other hand simultaneously draws a quadrilateral. After drawing several times, switch hands.
7. Leg Health Care
Sit on a stool with feet on the floor. Open the palm of one hand and gently rub it back and forth on the front of the knee, while the other hand gently pounds the front of the knee. Switch hands after a few times.
8. Finger Tapping
Place the index and middle fingers on the desktop, then quickly switch to the middle and ring fingers. Use an 8-beat rhythm for alternating practice, which can improve reaction speed while coordinating the left and right brains.
9. Touch Nose and Ears
Clap hands, then right hand touches nose, left hand touches right ear; clap again, left hand touches nose, right hand touches left ear. Use an 8-beat rhythm for alternating practice to coordinate the left and right brains.
10. One Shot for One
The index finger of the left hand stands upright (see image below), other fingers curled, showing “1”; the index finger and thumb of the right hand are extended, other fingers curled, forming a gun shape, facing the left hand. The index and middle fingers of the right hand stand upright, other fingers curled, showing “2”; the index finger and thumb of the left hand are extended, other fingers curled, forming a gun shape, facing the right hand. Continue this pattern for subsequent numbers.
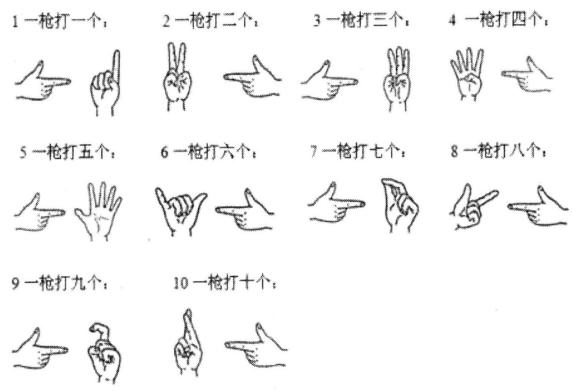
Staring Without Blinking
The eyes are our current focus. However, even so, the laws applicable to them also apply to other sensory organs—any activity process occurring in the brain center will take effect in all other places, and this process will also affect the entire body in one way or another. Focusing attention on the eyes will nourish the various nerves of the eyes. when staring intently at something, the ganglia at the root of the optic nerve will obtain sufficient blood supply, and the terminal organs of vision as well as the eye muscles will also be greatly activated.
Exercise 1
Find an object in the room or outdoors, such as a chair or a tree, and focus your attention on gazing at this object. Stare at this object on a level with full concentration, without straining your eyes too much; try to be as natural as possible. Now, notice the size of this object and estimate its dimensions. Observe its distance from you, as well as its distance from other surrounding objects. Then note its shape and see how it differs from the shapes of other nearby objects. Carefully observe its color. Is it harmonious with the surrounding environment? If so, what kind of harmony is it? If not, what causes it? Identify its texture and what it is made of. What is its real purpose? Does it serve this purpose? In what ways could it be improved? How can these improvements be achieved?
While searching for this information, keep your brain revolving closely around these relevant questions. Perhaps it will be difficult at first, but with prolonged practice, the brain will naturally and quickly respond to these questions. Finally, write down all the information you can recall.
Exercise 2
Walk through your room at a moderate pace, or walk around the room once, quickly noticing as many objects as possible. Now go outside the room and close the door, and write down the objects you just saw. Rely on the impressions left in your mind, not on information you already knew beforehand.
Exercise 3
Find 25 to 30 pebbles of moderate size, of which 8 or 10 are red, 8 or 10 are yellow, and 8 or 10 are white. Place them in a wide-mouthed box, then mix the pebbles of various colors completely together. Now, use both hands to quickly grab two handfuls of pebbles, then let go, allowing these stones to roll from your hands onto the tabletop or the ground simultaneously. Once they have all fallen, quickly glance at the selected pebbles, then turn around and write down the number of pebbles of each color from memory (do not guess).
Exercise 4
Take 50 square pieces of paper, 5–6 cm in size. Write a letter on each piece of paper; the handwriting should be clear and neat. Place them face down on the desktop, spread out. Pick up 10 pieces of paper with the letters facing down, then quickly flip them onto the desktop, trying to spread them out face up. Now, look at them carefully for a very short time. Then turn around and write down the letters you saw from memory. Immediately after, repeat this exercise with another 10 pieces of paper.
Exercise 5
Open your eyes wide, but not so much that it causes discomfort. Look straight ahead, with attention fully concentrated. Observe all objects within your field of vision, but your eyeballs must not move in the slightest. Persist for 10 seconds, then stop looking forward and write down the names of the objects you can recall. Rely on your memory, not on information you already knew, to make the record.
Exercise 6
Look straight ahead, blink naturally, and gaze at an object not too far away, such as 10–60 cm away. Focus your attention on this object. Count silently to 60, which is one minute. While counting silently, observe carefully with concentration. Now, close your eyes and try to outline the image of this object in your mind. Some people can make this image very vivid and clear, just like the real thing, while for most people, this image may not be so clear and vivid. Whether clear or not, try to describe every part of this object in your mind as much as possible. Do not look at it again; now write down the characteristics of each part, trusting your impression. Repeat this exercise 10 times a day, using 10 different objects as targets respectively.
The purpose of this exercise is to teach you to observe the true appearance of things and imprint them in your mind. As the exercise progresses, the carefulness of observation and the clarity of the object’s image in the mind will be greatly improved.
Keen insight is driven by inner motivation. This requires that observing things should reflect their true appearance. One must pay attention to the results and effects of various events—whether single events or complex combinations of events—so as to leave a comprehensive impression of them in the mind. At the same time, appropriate comparisons must be made regarding the motives for various observations. These exercises train insight, memory, the ability to impress the mind, and self-control, ultimately greatly promoting the development of willpower.
Exercise 7
Look at a small point 30 meters ahead, stare at it with full concentration, blink naturally, and do not let your eyes get too tense. While gazing, count to 50.
Each day during the silent count, extend the count by 20, that is, 50 on the first day, 70 on the second day, 90 on the third day, increasing sequentially.
Through training, the eyes can achieve fixed gazing. Some people never look directly into others’ eyes; instead, they take a glance and then shift their gaze to other things, looking here and there, wandering. A key element of successful personal speaking lies in the eyes; this is a secret of success. Looking directly into someone’s eyes is actually a psychological victory. Direct and frank eyes, wherever noticed—on the street, in shops, in social activities, on the podium—will generate a huge force. The magical power of keen eyes can be cultivated. To achieve this, one must invest one’s thoughts into this “window of the soul.” What a person can obtain from life and nature depends on how much thought they can invest in observation. To understand and grasp reality, one must let thoughts enter reality and actively obtain real information. Therefore, train yourself so that when you meet everyone, you can look directly at them with steady eyes, but do not stare at them, keeping the other person completely within your gaze. Note that when doing this exercise, the eyes must always reveal your thoughts; open your eyes wide and look at the other person with frankness and friendliness. Also remember, vacantly staring with wide eyes is just a sign of ignorance, because will is not revealed in your eyes.
Exercise 8
A dull stare reveals emptiness and weakness. A steady, direct gaze should be bright and full of vitality. As long as the soul revealed through the eyes is honest, the power of the eyes will increase and benefit you infinitely.
Look at an object in the room with a firm, natural gaze. Focus all your thoughts on your eyes, not on the object being gazed at. At the same time, do not look at your nose; look at the object, but let your peripheral vision spread all around it. Use all your strength for the act of “seeing.” Do this several times with appropriate rest to avoid eye fatigue or tension.
Now, imagine an emotion and mimic it, then try your best to reveal this emotion through your eyes. For example: Intense interest—let a light of excitement flash in your eyes. Pure joy—let your eyes radiate the brilliance of joy, but don’t just grin foolishly like a clown. Intense disgust—stare angrily at the ink bottle, the hateful gaze in your eyes sufficient to cover the black shape of the ink bottle. Practice the gaze expression of various emotions in this way.
Listening with the Heart
Oh, early in autumn, came the first herald of winter, when on a certain morning, the adult stag used its hoof to knock open a small drinking hole in the brittle ice, and the thin ice covering the pond instantly loosened, turning into a tiny ripple, vanishing amidst the churning spray. — Browning
If you can see that beautiful image from Browning’s verse, then you can probably hear the melody in the verse as well. If a person can hear all sounds, must they necessarily hear accurately? Are they always listening with their heart? Do they use their heart to distinguish the tone, characteristics, and direction of sounds? In this regard, do differences in talent and education make a difference? Do both create differences? It is possible that education indeed plays a large role. Therefore, the value of training the ears—excavating the potential abilities of hearing—is obvious.
To hear something requires excluding some interfering sounds while accepting a certain sound, chord, or music with great interest. All of this actually depends on a person’s mental investment. A person with an active, keen nervous system can hear all sounds, while a dull, numb person hears almost nothing.
Exercise 1
How many kinds of sounds can you hear when you listen attentively? Count them. Listen seriously!
Try to distinguish their different directions, different sources, different tones, different intensities, different characteristics, and different combinations.
Exercise 2
Select a relatively distinct sound and listen carefully to see how detailed a description you can give of it.
Repeat this exercise 10 times every day, then switch to a different sound.
Exercise 3
Select the faintest sound that you can consistently hear. During this process, try to discover some patterns you hadn’t noticed before. Note all the descriptions you can make of it.
Exercise 4
Select a rhythmic sound that you can often hear. Only pay attention to this one sound. Immerse yourself in this sound and listen with concentration. Note how many characteristics it has that are worth describing.
Exercise 5
Select a sound you can consistently hear that is also the most pleasing to you. Think about the reasons why it is so beautiful and melodious.
Exercise 6
Listen carefully to a melody played on an accordion. Then, try to review this melody completely from memory in your mind. You may only be able to recall one or two notes, having forgotten most of it. However, if you persist in this practice, gradually, you will be able to restore in your mind the tune that was forgotten at the beginning.
Have someone else strike the piano keys nearby, one after another. At this time, do not look at the player, but strive to distinguish the various sounds—whether they are sharp or mellow—and identify their positions on the keyboard and the names of each note.
Repeat the exercise of listening to two keys, struck with one hand; repeat the exercise of listening to four keys, struck with both hands; repeat the exercise of listening to full chords, played with one hand; repeat the exercise of listening to full chords, played with both hands.
Exercise 8
Select a specific sound that you particularly dislike and that often disturbs you, and make it the object of your practice for the day. Now, with a great exertion of your willpower, shift your attention to other sounds, thereby shutting out the noise you wish to expel from your consciousness. Sustain this effort for 5 minutes. Do not be discouraged. You can eliminate it, as long as you are determined to do so. After 5 minutes, take a break and stop paying attention to those sounds. Then repeat the exercise; this time you can persist in this practice for 10 minutes. Spend a total of 30 minutes on this exercise. Each time, extend the duration of isolating the noise by a few minutes, with short breaks in between, allowing your attention to shift to other things.
Exercise 9
At night, when you are troubled by some annoying noises, stop and do not think about them. No matter what, persist in telling yourself not to mind them.
Think of a particularly soothing melody, a beautiful thought, or a pleasant experience. Do not try too hard; relax a little. Recall a sound in your mind that is completely different from the one disturbing you, and let it echo in your mind. Note! It has a certain regularity and rhythm. Imagine the loud “tick-tock” of a large clock, the monotonous and low creaking of an old water wheel, or the sound of waves crashing on the beach one after another. Are they not full of rhythmic rhyme?
Identifying Objects by Scent
An exquisite heart is complete with all seven orifices, and the sense of smell is one of them. When the soul smells the intoxicating breath of the world, how can it help but be moved? Give me a man with a big nose! In my observations, I have found that people with long noses always have intelligent and wise heads. — Napoleon
The sense of smell can form one of the most powerful parts of a person’s memory, yet it is clearly severely neglected. When neglected organs are perfected, the ability to think can be greatly exercised.
Exercise 1
Pick a fragrant flower (or a traditional Chinese medicine ingredient) and smell it carefully. Walk around the room for a while, moving away from the flower. Now recall what its smell is like and how strong it is. Pick a flower with a different scent to repeat this exercise. Be sure to give your nostrils adequate rest, otherwise the sensations of smells will become confused.
In the above and following exercises, a strong will must be inseparable from you, keeping your mind focused on your nose.
Exercise 2
Pick two different flowers (or traditional Chinese medicine ingredients). Smell the scent of one flower, and then smell the other. Now strive to recall the scent of the first one, and then recall the scent of the latter. Then try to compare the scents of the two flowers, noting the differences between them.
Exercise 3
Sit upright and inhale slowly, trying to point out one by one all the smells you perceive. Is there really such a smell? Where does it come from? Have a friend hide some fragrant objects in the room—some peaches or an opened bottle of perfume. It is best if you are in another room, so that you do not know what is hidden and its location.
Exercise 4
Have a friend hold a fragrant or aromatic object in their hand without letting you know what it is. Have them hold the object at a certain distance from you, gripping it tightly with both hands together, and then gradually approach you, getting closer and closer until you can perceive the scent. Note how far away you are from the object when you perceive it through your sense of smell. Can you name this scent? Can you identify the object? Repeat this exercise with intermittent breaks, using different “smellable” objects to practice repeatedly.
Have you noticed that certain scents require a shorter distance to perceive compared to others? Is this because of the difference in the intensity of the scent, or is it due to the characteristics of the scent itself?
Exercise 5
The ability of any of the five senses can be continuously strengthened in the real world. A deep impression from any sense can evolve into significant events in life. A high-quality life gives greater meaning to the sense of smell. The current exercises can be continued indefinitely. Develop a habit in your life of associating pleasant scents from gardens, fields, or woods, using real and powerful thoughts to imagine. For example: newly mown grass—Whittier’s poetry; freshly turned soil—the affluent life of the world; flowers—the beautiful scenery of the earth.
This habit will open up new worlds for you, cultivate positive attention, and thereby gradually forge a powerful brain in your life.
Intimate Contact
The sense of touch is the skin’s true perception of stimuli; it is one of our most familiar senses. Through training the sense of touch, we can help ourselves imagine better and exercise our thinking.
Exercise 1
Gently move the fingertips of your right hand over an uncovered flat surface. First a rough surface, and then a smooth surface. Note the difference in sensation when passing over the rough surface versus the smooth surface. This requires very attentive feeling, as the differences are varied. Repeat this exercise on several rough and smooth surfaces. Note whether the sensation in one hand is more intense than in the other. Now repeat this experiment with fabrics—linen, cotton, cashmere, silk. In the exercise, pay attention to comparing the different feelings two different fabrics give you. Continue this exercise by pairing several different fabrics one by one.
After finishing one round with one hand, switch to the other hand and repeat the exercise. What is the main sensation silk gives you? What about cotton? Cashmere? Linen? Besides the tactile sensation of the various fabrics, are there any other feelings? If so, are they comfortable or uncomfortable sensations?
Exercise 2
Gently touch the uncovered desktop, letting the fingers of each hand touch the surface one after another. While doing this, note the stability your hand can maintain. Now repeat this exercise, but apply strong pressure with each finger touch. What is the difference between the sensation of a light touch and heavy pressure?
Pick up something very light, such as a rubber ball, let it stay in your hand for a moment, and then immediately let it drop. Now grip it tightly, then immediately release it. Can your fingers perceive this object in the very first instant? Or do they only feel it during the second grip? Pay attention to the difference in sensation.
Exercise 4
Close your eyes and scatter a few objects randomly on the table. Keep your eyes closed, and gently stroke these objects with your right hand, trying to estimate the distance between each object. Do not use your palm or fingers as a measuring tool. Then repeat this experiment with the left hand. Consider this question: which hand’s estimation is more accurate?
Exercise 5
Close your eyes and have a friend hand you several small objects one by one, but do not grasp them in your hands; simply feel them by touch. Now, try to determine what they are. For example: a small onion, a small potato, a flower bulb, a piece of dry putty, a piece of paraffin wax; or some sugar, sand, pepper, salt, etc.
Exercise 6
Get some small round objects, of any texture, such as wood or iron, provided they are exactly the same size but have slightly different weights. For example, have two that weigh 50 grams, two that weigh 100 grams, two that weigh 150 grams, and so on up to twelve pieces. Mark or write the weight on only one side of each piece. Place them in disordered order on the table with the unmarked side facing up. Close your eyes, randomly pick up one piece, and then pick up another with the same hand. Judge by feeling whether the weights of these two pieces are the same. Estimate the weight of the picked pieces for each trial. Then try with the left hand. Then repeat the experiment by picking up one piece with each hand. Repeat the above several trials many times.
Take 24 small wooden blocks. Scatter them all on the tabletop. Close your eyes, pick up one, place it in your palm, feel it, and imagine its appearance in your mind. Pay special attention to its faces, lines, and corners. Now open your eyes and see the difference between the image in your mind and reality. to reduce the difficulty, you can look at these models several times until you can close your eyes and present the observed model in your mind.
Exercise 8
When shaking hands with others, pay attention to discerning certain personality traits from their handshake style.
Unity of Body and Mind
We acquire knowledge of various sensations through different sensory organs. But we also often enter a so-called “general sense” (common sensation); as long as you sit quietly in a very quiet room for a little while, you will experience this. All experiences of the nervous system can be perceived; you can feel the beating of the heart, hear your own breathing, and even notice the rustling sounds by your ears. The whole body can perceive sensations of warmth or cold. You feel the pulse of life beating; you are clearly aware that you are in a state of tangible sensation. Undoubtedly, you are sentient in any part, and this sentience is also almost covering the whole body.
Exercise 1
Sit quietly in a room where you will not be disturbed. Place your attention on a certain part of the body, such as the hand, from the palm to the elbow, concentrating all thought activity there. Exclude all sensations that do not originate from the hand. Write down these sensations for future reference.
Switch to the palm area to repeat this exercise. Then the shoulder, then the back, and then the feet. Continue practicing like this, switching to different parts of the body. Note, strive to experience those things that absorb your feelings.
Switch to the head to repeat this exercise. Now focus entirely on listening—not listening to any sound, but feeling the ears with the nerves. Similarly, concentrate entirely on vision, letting all thought activity focus on the eyes, not the objects seen by the eyes.
Next, press on a certain part of the body, such as the back of the hand or the face. While doing this action, resolutely focus your attention on another part, to the point of forgetting the sensation of being pressed. Record the result of each practice.
Exercise 2
Stand quietly in a quiet room, and then perform the following exercises in the same way.
a. Move the right arm slowly and steadily from the side of the shoulder until it is raised above the shoulder position. Repeat 6 times, focusing your attention on your movement.
b. Move the right arm forward from the side of the shoulder until it is horizontal. Repeat 6 times.
c. Move the right arm to the right from the side of the shoulder until it is horizontal. Repeat 6 times.
d. Hold the right hand one arm’s length above the shoulder, swing the entire arm to draw a semicircle, extend the arm forward and downward until it reaches the side of the leg, without bending the body. Repeat 6 times.
e. The initial position of the right hand is the same as above; swing the arm to the right. Repeat 6 times.
f. Extend the right arm to the right, swing it forward until the hand is directly in front. Repeat 6 times.
g. Similarly, repeat the above movements with the right arm in the opposite direction.
h. With the left arm, repeat the same movements 6 times.
i. With the left arm, repeat the same movements in the opposite direction 6 times.
These movements must be performed seriously and slowly. Pay attention to every movement with your entire mind; do not let your thoughts wander. Put your whole thinking into your every move, concentrating completely on the action you are performing. In addition, the most important thing is to be filled with willpower for every movement. Infuse willpower into every muscle.
Exercise 3
Stand quietly in a quiet room. Do not hold onto any other objects with your hands; stand on your left foot alone, keep your body balanced, swing your right foot forward as far as possible, then return to the original position and land on the ground. The movements should be serious and slow; do 6 times.
a. Swing the right foot to the right side, return to the original position. Repeat 6 times.
b. Swing the right foot forward and then to the right, then return to the initial position. Repeat 6 times.
c. Swing the right foot backward and upward as far as possible while keeping the body balanced, then place the foot back to the initial position. Repeat 6 times.
d. Swing the right foot backward as above, then draw a semicircle to swing to the right side, then return to the initial position. Repeat 6 times.
e. Similarly, repeat the above movements with the right foot in the opposite direction. Repeat 6 times.
f. Repeat the same movements with the left foot. Repeat 6 times.
The exercises suggested here must be performed with vigorous energy, but maintain slow and serious movements and a high degree of mental concentration.
Exercise 4
Stand quietly in a quiet room. Look straight ahead with both eyes, slowly turn your head to the right to the maximum extent, then turn your head back to the initial position. Repeat 6 times.
a. Look straight ahead, turn your head to the left, then return. Repeat 6 times.
b. Slowly tilt your head backward to the maximum extent, then return to the initial position. Repeat 6 times.
c. Slowly bend your head forward to the maximum extent, then return. Repeat 6 times.
d. Lower your head toward your chest, slowly swing to the right, circle upward to the right shoulder, then swing down to the front, continue swinging upward to the left shoulder, then swing down back to the initial position in front. Repeat 6 times.
e. Tilt your head back, centered between your shoulders, circle upward to the right toward the right shoulder, then swing down to the left and continue upward to the left shoulder, then swing down to the right back to the initial position. Repeat 6 times.
f. Repeat the above movements every day for 10 days.
Exercise 5
Stand quietly in a quiet room, keep your feet still, slowly twist your body to the right to the maximum extent, then turn to the left. Practice a total of 6 times.
Stand naturally, extend both hands to the sides, bend your body forward, keeping your upper body straight; then turn your body to the right; then to the left; practice a total of 6 times.
These exercises are carefully designed and possess a certain inspirational significance; they can also be varied. However, one rule that must be strictly observed and implemented is to perform all movements slowly and earnestly, with the mind highly focused on the execution of the movements. Maintain a sense filled with willpower.
Exercise 6
Stand naturally. Focus your mind on yourself. Then calm down and firmly, unshakably declare: “I am absorbing beneficial forces! I am open to all positive influences! The strength of body and mind is increasing! Everything is so harmonious!” Repeat these words calmly but forcefully many times. Do not display negative emotions; maintain a feeling filled with willpower. Willpower exists in the best mental state. Elevate yourself to the realm of triple health—physical health, mental health, and spiritual health.
a. Continue this exercise for 15 minutes. Then rest slightly for a while. Practice at least once every morning.
b. Whenever you feel anxious, confused, or agitated, enter into this determined mood to welcome beneficial forces. Following this guidance will bring you infinite value.
Letting Imagination Run Wild
The “Letting Imagination Run Wild” here differs from the imagination training in Chapter 7; Chapter 7 mainly trains the brain’s ability to present clear images, whereas the imagination exercises here involve the conscious guidance of specific problems and are imagination under self-conscious thinking. Throughout the practice process, you must always remember that you are cultivating your own imagination, and your purpose is to reveal the causes of certain behaviors and to judge whether the results of events’ development are reasonable. As you continuously improve your imagination and analytical abilities in this way, both your right brain’s imagination and your left brain’s logical thinking abilities will be strengthened.
Exercise 1
Visualize a rose in your mind and imagine its fragrance. You are on a mountain covered with blooming roses, and the air is filled with the rich scent of roses. What effect will the flower fragrance have on you? What would you do in this situation? Drop a drop of musk to repeat this exercise. Then imagine how strong the fragrance would be if a whole lake were full of musk. Again, use your imagination to picture a scene in a forest where birds are singing melodiously, rising and falling, creating a lively atmosphere.
These exercises should be conducted in a quiet room. You must mobilize your consciousness to control your brain and strive to do this exercise. When imagining, be as clear and vivid as possible. Repeatedly imagine until this image surfaces vividly in your mind, just as if it were truly presented before your eyes.
Exercise 2
Stand beside a babbling brook or waterfall. Now listen carefully to the sounds reaching your ears. The various sounds mix together to create an overall sound effect. What does this sound sound like? What does it remind you of? What kind of emotions does it evoke in you? After you have gradually adapted to the overall effect of this sound, try to distinguish which individual sounds are mixed together to form it? After completing this process carefully and thoroughly—that is, after breaking down the entire sound into different components—imagine one of these sounds is very loud and clear; make this sound as loud as possible; then continue to imagine another sound, a third sound, and continue without stopping until all sound combinations are completed.
Finally, switch from this place with sound to a quiet place, and recall the sounds you just heard: firstly as the entire combined sound; secondly, recall each individual sound you analyzed earlier. Practice continuously until you can easily and casually conjure up these sounds.
Exercise 3
Recall an experience that left a deep impression in your memory. Relive every stage and the entire process of that time in your mind again, bit by bit slowly, with intense focused emotion. Think about the cause of the event and the connection of its details, as well as the impact it had on you at the time. Did you feel happy or painful then? Regardless of your feelings at the time, explain the reason. What consequences did it bring to your future life? Would you relive this experience? If not, why? If you were to do the same thing again—then how would you do it? If you want to prevent the same thing from happening in the future—then how would you prevent it?
Continue to recall various experiences until the lessons of caution and looking before you leap are deeply engraved in your heart.
Exercise 4
In a quiet room, construct a fictional picture, for example, of something you have never seen before: a strangely shaped bird; an animal, perhaps beautiful and exotic, or docile and ugly; a tall building, magnificent and mysterious; a landscape, weird and charming or desolate and barren. Do not let your brain fall into a state of idle fantasy. You must use your willpower to control the direction of your brain’s thoughts as much as possible.
Exercise 5
Stare at a relatively large object and see if it triggers your imagination in some way. Is the object you are looking at a horse? Give it wings and let it fly to a vast and distant planet. Is the object you are looking at a ball of yarn? Imagine it as a spider’s web; if you want to weave it into a thousand robes, or use it to send a message, you only need to use your mind to blow a breath on it. Continue to use different objects for such bizarre imaginations until your imagination is completely under the control of your willpower—able to be aroused, reined in, and dismissed.
Exercise 6
Find a sentence from a classic writer’s work that represents the best embodiment of rich imagination, and visualize the scene described by this sentence in your mind. Lowell wrote in The Moose Log: “Sometimes the fence stretches out its whitening horns, just like the hunter’s rich trophies.” Now try to imagine the scene under Lowell’s pen, imagining the fence as whitening horns. Why did the author make the horns turn white?
Let us quote another sentence from Lowell’s work: “Four or five loons formed a long line, winding and flying in the air from time to time, emitting wild and timid cries from time to time; this sound always sounded very distant, just like the last continuous curling echo in the valley; precisely because of the occasional faint sound, rather than the disturbing silence, the valley appeared even more lonely and empty.” Try to imagine a sound that reminds you of “the last continuous curling echo in the valley.” If you have heard the call of a loon, try to visualize such a vivid scene in your mind. Whether or not you have heard the sound of a loon, you must transform the text description before your eyes into a real artistic conception and present it in your mind. Do not be half-hearted, do not let your mind wander to other things, and maintain the impression and feeling the current scene gives you. Then firmly dismiss this scene and your feelings from your mind.
Exercise 7
Study a machine with a simple structure. Understand the purpose of this machine. Study its parts and their interrelationships. After fully analyzing its mechanical principles, close your eyes and let it surface in your mind. Recall this machine bit by bit until a complete image is presented in your mind, then disassemble it into different parts, and then reassemble them in your mind. Continue practicing with different machines until you can see the principle of a machine at a glance, and visualize its internal structure and components in your heart.
Exercise 8
Choose a simple object from your life experience, home, or workplace; this object may be very practical. Then continue to consider how to arrange it reasonably to realize its value. Do not let contemplation of this problem affect more important matters. Our purpose here is not to cultivate inventors, but to cultivate imagination, and to let readers understand the importance of willpower and the function of will. First, you must ensure that the function of will is never relaxed. Continue practicing until you can effortlessly assemble this object in your mind.
Exercise 9
Recall a serious mistake you made in your life, and seriously consider what temptations of motives led you to make the mistake at that time. Consider the relationship of these motives, their intensity, and their duration. Judge honestly whether you considered everything thoroughly before acting. You will clearly remember that you did not seriously consider every motive at the time. Admit that you were directed by one motive while ignoring the existence of other motives. Then recall what consequences your choice at that time produced. Looking back now, in what aspect do you think you should not have done so? If you had made the correct choice at the time, what would the result have been? Assume you are in the situation of that time now, based on your current experience and knowledge, what choice would you make? To avoid making similar mistakes in the future, you must consider various factors that were not considered at the time; that is, gather all motives, analyze them item by item, repeatedly weigh their pros and cons, and try to imagine the results that various motives may trigger in the future. At the same time, you must ensure that you never make the same mistake again in the future, and you must think deeply about important issues.
Recall the beautiful scenery you saw during your travels. Compose such a picture in your mind: the undulating ground is covered with thick fallen leaves, with clusters of bushes from time to time; the leaves on the trees are colorful and mottled, tall branches support a lush canopy, sunlight shines down from various angles, bright and vivid; from time to time a breeze passes through the shining leaves, making a rustling sound; and the entire forest is quiet everywhere except for the occasional breeze and a few bird cries coming from the open spaces; squirrels jump nimbly among the bushes and on the forest floor; you stand there, feeling that you are standing in the most brilliant and clear place, a happy and relaxed mood arises spontaneously, and you have to marvel at the prosperity and exquisiteness of the world!
Now imagine some similar scenery. What does the scenery here remind you of? You must consciously analyze the similarities or differences between these similar sceneries, as well as the impressions they left on you and the feelings at the time. Do not let your imagination run wild without limits. This is a meticulous task. Now continue to use this scenic spot as a basis and conceive a completely different landscape. This exercise is the same as the above exercise in all respects, except that it associates from the perspective of differences rather than similarities. Practice every day according to this guidance until the meaning of the exercise is fully revealed.
This exercise can also replace scenery with experience, first comparing similar experiences, and then comparing different experiences. Throughout the practice process, always pay attention to the control of will over imagination.
Read a few poems rich in imagination. Understand every word in the poem, and after thoroughly grasping it, vividly imagine the scene described in your mind, then write down the coherent thoughts and emotions expressed in the poem clearly. Then pay attention to every place in the poem where the imagination is rich and peculiar. Then evaluate its shortcomings or beauties from the perspective of imagination. Observe the relationship of mutual dependence and mutual influence between these imaginative elements. Then analyze where the secret of its imagination’s beauty lies? How does it move people and make it unforgettable? Study why this poem has been handed down and has such influence on people. Persist in this exercise until you have fully mastered many of the world’s beautiful poems.
Use the same method to read a few masterpieces (not novels), treating the imaginative parts as secrets to be revealed and analyzed. Select the best books from your collection for this exercise.
Find a novel and analyze it using the same method. Now your objects of study are life scenarios and human nature issues. Read this book and vividly imagine the personality traits of each character in your mind. Be very familiar with the characters in the book, study the reasons behind their behavior, and investigate their motives. Pay attention to the influence of family background and living environment on them. Observe whether their behavior patterns are faithful to the reality of life. If it were you, would you take different actions? Why? You can clearly see that their reasoning is wrong; when making choices, they did not fully consider all the factors involved and did not seriously weigh the motives most beneficial to them. Continue reading to see what consequences their actions lead to. Are these results natural—given the preceding actions and circumstances? Can this character be improved? Can the plot be written better? Can the development of these characters’ personalities and fates be more reasonable and logical? Can their behavior and the relationships between them be further improved?
Treat this book as a part of real life, analyze it using the above method, and after thoroughly understanding the content of the book, you can apply the insights gained from it to your actual life. Persist in this exercise until you have mastered the best English literature.
This exercise involves converting target memory content into images, and then creating dynamic connections between images. Through these connections, it is easy to remember the target content and its sequence. These connections can use exaggeration, personification, and various other methods; the more specific and clear the image details, the better. However, this Letting Imagination Run Wild is not boundless; it must be expressible in one or two sentences, otherwise, it deviates from the purpose of memory.
The figure below shows two water glasses and two mushrooms. Please design a scene where the water glasses and mushrooms are the main subjects. Can you imagine what this scene looks like? The more bizarre, the better.
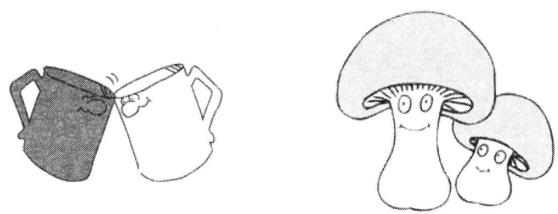
My imagination is: Under the scorching sun, a mushroom with sweat all over its head bounced to the side of the emerald green water glass and gulped down water. What is the scene in your mind?
Right Brain Thinking Training
Thinking training is for practicing left-right brain coordinated thinking, which can exercise spatial thinking ability, Image Thinking ability, etc. This type of training belongs to left-right brain thinking training. There are many books on this type of training in bookstores. This book lists some practice cases for reference.
3D Expansion Diagrams
Human spatial recognition ability is controlled by the right brain. Many people around us have a very poor sense of direction; once they arrive in an unfamiliar place, they cannot distinguish east, south, west, or north. In fact, this is a manifestation of a lack of right brain spatial recognition ability.
People have also discovered that taxi drivers can deliver passengers to their destinations accurately and without error in complex traffic conditions. Do taxi drivers have Special Functions? Actually, no. The stimulation caused by taxi drivers frequently searching for roads causes an increase in brain nerve cells, and the brain’s spatial thinking ability is gradually strengthened.
With this spatial thinking ability, the brain can have a sense of distance and depth, and can appreciate architecture. Repeatedly performing spatial recognition training can improve this function and promote Right Brain Development.
Below is a cube model. Can you imagine what each face looks like when unfolded?
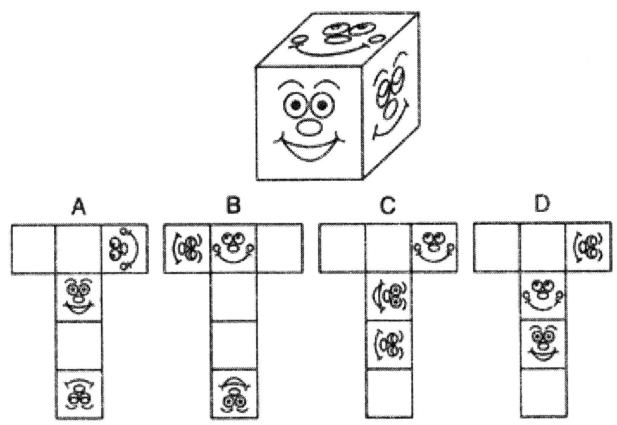
Left and Right Hand Recognition (Thurstone Hand Gesture Test)
Frequently performing left and right hand recognition training makes your brain more active during thinking activities such as imagination and reasoning. When doing left and right hand recognition training, you must be able to associate the part of the body with the whole. The ancients said, “seeing one spot and knowing the whole,” which refers to this ability.
There are many hands in the figure below. Without looking at your own hands, can you distinguish whether these are left hands or right hands? If it is a left hand, draw an O in the box on the upper left; if it is a right hand, draw an O in the box on the upper right.
After finishing the questions, compare them with your own hands to see how many you got right and how long it took to complete.
If the accuracy rate reaches over 90%, then congratulations, your type ability is already very good; if the accuracy rate does not reach this standard, then you need to continue to work hard.
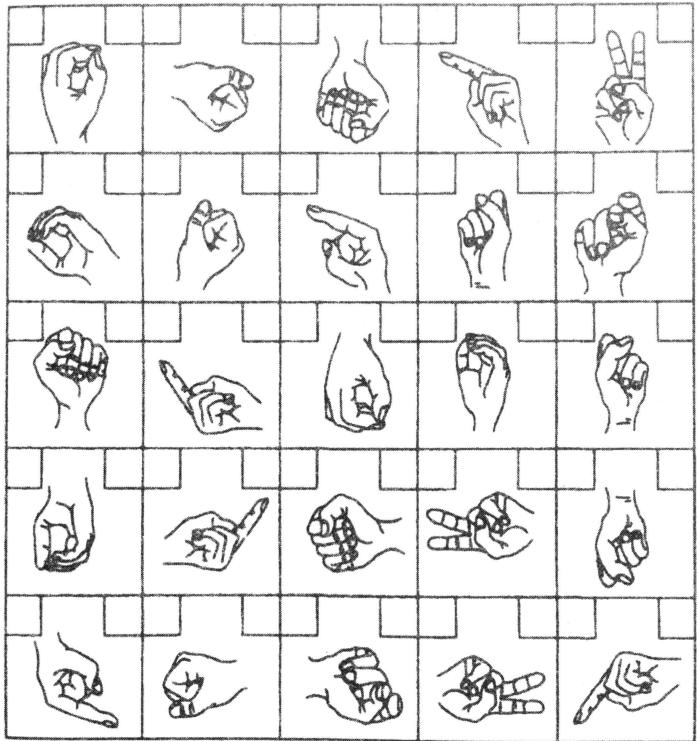
9-Dot Connection
9-Dot Connection is a very representative Right Brain Development training question type. Through this training, you can improve your right brain function and unleash your immense creativity.
In the figure below, 36 squares are arranged, and each square is composed of 9 dots. Please connect the 9 dots with straight lines to form different figures. Figures with different orientations (A and B can only be counted as one), such as splitting a figure into two in C is not considered as one figure.
The time is 5 minutes, and the goal is to create 30 different figures within the specified time. Take D as an example.
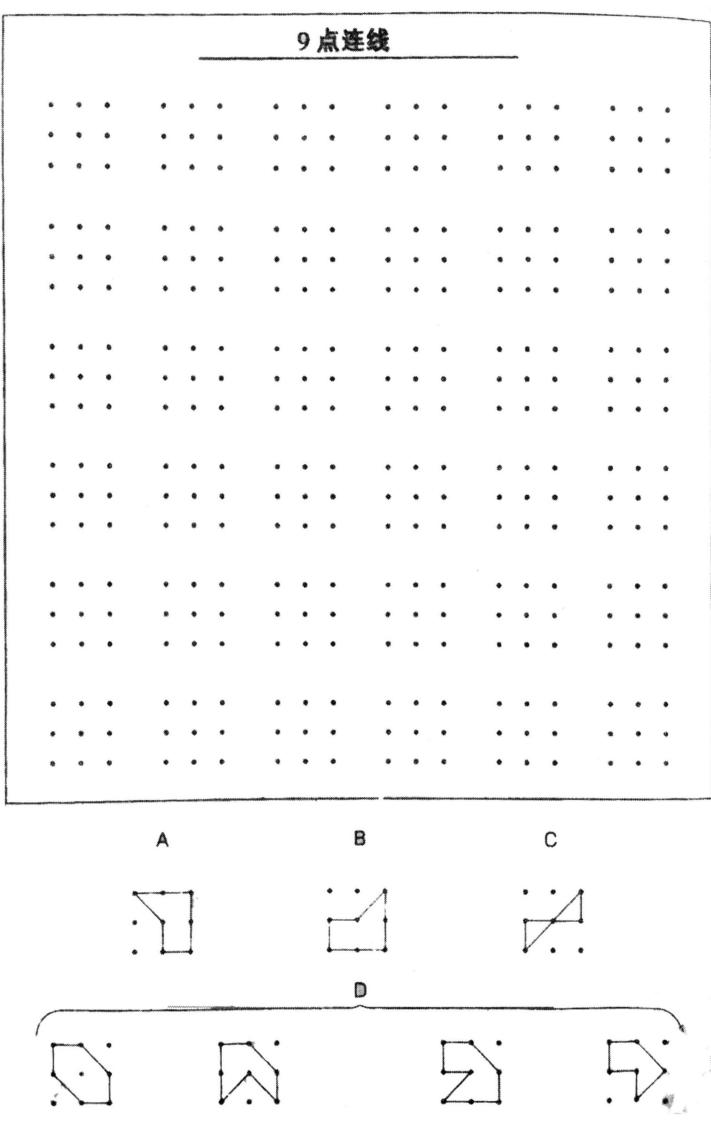
Instant Imaging
“Instant Imaging” is an intuitive judgment ability cultivated after repeated training. When matches are scattered in front of you, a single glance allows you to roughly determine the number of matches. This is just like when we learned arithmetic as children; at the beginning, calculating “3+2=?” required a calculation process, but after a large amount of calculation, relying on judgment, one can immediately say the answer.
Training for Instant Imaging ability can be done anytime, anywhere. On the way to and from school or work every day, sitting on the bus and watching the cars speeding by outside the window, train yourself to remember their license plate numbers. Isn’t that challenging? Below, let’s do a match-counting training.
Find a box of matches, take an appropriate amount of matches and place them in your palm without counting them. Scatter the matches on the table, then quickly take a glance and count exactly how many there are. You must have a watch by your hand to time the game.
For the first time doing this training, you can control the number of matches to within 8, requiring yourself to finish counting within 3 seconds; gradually increase the number of matches afterwards.
1000 Images
Makoto Shichida was the first to use 1000 images to develop right brain memory (Photographic Memory) in his book “Image”. Using 1000 images can not only train imagination but also acquire the ability to use images for memory. The right brain’s function of memorizing graphics is very powerful. Therefore, converting learning content into images makes it easier for the brain to receive and remember. Domestically, following this memory law and borrowing Makoto Shichida’s method, the most common 2000 Chinese characters were formed into words and integrated into 1000 pictures, making the Chinese characters part of the pictures, thus making memory easy. Memorizing 1000 images is not only the basic skill for various memory methods in memory techniques, but also in this training, information enters the brain at a very high speed, and right brain activation is completed unconsciously. The author strongly suggests that children can persist in memorizing the 1000 images and reach the level of reciting all of them within 7 minutes. Of course, this may take several months, but everything will be worth it.
During training, you can purchase 20 small cards for 1000 image memory (50 images per card) and a dubbed video disc. The training methods are as follows:
I. Take every 50 images as a unit, use the series (story) method, make up a story in order and memorize it. The principles for making up stories are: exaggeration, humor, absurdity, interest, full of color, and movement.
Here is a reference story for images 1-20. Let’s start our imaginations and come up with more imaginative Chinese stories. Publish them for everyone’s reference.
-
(Frog) tied up (Headscarf) and worked desperately to pile up (Coal) on (Saturn). 2. Then poured (Sulfuric Acid) on the coal pile, and a magical (Reservoir) was built. 3. (Octopus) happily jumped into the reservoir, but unexpectedly was melted into (Oysters). 4. Packed the oysters in a (Hammock) and transported them away with (Balloons). Soon a (Flag) was seen in the distance. 5. Above the flag was the image of a (Skeleton); it turned out to be a (Haunted House). 6. After entering the haunted house, I met a (Cyclops) who was eating (Macaroni). 7. Just as I was about to use a (Camera) to take a picture of the Cyclops, it saw the camera and demanded it, forcibly exchanging it for (Seaweed) and a (Scarf). 8. Wrapped the scarf around a (Lamp Stand), and the (Shadow) happily started playing the (Saxophone). 9. From the saxophone, following the sound, many (Lily) flowers floated out and landed on the streets of (Hawaii). 10. In Hawaii, (Volleyball) was being played. Just as the referee’s (Whistle) sound fell, a (Concrete Mixer Truck) suddenly rushed in.
-
The concrete mixer truck threw (Peony) flowers in to mix, then wrapped it in (Rice Cake). 12. While hiding in a (Kotatsu) eating rice cakes, a (Long-necked Monster) brought (Umeboshi). 13. After crushing the umeboshi with a (Soup Spoon), a (Firefly) ran out from inside, illuminating the (Tokyo Tower). 14. The next morning, a huge (Blackboard) was hanging from the tower, with a (Secret Code) written on it in chalk. 15. No one could understand this code. (Zenigata Heiji) thought for a while and walked towards a (Park). 16. Under the (Azaleas) in the park, digging with a (Shovel), a (Triangle) shaped (Letter) was dug out. 17. Just wanted to open it, but a (Wild Boar) suddenly ran over and snatched it away. 18. A (Vase) flew over from a distance and landed right on the wild boar’s face, making it unable to see, and it crashed into a (Photocopier). 19. At this moment, a (Hag)‘s head stretched out from the photocopier, got angry, and shouted loudly: “Who on earth are you!” 20. On the (Forehead) of the hag was a blooming (Plum) flower. A (Warbler) lived on it.
II. After memorizing the story, perform repeated rapid viewing.
It is best to use double speed (you can adjust it yourself with software) to perform repeated rapid viewing, and memorize the 50 images in order by familiarity. At the very beginning, do not require too much recall and speaking out.
Do not recall, do not read, just look. Stop to recall and speak out the image names.
III. Then proceed to the memory of the next 50 images using the previous method. However, at this time, do not forget to review all previously memorized image names. By analogy, memorize all 1000 images. Remember, at this stage, do not deliberately try to memorize the numbers corresponding to the images.
IV. After completely memorizing the 1000 images, start to reach the level of saying all 1000 images within 7 minutes.
V. When the speed keeps up, take 50 images as a memory unit, stare at the 50 images on the same plane for 15-30 seconds, then close your eyes, let the 50 images feel as if they are right before your eyes, and speak them out at a speed of within 40 seconds per sheet (50 images). At this stage, you can basically remember the number corresponding to each image.
This training must persist for 100 days. Recall and speak out the 1000 images at least once a day, which is about 7 minutes. Of course, during this time, there is still time to continue flashing through them in order to consolidate the Photographic Memory.
Chapter 12 Connection with School Education
Education is a behavior of inheriting and improving human morality, science, technology, knowledge reserves, and spiritual realms, and it is also the transmission of human civilization. In a broad sense, any activity that enhances people’s knowledge and skills and influences their thoughts and moral character is education. Education in a narrow sense mainly refers to school education. Its meaning is that educators, according to the requirements of a certain society (or class), purposefully, planned, and organizedly exert influence on the body and mind of the educated, cultivating them into people needed by a certain society (or class).
Currently, many schools and parents have ignored the purpose of education and focused too much on the teaching process, even only looking at the teaching evaluation of school education, that is, only focusing on students’ academic performance. The result of doing so often ignores the cultivation of children’s abilities and comprehensive qualities, resulting in a large number of students with “high scores and low abilities” or students with neither high scores nor strong abilities. This is the “exam-oriented education” that is generally not recognized by society but is not easy to change. Exam-oriented education deviates from quality education and adopts a mechanized education method to cultivate students. It uses the rate of advancement to higher education to test the quality of school education, the work performance of teachers, and the academic level of students. It takes exams as its purpose, and its education model and exam methods limit the full play of students’ abilities. The students cultivated find it difficult to adapt to job requirements and social development. Schools, society, and parents adopt a single evaluation method for students, treating “getting grades up” as the only requirement, and measuring students’ levels through exams and scores.
Many parents cannot comprehensively analyze various educational issues and can only evaluate the quality of schools and the success or failure of children’s education based on grades. Regarding the value of Right Brain Development, some parents are only willing to seek verification from the short-term learning status of students. This is a normal reaction. The right brain is so magical, the potential of the right brain is so huge, and it is a matter of course to be able to apply it to all aspects of life, learning, and work. This chapter selects some training methods that can produce immediate results in learning for parents and students to use. However, this result requires a premise to be seen, and that is “use”. Some of these methods, even if trained for only a few minutes a day, will have great results, so persisting in “use” is fundamental.
Concentration Helps Students Improve Homework Speed
Concentration, also known as attention, refers to a person’s psychological state when focusing on a certain object or activity. Human attention is influenced by many factors, and attention deficit is often a common characteristic of many poor students. Maintaining good attention is a basic condition for the brain to carry out cognitive activities such as perception, memory, and thinking. In our learning process, attention is the gateway to our souls, and it is the only gateway. The wider the door opens, the more we learn. However, once attention is scattered or unable to be focused, the gateway to the soul is closed, and all useful knowledge and information cannot enter.
Every exercise in Right Brain Development training is related to concentration. Without entering a state of concentration, the Pineal Gland cannot be activated or awakened, and Mental Imagery cannot be formed. In particular, ESP training must be in a state of concentration to “feel” the images. Therefore, as long as you persist in every Right Brain Development training exercise, concentration will continuously improve. After concentration improves, the efficiency of doing homework will naturally increase.
Before learning Right Brain Development training and the Inspiration Learning Method, sixth-grader Tongle often couldn’t finish his homework until 10:30 PM. It wasn’t that the homework was too much to complete; his classmates could all finish their homework before 8:00 PM. He dawdled over his homework every day, drinking a glass of water for a while, listening to the sound of the TV in the living room for a while—in short, his attention could not be focused on doing homework for a long time. Through training, Tongle’s mother was pleasantly surprised to find that not only could Tongle start doing homework consciously as soon as he got home, but his concentration was also very focused, and the efficiency of doing homework was greatly improved.
Five high school students, after completing the basic training of the Inspiration Learning Method, came to Mingbo Education School and said that their speed in doing homework had improved significantly. It is normal for homework at the high school stage to be done at 11:00 or 12:00 PM, but they can basically complete their homework before 10:00 PM, saving about 1 hour compared to other students. Every day, they have the equivalent of 1 hour more than other students, making learning much more relaxed. If they were to use the saved time for studying, one wonders if it would help further improve their grades.
Exercise: Meditation Before Doing Homework
Doing meditation at home before doing homework is of great help in improving the speed and accuracy of homework. About 10 to 15 minutes is enough.
Choose a comfortable meditation posture, keep your back straight, close your eyes, and take a few deep breaths.
Recall the classes taken that day: Chinese new words, sentences, recited paragraphs, and the central idea of the text; mathematics theorems, example problems, and problem variations; English words, phrases, and sentences; experiment phenomena in physics and chemistry; graphics and images in history, geography, and biology. Play these back in your mind like a movie. Connect the content of each class with the previous few classes, organize a course outline, or you can draw a mind map in your brain. If there is something you don’t understand, imagine asking the teacher to explain it to you, and thank the teacher when asking and after the teacher finishes explaining. After thinking through all the day’s classes, imagine the scene of yourself concentrating on doing homework and the image of relaxing and being happy after finishing the homework. Then open your eyes, end the meditation, and start doing homework.
Text Recitation is Very Simple
In school education, the learning of knowledge is mostly related to memory.
In psychology, memory is explained as follows: Memory is the brain’s encoding, storage, retrieval, or recognition of experienced objects. It is the basis for carrying out advanced psychological activities such as thinking and imagination. Human memory is related to the hippocampal structure of the brain and changes in chemical components within the brain.
Memory, as a basic psychological process, is closely linked to other psychological activities. Memory connects human psychological activities and is a basic function for people’s learning, work, and life. The process of transforming the abstract and disordered into the figurative and orderly is the key to memory. Modern humans continue to research memory, despite the considerable development of today’s science and technology. Applying those methods and techniques that have been proven to effectively improve memory through practice can make them better serve human work, life, and learning.
There are methods to memory, so many books on mnemonics can be found in bookstores. Here, we can recommend The Buzan Memory Book (by Tony Buzan) to our friends. This book introduces various most effective memory methods in simple terms, and it does not require deep utilization of right brain potential. However, in the psychological explanation of memory, there is also the statement that “research on memory belongs to the field of psychology or brain science.” Everyone knows that the memory capacity of the right brain is 1 million times that of the left brain. As long as the powerful memory ability of the right brain is awakened, and one learns to freely control the right brain, 1/100th of the time and effort used in the past is enough!
If there is only the “technique” of memory, without the “way” of the right brain, these memory techniques are still difficult to play a role. In terms of memory, the best combination of this “way” and “technique” is the “Super Right Brain Photographic Memory Method”.
The intuitive image ability of the “Super Right Brain Photographic Memory Method” is the key to right brain memory; imagination training opens the right brain memory circuit; field of view expansion training awakens the ability to “remember the whole image at a glance”; using the association method achieves amazing memory effects. The Super Right Brain Photographic Memory Method allows you to unconsciously enter the right brain working state, learn to freely manipulate the right brain, improve learning efficiency by hundreds of times, and maximize right brain ability.
Realistically speaking, most trainees cannot persist in the systematic training of the “Photographic Memory” method for a long time. Many trainees often stop after getting a taste of the basic ESP training and no longer continue learning other courses under Right Brain Development basics, which is indeed a pity. However, despite this, we will all be pleasantly surprised to find that as long as we can persist in using Blindfolded Reading training, text recitation, memorizing ancient poems and texts, and understanding ancient poems and texts are much more efficient than before participating in the training. In the cases of He Yiran and Cao Tianyi introduced in Chapter 1, they only persisted in ESP practice for a long time, and they had a very significant improvement in memory.
Exercise: Blindfolded Recitation
-
Let the student enter a relaxed and empty right brain state, put on an eye mask, and take a few deep breaths.
-
The student reads the content to be recited 2 to 5 times while blindfolded. There is no requirement for the reading speed; just do it as you please. When reading blindfolded, try to maintain images and text in the brain.
-
Meditate and recall for two or three minutes, take off the eye mask, and recite.
Photographic Memory for Vocabulary Memorization
Developing the right brain and forming intuitive image ability is the foundation for massive memory. With Mental Imagery Ability, various memory methods will be like a fish in water, and remembering various knowledge through these memory methods will be very easy. Memorizing English words is the most important link in English learning. It can be said that vocabulary determines English proficiency. Therefore, the most effective and widespread English word memory methods in China mostly use the image memory method.
The English word image memory method is to convert English words into images, and then memorize the words like watching a movie or watching a cartoon, fully mobilizing the right brain image memory potential, so that a large number of memories, short time, and fast speed can be achieved simultaneously. After turning boring and meaningless English letters into vivid and lively images, people find it hard to forget after just one glance. The English word image memory method fully utilizes everyone’s innate Photographic Memory for vivid images, turning boring English words into vivid and lively images, thereby allowing us to achieve the powerful memory effect of Photographic Memory for words!
Using the image memory method to memorize English words, the key lies in converting abstract letters into familiar images, and then associating these images. In this way, the originally abstract words can become a vivid scene, allowing for memory like watching TV or watching a movie. It is not only fast and firm but also full of fun in the memory process, which will make you fall in love with memorizing words from now on! This is the Photographic Memory image memory ability that everyone of us is born with.
The English word image memory method recommended in this book is Photographic Memory for Vocabulary Memorization by Zhang Haiyang and Huang Wei (Harbin Publishing House, 2009). Based on a large amount of teaching experience from long-term promotion of rapid memory nationwide, and combining the memory difficulties and doubts fed back by thousands of students, Photographic Memory for Vocabulary Memorization was developed. Its features are as follows:
-
Deeply utilizes the principles of image memory, integrating exaggerated and absurd image cases. One word corresponds to one image scene, making word memory profound and interesting. And it makes students interested in English learning!
-
The arrangement of words is combined with the learning progress of primary and secondary school students, divided into three stages: Grade 7, Grade 8, and Grade 9, achieving the goal of learning for application and improving English grades!
-
Anime word memorization is convenient and fast, moving the English learning classroom into the student’s home, without the need for parental companionship and tutoring, and students fall in love with memorizing English words themselves.
Photographic Memory for Vocabulary Memorization divides word learning into the following three image splitting memory steps:
Step 1: Split the word into images. Split the unfamiliar word into several parts that are easy to remember, and make each part easy to produce specific, familiar images in the mind. For example: hippo (hippopotamus), the word can be split into three parts: hi—the pronunciation of “嗨” (hi); pp—the pronunciation of “屁屁” (buttocks); o—the shape is like a circle.
Step 2: Use rich imagination (exaggeration, humor, funny, horror, etc.) to create a vivid scene using the several parts split in the first step. The scene not only contains the various images of the word split (literal images or homophone conversions and substitute images using similar object images) but also contains the image of the word’s meaning. For example: (hippo) Hi, that round butt is a hippopotamus!
The story scene is shown in the figure below:

Step 3: After completing the above two steps, close your eyes and recall the story scene just now, recall the main images of the scene, and convert the images into letters until the spelling and pronunciation of the entire word are completely recalled. For example: (hippo) Hi—hi; Buttocks—pp; Round butt—o; the complete spelling of the hippopotamus word is: hippo.
Photographic Memory for Vocabulary Memorization summarizes the splitting methods and techniques of word memory into four steps:
Step 1: Find the word (including finding complete words, approximate words, and root affixes);
Step 2: Find the Pinyin (including finding full Pinyin, approximate Pinyin, and Pinyin initials);
Step 3: Find the Code (letter encoding);
Step 4: Find Homophones (including overall homophones and partial homophones).
These four steps, simplified, are: Word—Single, Pinyin—Count, Code—Compile, Homophone—Write. Using homophones, it is “Single Count Compile”, which means that to memorize words, “Single Count Compile” alone can achieve very good results.
Before explaining these four steps in detail, let’s do a small test first. Below are 10 groups of information. Please look at them seriously once or twice, then close your eyes and recall to see which group of information leaves the deepest impression and which group leaves the vaguest impression.
Step 1: Find the Word
Find Complete Words
Find complete words that you recognize or are familiar with from the new words to be memorized.
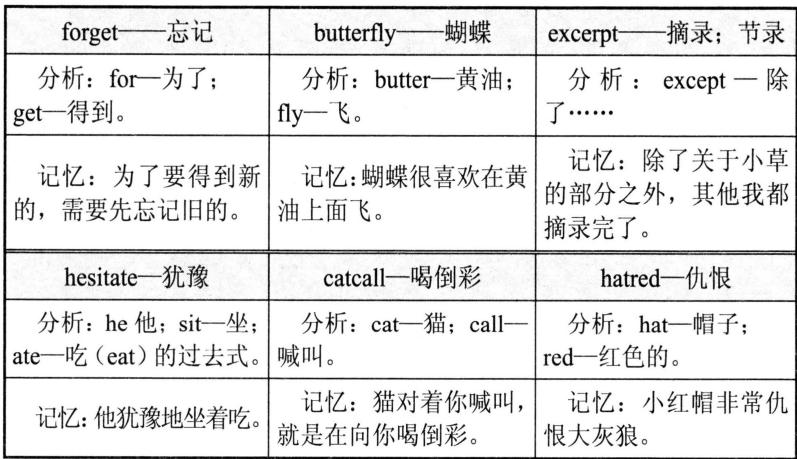
Find Approximate Words
Find approximate words that you recognize or are familiar with from the new words to be memorized.

Find Root Affixes
Find word roots or affixes that you recognize or are familiar with from the new words to be memorized.
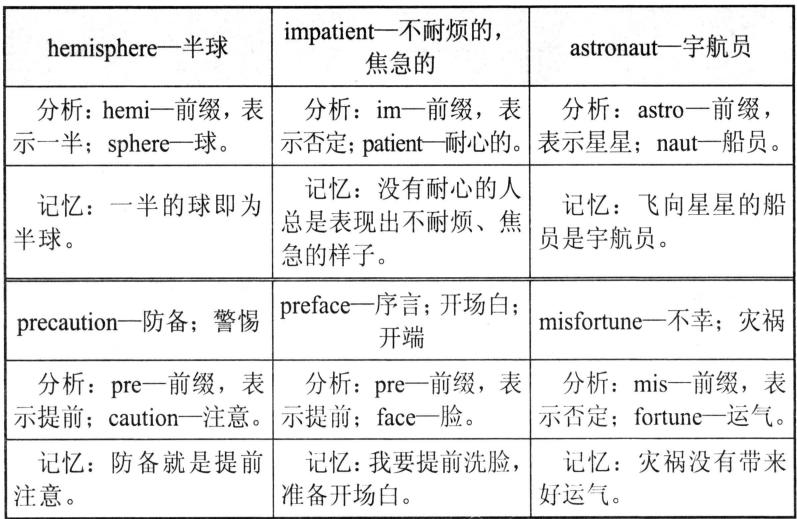
Summary: “Learning new things by reviewing old ones” (using the familiar to remember the new) is another important principle in word memory. If you use the rote memorization method, then any word is a strange combination of letters. However, if we are good at finding familiar parts from a new word, finding a learned word, then we will feel it is very simple to memorize this new word.
Step 2: Find the Pinyin
Find Complete Pinyin
Find complete Chinese Pinyin that you are familiar with from the new words to be memorized.

Continued Table
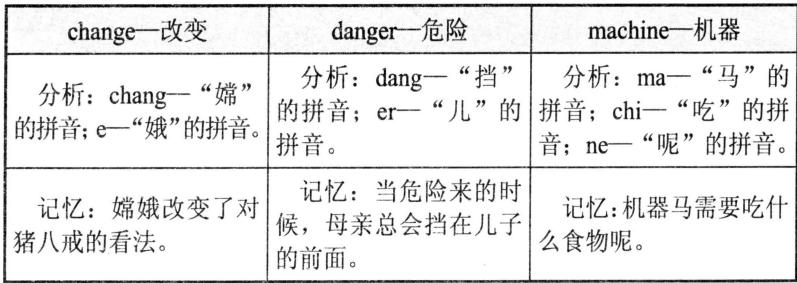
Find Approximate Pinyin
Find parts of approximate Chinese Pinyin that you are familiar with from the new words to be memorized.

Find the Pinyin Initials
Find the Chinese Pinyin initials from the words to be memorized that can easily form images.
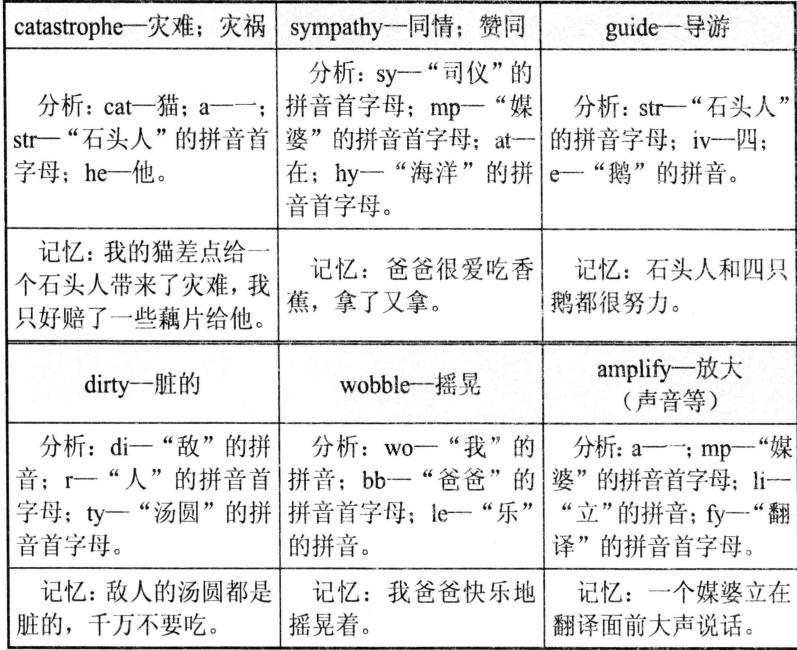
Summary: If you don’t use Pinyin when memorizing words, it is a huge loss. Pinyin evolved from the basis of English, and many Pinyin rules reference English. Therefore, using the Pinyin method to memorize words is completely justifiable! For Chinese people in the third grade of elementary school and above, Pinyin is a very familiar thing, while English letters are relatively unfamiliar. Using Pinyin to memorize words fully complies with the memory principle of “using the familiar to remember the new.”
Step 3: Find Codes (Find Letter Codes)
Note: Transform single or multiple letters into vivid images through methods like pictograms, and form a set of codes for common conversion methods.
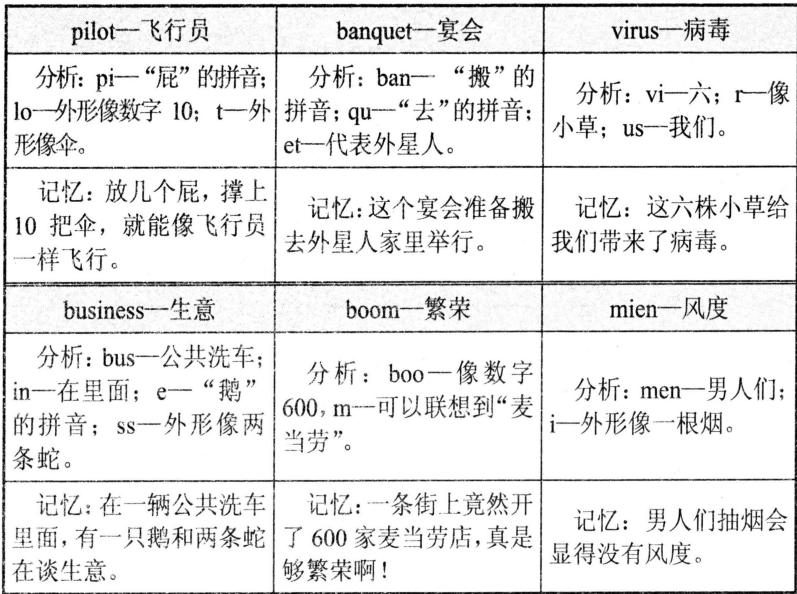
Summary: s looks like a snake, f looks like a crutch, t looks like an umbrella, P looks like a red flag, m is associated with McDonald’s, k is associated with KFC, etc. These are examples of encoding letters, converting abstract letters into familiar images. In this way, the Photographic Memory method can be applied very well. Therefore, the step of “finding codes” trains our ability to flexibly transform letters into images.
Step 4: Find Homophones
Overall Homophones
Find words or short phrases in Chinese that sound close to the pronunciation of the word.

Continued Table
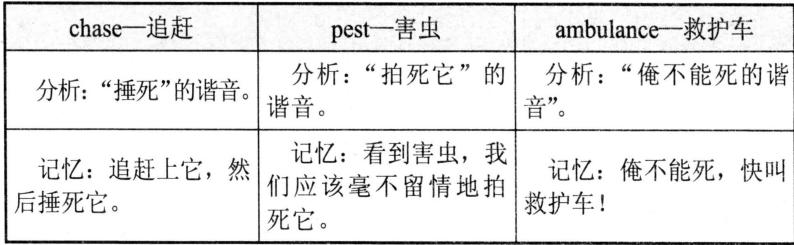
Partial Homophones
Find parts of the pronunciation in new words that are close to Chinese pronunciation.
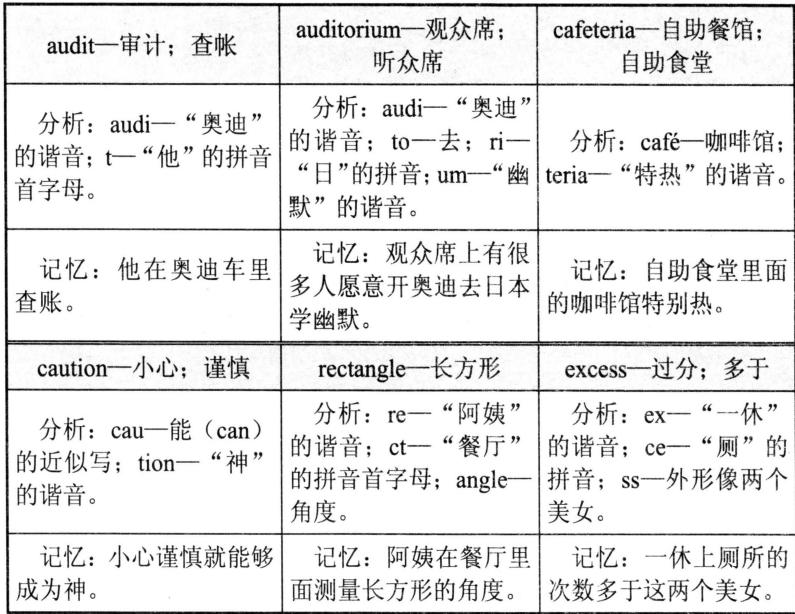
Some people oppose the homophone method, worrying that it will mislead students’ correct pronunciation. In fact, the purpose of the homophone method is to remember the letter combinations of the word, not to remember the pronunciation. Pronunciation should of course be based on phonetic symbols, but this does not prevent us from using the principle of homophones to remember its letter combinations. Furthermore, a very important reason why many students fail to learn English well is that they have not mastered phonetic symbols well; this is a dereliction of duty in school education. In fact, many words are translated through homophones, such as sofa—沙发; cola-可乐; chocolate——巧克力, etc. Through these words, we know that the vast majority of students can correctly distinguish between homophones and phonetic symbols. Of course, we still suggest that people with relatively standard pronunciation use this method.
Summary: When we encounter an unfamiliar word that needs to be memorized, we can memorize it according to the four steps of “Four-Step Word Memorization” “Single-Reliance-Compilation” (单凭编写). First, see if you can find familiar words from it (including complete words, approximate words, and roots/affixes). If not, see if you can find Pinyin (including full Pinyin, approximate Pinyin, Pinyin initials). Through the above two steps, if there are still a small number of letters left, you can use the letter coding method to convert these letters or letter combinations into common codes. If your word pronunciation is relatively standard, you can consider using the homophone method to help memorization. Then, connect these converted Chinese meanings with the Chinese meaning of the word to form a sentence that is easy to remember (preferably rich in image sense). In this way, no English word can defeat us!
Meditation Promotes Knowledge Consolidation
Scientists have discovered that meditation can really exercise the brain’s thinking and can make the brain bigger. Practicing simple meditation techniques, such as focusing on your breathing, helps build dense gray matter areas, which are greatly related to learning and memory abilities and help control human emotions. The following three meditation exercises can help consolidate learned knowledge and improve exam scores.
Exercise: 3-Minute Meditation Between Classes
Sit upright beside your desk, keep your back straight, and close your eyes.
In the meditation, see the board writing the teacher wrote on the blackboard in the last class, organize the outline of this lesson taught by the teacher in your brain. For the key and difficult content emphasized by the teacher in class, the teacher’s voice should appear; for the example problems or in-class exercises you did, text should appear. Tell yourself that the content of the last class has been organized, thank the teacher, and I will continue to attend the next class in a very good state. Take a deep breath and end the meditation.
Exercise 1: Review and Preview Meditation
Review meditation is generally suitable for reviewing a week’s or a unit’s courses. Review meditation should also be performed frequently before exams, midterms, or finals. It is best to scan the book quickly before meditation. During review meditation, you should be able to imagine inviting the teacher, hearing the voice, and seeing graphics, images, and text. If you cannot invite the teacher, it indicates that the degree of concentration needs to be further improved, and the review effect may be somewhat poorer, but it is still much better than reviewing bit by bit using the left brain. This method can also be used for preview and self-study. After training through the Tao’s Inspiration Learning Method, this method can quickly enter the state and achieve excellent results.
Choose a comfortable meditation posture, keep your back straight, close your eyes, relax and empty yourself, and imagine letting yourself float to a very quiet, comfortable, and energetic place to sit down. During meditation, it is best to form a systematic and as complete a mind map as possible for each subject. If you encounter something you don’t understand or can’t do, you can ask the best teacher (you know them or not) for advice. When asking a teacher, be polite, and the teacher will be happy to explain and answer questions for you. Listen carefully to what the teacher says while thinking carefully, remember what the teacher says firmly, and ask the teacher to explain in as much detail as possible. After the teacher finishes speaking, remember to thank the teacher. Take a deep breath, return to a waking state, and you can do simulation exercises to test the learning effect.
Exercise 2: Eliminate Exam Anxiety
Choose a comfortable meditation posture, close your eyes, and relax completely. Imagine that you are about to take an exam. Following the exam procedures, from you entering the exam room full of energy, to entering your seat, preparing, the proctor announcing precautions, distributing papers, writing candidate name, exam number, and seat number information, doing questions, etc., silently recite the content outline you have reviewed, formulas, theorems, laws, diagrams, or the solution ideas for a typical problem, etc., to ensure the correctness of solving. Only imagine the general process of you solving problems easily or the process of finally solving a difficult problem after some thought; it may also not involve specific test questions.
If you find yourself feeling nervous, stop imagining, focus your attention on breathing, and relax again. When completely relaxed, imagine the scene again and experience the feeling of relaxation.
Repeat the above scene 2 times without feeling nervous.
Imagine the scene and mood of blooming joy and excitement after successfully completing the exam, and experience the sense of success within it.
Redirect attention to your breathing and relax, ending the meditation.
Do not meditate for too long each time; generally, 20 to 30 minutes is sufficient.
Image Thinking Helps Science Learning
Many people believe that Right Brain Development only exercises Image Thinking Ability and creative artistic inspiration, so it will not play a significant role in students learning Science subjects such as mathematics, physics, and chemistry. Actually, this is not the case. After Right Brain Development, as long as it is used well, it will also greatly promote the learning of Science knowledge. The knowledge of any subject comes from life and is meant to be used in life. The knowledge of Science looks like only logical abstract thinking, but for the understanding of this abstract thinking, if we use the graphics and images of the right brain to solve it, learning these Science knowledge will become very simple.
When Kang Cheng, a third-year middle school student, did some math problems, he would form Mental Imagery of geometric figures related to the math problems and auxiliary lines while watching, so he could finish the problems quickly. When listening to physics or chemistry classes or doing problems, images of related experimental processes and molecular formulas would also form in his brain. Learning these Science knowledge became simple, doing problems became easy, and exam scores also gradually rose.
If this kind of Mental Imagery Ability is not activated, using some common mnemonics in learning and adding right brain image imagination will also have some techniques and effects for Science learning. For example:
The metal activity series table in middle school arranges 14 common metals and inserts the non-metal hydrogen among them as a standard for judging whether metals can react with acids, namely:

Because it is too difficult to memorize, a chemistry teacher composed a mnemonic for it:
Marry that beauty, body is thin and light, total one hundred jin.
Therefore, Right Brain Development is very useful for any subject, it just must be used. As long as the point of interest is placed on the required content, the right brain can help learn this part of the content, and learning will also become simple, relaxed, and interesting.
Use the Right Brain to Write Essays, No Need to Worry About Writing Well
Many students are afraid of writing essays, hate writing essays, and feel that writing essays has no ideas, no words, and no inspiration. In fact, when a child’s Pineal Gland is activated and has Mental Imagery Ability, writing has already become a very easy thing. Play a few games, with simple guidance from an Instructor or parent, and the child can write an essay quickly. An example is given below:
Exercise 1: Meditation Guidance for Essay Writing
We have arrived above the blue sky and white clouds. The blue sky sets off the white clouds, and we see clusters of clouds floating in the sky. Not far away, a white cloud shaped like a lotus flower is floating towards us. We slowly sit on it, sit tight, and begin our journey today. Flying forward, at this moment, we arrive at a five-star grand hotel. Two stone lions stand at the entrance, appearing particularly majestic. There are also doormen and welcome ladies at the entrance. Let’s see what color clothes the welcome lady is wearing. We slowly walk into the hotel, following the waiter’s guidance to the hotel lobby. Looking at the crystal chandelier on the ceiling, it is crystal clear. Looking at this lobby, it is decorated very luxuriously, splendid and magnificent. Now we go to the restaurant and find any empty seat, and we sit down. Now we call the waiter to order dishes. We order to our heart’s content, ordering whatever we want to eat. We order all our favorites, whether we have eaten them before or not, ordering a full table. We order sour, sweet, bitter, and spicy. Let us first taste the sour one. Is it as sour as a lemon? Then taste the sweet one. Is it as sweet as candy? Then taste the bitter one. Is it like traditional Chinese medicine, so bitter that we can’t open our mouths? Finally, let us taste the spicy one. Like Sichuan hot pot, it is numb and spicy, so spicy that our throats are almost smoking. Let us eat to our heart’s content. While eating, we vaguely hear a piece of music playing in our ears. It sounds like a wedding march. Turning our heads to look, sure enough, a couple is holding a wedding. The woman is wearing a white wedding dress, looking particularly beautiful. The man is wearing a white suit, looking particularly handsome and energetic. Hey, they seem to be walking towards us. Maybe they mistake us for guests they invited. Okay, we politely raise our wine glasses, accept the blessings of the couple, and also send our blessings to them, wishing the couple a happy wedding and a lifetime together. Okay, that’s done, we continue eating ours. Let’s look at the table next to us. Two men are playing finger-guessing games, “two fives, four sixes” and so on. It’s so noisy, particularly clamorous. The atmosphere feels more and more wrong. I estimate they will start quarreling soon. Hey! Let’s eat quickly. After eating, we call the waiter for the bill. Ask how much we consumed. Ask if he can give us a discount, a sale. We pay cash and don’t use a card. After paying the bill, we walk out of the hotel and continue flying forward. The speed is getting faster and faster. Soon we arrive at a KTV again. This KTV is different from ordinary KTVs. It holds an audience of tens of thousands. There is a huge stage in the center of the venue. Many stars have held solo concerts here. We slowly walk in. Wow! The audience is very enthusiastic. There are screams and cheers. It is boiling with noise. The lights are shining brightly, colorful. We slowly walk onto the stage and walk to the center of the stage. It turns out today is our solo concert. After we walk onto the stage, we say hello and greet our fans and audience. They are holding fluorescent sticks and shouting our names. We sing a song for them, singing a song we have never sung before. …
At this time, a large group of young people walk up from the side of the stage. They are holding flowers and walking towards us to present flowers to us. There are also young people holding our posters asking for autographs, and some even holding T-shirts for us to sign. After taking the flowers and signing our big names, we give them a hug to thank them for their support. Okay, we continue singing, singing to our heart’s content, singing with emotion. Due to time constraints, we say goodbye to our fans and our audience. After saying goodbye, we walk down the stage, walk out of the concert site, and continue flying forward. At this time, we see bright light ahead. We fly in a bit to take a look. It turns out to be a school. This school is a school in the universe, the best school. Then we walk in. We go to find the teacher’s office. After finding it, we walk in and take a look. There are many teachers in the office. We find a teacher we like, say hello to him (her), and introduce ourselves: what is our name, how old are we, what grade are we in. (Do you know? The teacher we invited is the best and greatest teacher in the universe). Now we let this teacher help us write an essay with the title “Spring”. We tell the teacher that this essay of ours is going to be published, and we ask the teacher to use the best words and best sentences to write it. We first ask the teacher to present the scene of spring to us, making it feel like we are there, and see what is in the scene: Spring, a hundred flowers blooming, all things recovering, spring is in the air, spring is warm and flowers are blooming, birds are singing and flowers are fragrant. Okay, now we ask the teacher to help us conceive and write this article on the blackboard, using all the good words and sentences, decorating this article with the most beautiful language (The teacher has written a few paragraphs. Okay, continue watching. Watch it once, then watch it again. The second time, we ask the teacher to read it out to us. Those not finished continue writing. Speed up. Finish writing it all. Okay, now count 6 numbers silently with the teacher. We have finished writing it all and memorized it. With one clap of hands, we will write this article down).
Exercise 2: Guided Essay “She Held My Hand on the Journey of Growth”
Only with the vast blue sky can birds fly freely; only with the vast ocean can fish swim happily; only with the nourishment of the land can trees grow vigorously. Then, our growth also needs the care of love! On the road of growth, people keep leaving or entering our lives, but she is always holding your hand, never leaving or abandoning you, accompanying you by your side, staying with you when you cry and when you laugh. That is why you have your own happiness. Grateful to have her!
Sometimes we dare not imagine. If one day this world had no sunlight, no water source, no parents, no family affection or friendship, what would this society become? In life, we often take it for granted when we enjoy warmth, but we often lack a grateful heart. We are grateful to many people and many things for teaching us to cherish the little bit of happiness and sweetness, but it is often difficult to say “Mom, I love you, Dad, I love you” from our mouths. However, crows have the righteousness to feed back, and lambs have the grace to kneel and suckle. Not understanding gratitude means losing the emotional foundation of love. Learning to be grateful, grateful to all people who treat and help us kindly, and even grateful for the bumps we have experienced.
The journey of growth is distant and long. Sometimes wind and rain stop me from moving forward; sometimes the clods and stubborn stones on the road leave me scarred; sometimes I am blinded by the momentary scene and refuse to move forward. But there is always such a pair of warm and big hands supporting me all the time, helping me, crossing one fork in the road of growth after another, and walking on the correct path.
She is not a god, but the most ordinary and ordinary person, but in my mind. She is my forever guardian angel. She uses her pure wings like an angel to guard me. When I was tortured by difficulties and was in pain, it was her who drove away the difficulties and saved me; when I was sick and lying weakly on the bed, it was her who brought the bitter good medicine to my mouth; when I lowered my head in front of setbacks, it was her again who told me to be brave, to overcome difficulties, and to pass one difficulty after another; when I failed and was listless and depressed, it was still her who gave me the spirit of learning lessons and starting all over again, to cheer up again.
Now, I am no longer that ignorant child of the past. In the past time, the help she gave me and the care she gave me are still fresh in my memory, as if they were a unique carving knife, carving them one by one into my mind. The past is like poetry, like a painting, like a dream, so beautiful and nostalgic. I stand alone in the beautiful section of the road of growth. No! Who is alone with me? With me, there is also her, the mother who forever guards me, the forever holy and beautiful mother in my mind! And there is her, the mother I respect most who gives me hope, gives me light, gives me life, and gives me faith in life!
The past still blooms like flowers, like the innocent smiling faces of children. Who says “the past is like smoke” will dissipate? The past should be like that green, tall bamboo, day by day, year by year, evergreen! Just as she loves me and I love her!
In the days when I grow up day by day, she is with me like a shadow. I no longer fear, no longer hesitate, and no longer am lonely. Thank you to my dearest and most beloved mother. When I become an adult, I will also love you with my heart, just like you held my big hand holding my little hand!
Super Learning Method
The “Super Learning Method” was developed between the 1960s and 1970s by Bulgarian scientist Georgi Lozanov. He synthesized research results from psychology, medicine, music, education, and other disciplines to study a method that uses music and adjusts breathing rhythm to develop brain learning ability. From an energy perspective, this method mobilizes both the left hemisphere of the human brain (managing logic, reason, and analytical thinking) and the right hemisphere of the brain (managing intuition, creativity, and imagination), and makes them coordinated and consistent without hindering each other. Amidst slow, solemn music, using rhythmic breathing and a relaxed, happy mood, one learns more than ten times the knowledge of the past. It is especially suitable for learning that requires a lot of memory, such as learning foreign languages, history, geography, medicine, biology, chemistry, etc.
Since right brain education had not been deeply researched during that period, but from the perspective of its learning steps, it is consistent with the process of right brain training. The Super Learning Method can be divided into seven steps:
(1) Physical relaxation exercises; (2) Mental relaxation exercises; (3) Suggestions affirming learning ability; (4) Imagination exercises to calm the brain; (5) Recalling past learning pleasures; (6) Rhythmic breathing exercises; (7) Super memory class.
The first 6 of these 7 steps are methods to guide the mind to a relaxed state, maximizing learning efficiency while the child is in an Alpha Wave state. The 7th step, the so-called Super Memory Class, is to learn at a certain rhythm in this state, trying every means to compile teaching materials into an operable mode. Using these 7 steps for learning can greatly improve learning efficiency, and learning becomes relaxed and happy.
Inspiration Learning Method
Mr. Tao Yongdi, the inventor of the Inspiration Learning Method (also known as the Tao Learning Method), began practical exploration in 1995 to apply his health preservation, energy, and quantum resonance theories to students’ learning. This set of methods can enable people to quickly enter an “inspiration” learning state, enabling students who accept and use this learning method to make progress and gains beyond imagination in a short time. Various Inspiration Learning Methods, 6L Guided Sensory Learning Methods, Inspiration Writing, Super Sensory Creativity, etc. in society almost all originate from Mr. Tao Yongdi’s Inspiration Learning Method. Right brain development training is more like a foundational course. If the right brain is developed and trained well, learning the Inspiration Learning Method is like a horse that can fly. Whether in study, work, scientific research, or life, it will be incredibly good. This has a certain connection with the Right Brain Potential Learning Method, but in some aspects, it is higher than the Right Brain Potential Learning Method.
The Inspiration Learning Method uses directive voice guidance procedures to inspire imagination and stimulate potential, starting with writing poems and essays to train the ability to capture inspiration. This method requires guiding students to convert the knowledge to be learned and memorized into three-dimensional image information, and then use the method of exertion to learn and memorize. After mastering this ability to capture inspiration, people will “see” and “hear” scenes in their memory, quickly record them using concise poetic techniques, and then go from poetry to classical Chinese to vernacular Chinese, followed by English, and then follow up subject by subject. It breaks through the traditional teaching thinking model, enabling children to become people with agile thinking, thousands of words at a time, eloquent speech, and infinite creativity. At the Wuxi Tao Learning Method Headquarters, in addition to cultural subjects being able to learn quickly in this normalized “inspiration” state, incredible progress speeds can also be achieved in foreign languages, Sinology, music, art, scientific research, and other aspects.
The Inspiration Learning Method is a learning method that allows people to quickly accept, master, consolidate, and apply knowledge by stimulating and consolidating the normalization of inspiration. It belongs to personalized education. Its basic principle is the normalized application of Alpha (α) Brainwaves. Its essence is to use a very simple set of positive energy voice guidance procedures to quickly bring the human brainwaves into the Alpha (α) Brainwave and Theta (θ) Brainwave states, which are the states most suitable for the Subconscious Mind, adopting a “directive” and “demanding” approach to acquire and apply knowledge. After mastering the Inspiration Learning Method, students form a normalized consciousness of inspiration and improve diversified thinking abilities.
Because Mr. Tao Yongdi’s great love was seen as a huge business opportunity by some businessmen, in many educational institutions that imitate the Inspiration Learning Method, and even their franchise institutions, they cannot communicate well with learners during the education process, or they have not realized or used the systematic theory and skills of the Inspiration Learning Method well during the education process, resulting in individual failure cases. In the author’s view, a major obstacle to the Inspiration Learning Method is the word “belief”. How to treat disbelief? There is nothing wrong with doubt; the difference lies in the way of questioning. Some people’s way of questioning is to understand and explore, while some people’s way of questioning is direct denial. Disbelief is like a solid ice; preaching cannot melt it. Because some of Tao’s theories involve quantum theory and biological wave theory, such a topic is indeed difficult for most people to understand. However, tens of thousands of successful cases are sufficient to explain those few dozen unsuccessful cases. Doing case studies is obviously much more scientific and meaningful than explaining.
Appendix: Right Brain Development Day 1 Course Flow
-
Ice-breaking: First, introduce yourself to the children, then have each child introduce their name and age. Next, talk about the necessity of Right Brain Development and give examples of world memory masters. Then, let students who can perform Blindfolded Text Card Touching demonstrate the magic of the right brain to everyone, inspiring their enthusiasm for Right Brain Development training!
-
Look at the Light Bulb: Stare at a 60-watt light bulb for 30 seconds, try not to blink until your eyes are nearly tearing up, then gently close your eyes. Ask what they see? Generally, everyone can see a small yellow sphere of light. Once seen, guide them to make it larger and larger, until the entire forehead becomes bright. Slowly turn it into a red apple, red like blood, a big green tree, a blue ocean, and a yellow banana. After transforming, slowly open the eyes and ask what they saw? What did it look like? Was the color deep or light? What was the shape? Praise them for what they saw!
-
Abdominal Breathing: Relax the whole body, place both hands on your legs, inhale forcefully through the nose to make the abdomen bulge, inhale until you cannot take in any more, then wait for 4 seconds, and finally exhale. When exhaling, do not let it all out at once; exhale slowly, counting to 8 seconds is best, and try to exhale until there is nothing left. Repeat 5 times.
-
Finger Games: Ten sets of Finger Exercises, perform them set by set so that every child can do them proficiently. In future refresher training, do two sets each time.
-
Moving the Light Sphere: Imagine there is a large sphere of light in the palms of your hands. Slowly move it up along your hands, arriving slowly at your elbows, moving along your biceps to your shoulders, slowly arriving at the back of your head, and finally reaching your forehead. Okay, let it illuminate your forehead, make it very bright.
-
Meditation Music: Subconscious Mind “Energy” Meditation Guide Script: Brow First, let the children sit quietly and calm down. After the music finishes, ask the children what they saw? They can use a pen to draw the images they saw.
-
Look at Color Cards: Prepare the Yellow Card. The top, bottom, left, and right of the card must be fully included in the field of vision. Stare at the Yellow Card for 30 seconds without blinking, Staring Without Blinking until the eyes are about to tear, then gently close the eyes and gaze at the Afterimage remaining on the retina. What do you see? Generally, children see the Complementary Color Card, then guide it to turn into the Original Color Card. Once transformed, open the eyes and see if there is an afterimage on the ceiling. Next, use the same method to look at the Red Card, Blue Card, and Yellow Card.
-
Becoming Small Granules: Enter a banana, apple, or orange to look around, taste, and smell. Slowly squeeze inside and see large fruit pulp granules. Take a bite, wow! So sweet! After eating to the full, roll around, smell again to see if it’s fragrant, take a nap, and fly into the flower petals to smell the floral scent.
-
“Dual-Tasking”: This involves training the left and right hands to draw simultaneously. This training strongly stimulates the right brain. Left hand draws horizontal lines, right hand draws vertical lines; both hands must draw simultaneously. Practice for one minute, then switch hands and repeat. It is normal not to draw well at the beginning; do not be discouraged. As you practice, you will draw better and better.
-
Touch Color Cards: Calm down, take deep breaths to brighten the light sphere, and touch the cards.
Main References
- [JP] Makoto Shichida. Right Brain Revolution—The Way to Awaken Potential Abilities and Success [M]. Translated by Fu Min. Shanghai: Xuelin Publishing House, 2005.
- [JP] Makoto Shichida. Super Right Brain Photographic Memory [M]. Translated by Li Jingjing. Hainan: Nanhai Publishing Company, 2004.
- Qian Duo. Give the Right Brain Back to the Child: A Complete Right Brain Development Manual Written for Chinese Children [M]. Guilin: Guangxi Normal University Press, 2011.
- Feng Xiaolan. Super Right Brain Photographic Memory Training [M]. Tianjin: Tianjin Education Press, 2005.
- You Xuxu. Meditation: A Magical Psychotherapy [M]. Beijing: China Overseas Chinese Publishing House, 2014.
- [KR] Lee Seung-hoon. Uncovering Children’s Brain Potential [M]. Translated by Wang Ning. Beijing: Seismological Press, 2006.
- [JP] Makoto Shichida. Super Right Brain Wave Speed Reading [M]. Translated by Li Jingjing. Hainan: Nanhai Publishing Company, 2005.
- Zhang Haiyang, Huang Wei. Photographic Memory for Memorizing Words [M]. Harbin: Harbin Publishing House, 2009.
- Chuan Wen. Brain Imaging: Decoding the Information Code Controlling Life [M]. Tianjin: Tianjin Science and Technology Press, 2012.
- [UK] Tony Buzan. The Buzan Speed Reading Book [M]. Translated by Lu Shiwen. Beijing: Chemical Industry Press, 2014.
- [US] Francois Haddock. Willpower Training—Improving Personal Willpower with the Haddock Training Rules [M]. Translated by Wu Qunfang, Shen Qiaowei. Beijing: China Archives Press, 2001.